AdsBridge has a trusted CIPIAI template, and it does more of the work than most trackers: it sets the click ID, the approved status value and a postback URL that already contains CIPIAI tokens. You copy that postback into CIPIAI, build a flow, and connect the flow link to an AdsBridge offer and campaign. Below are eight steps with a screenshot of every screen you'll touch.
An AdsBridge postback for CIPIAI is a server-to-server request that CIPIAI sends to your AdsBridge tracker when a conversion is recorded. It carries the AdsBridge click ID (tid), the payout and the conversion status, so AdsBridge can attach the conversion to the exact click, source and zone that produced it. You save it once as a global postback in CIPIAI Tracking Tools and select it in every flow.
What goes where: the AdsBridge and CIPIAI setup at a glance
Data moves in two directions. AdsBridge passes its click ID to CIPIAI through the offer URL; CIPIAI returns that click ID with the conversion through the postback.
Item
Where you get it
Where you paste it
Postback URL
AdsBridge → Affiliate Networks → CIPIAI template
CIPIAI → Tracking Tools → Postback → Global
Flow tracking link
CIPIAI → Offerwall → Flows (after approval)
AdsBridge → Offers → URL
Click ID click_id
Set by the CIPIAI template in AdsBridge
Nowhere, AdsBridge appends it
Zone parameter zone_id={zoneid}
You add it
End of the offer URL in AdsBridge
Campaign URL
AdsBridge → Campaign Created window
Your traffic source (push, pop, native)
Before you start, have an AdsBridge account and an approved CIPIAI webmaster account.
Add CIPIAI as an affiliate network in AdsBridge
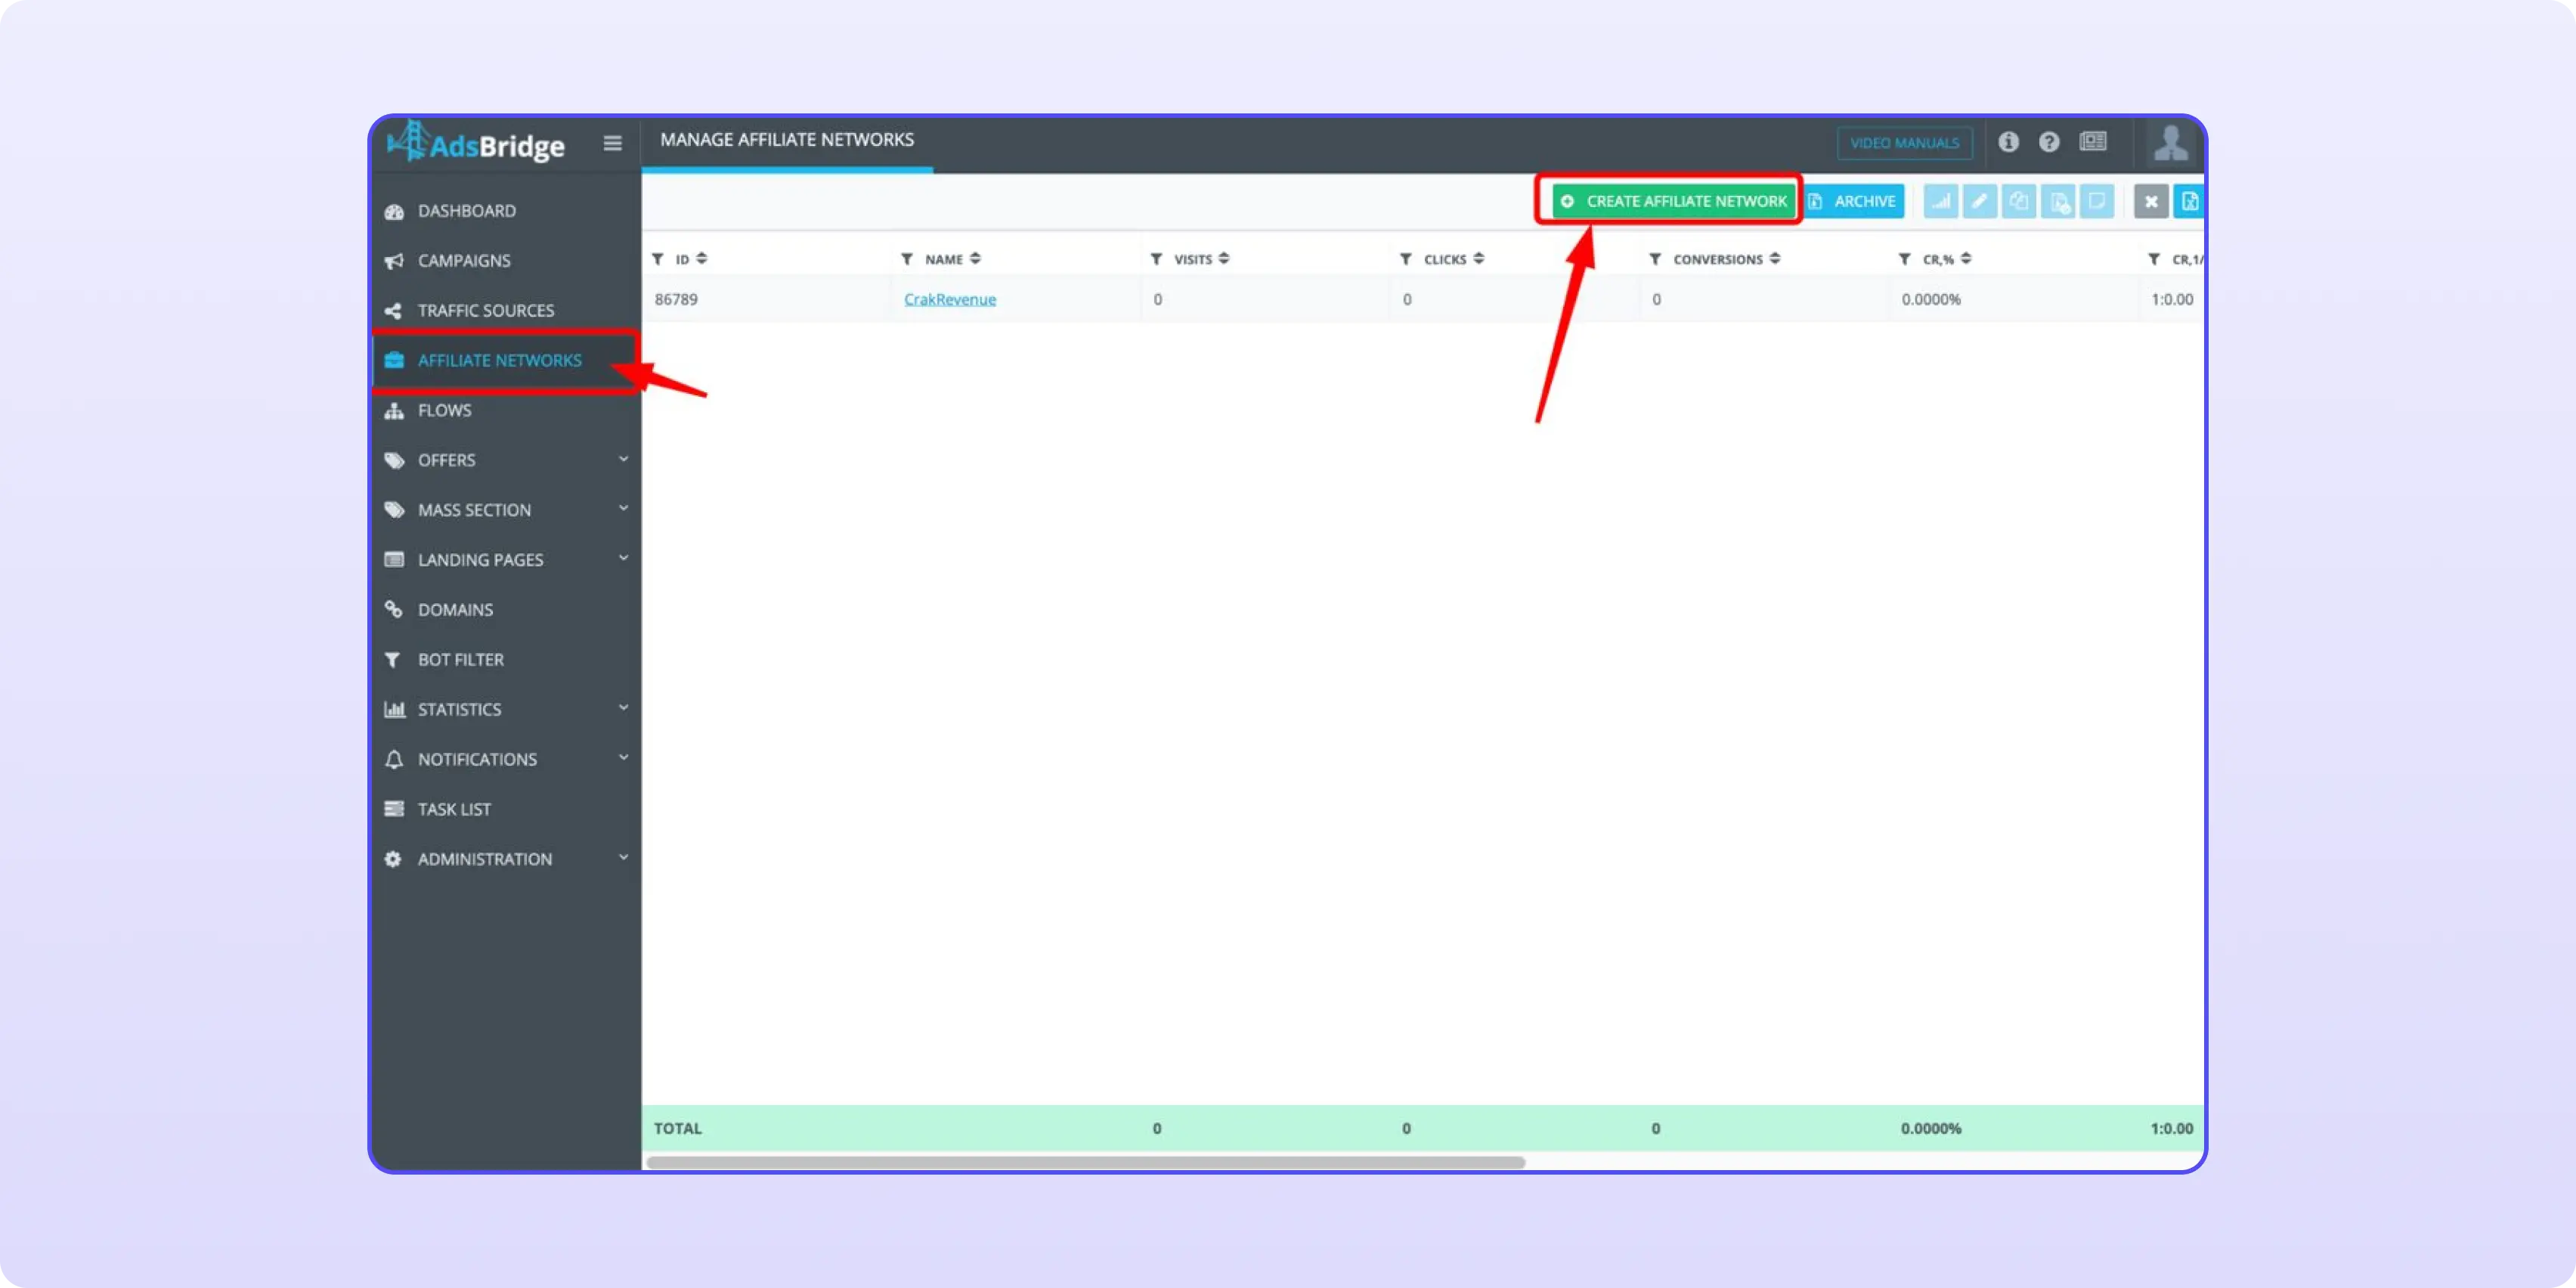
Open Affiliate Networks and click Create Affiliate Network.
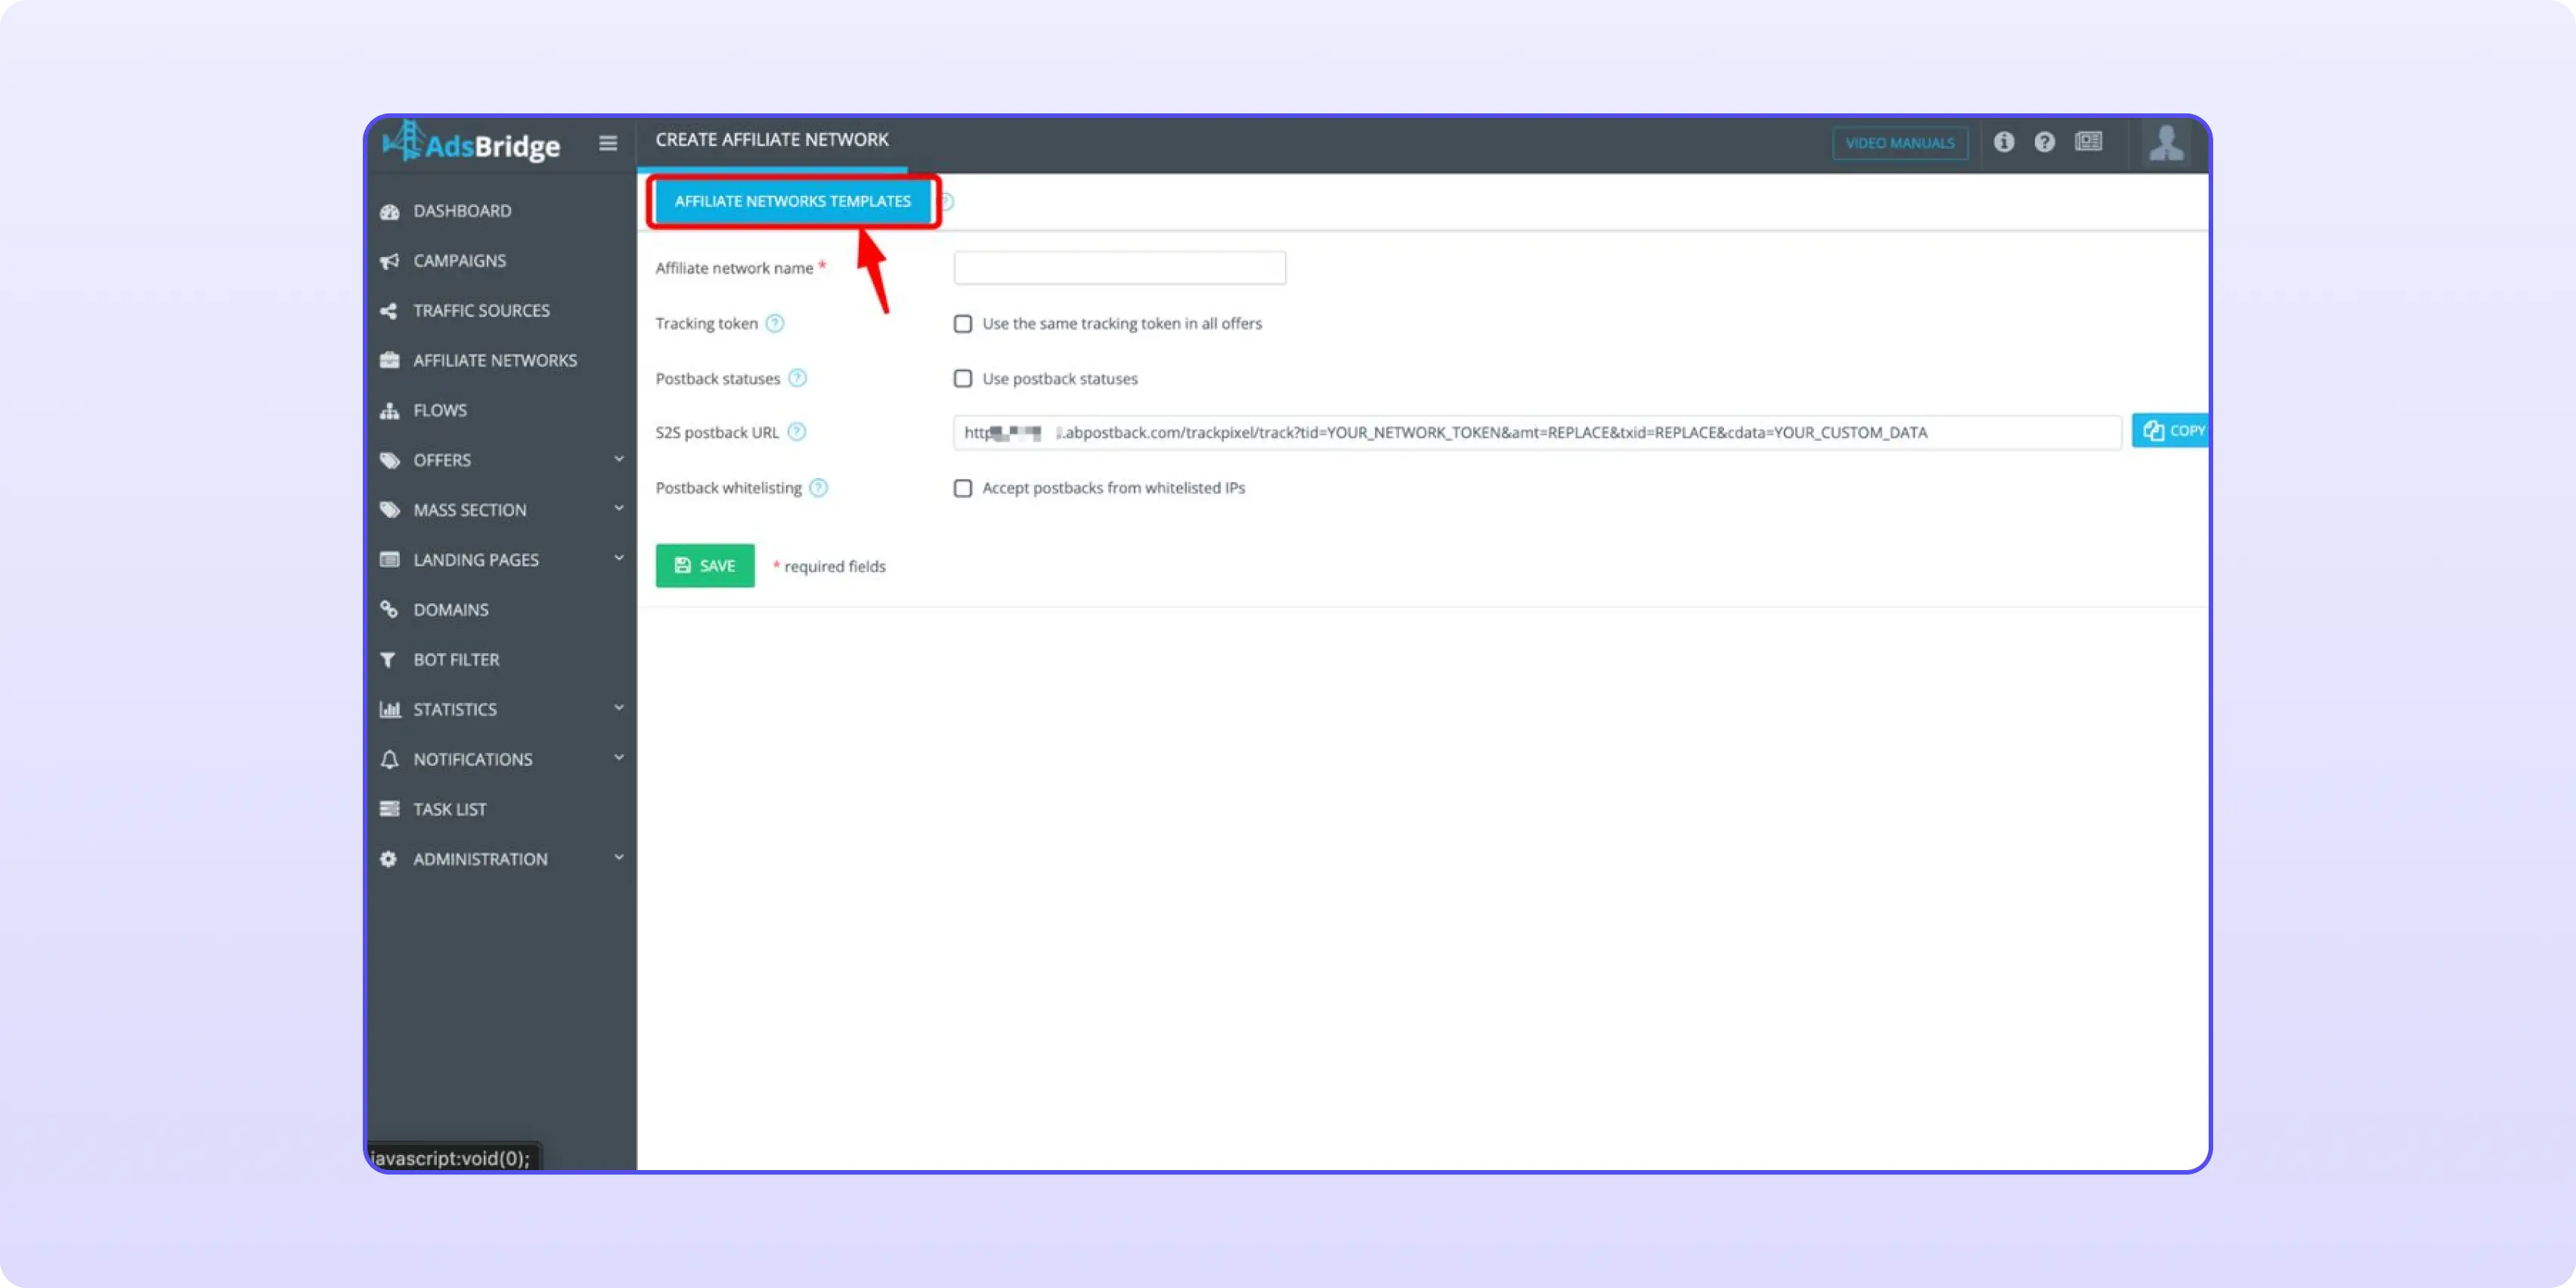
On the form, click Affiliate Networks Templates at the top.
Open the template list instead of filling the form by hand.
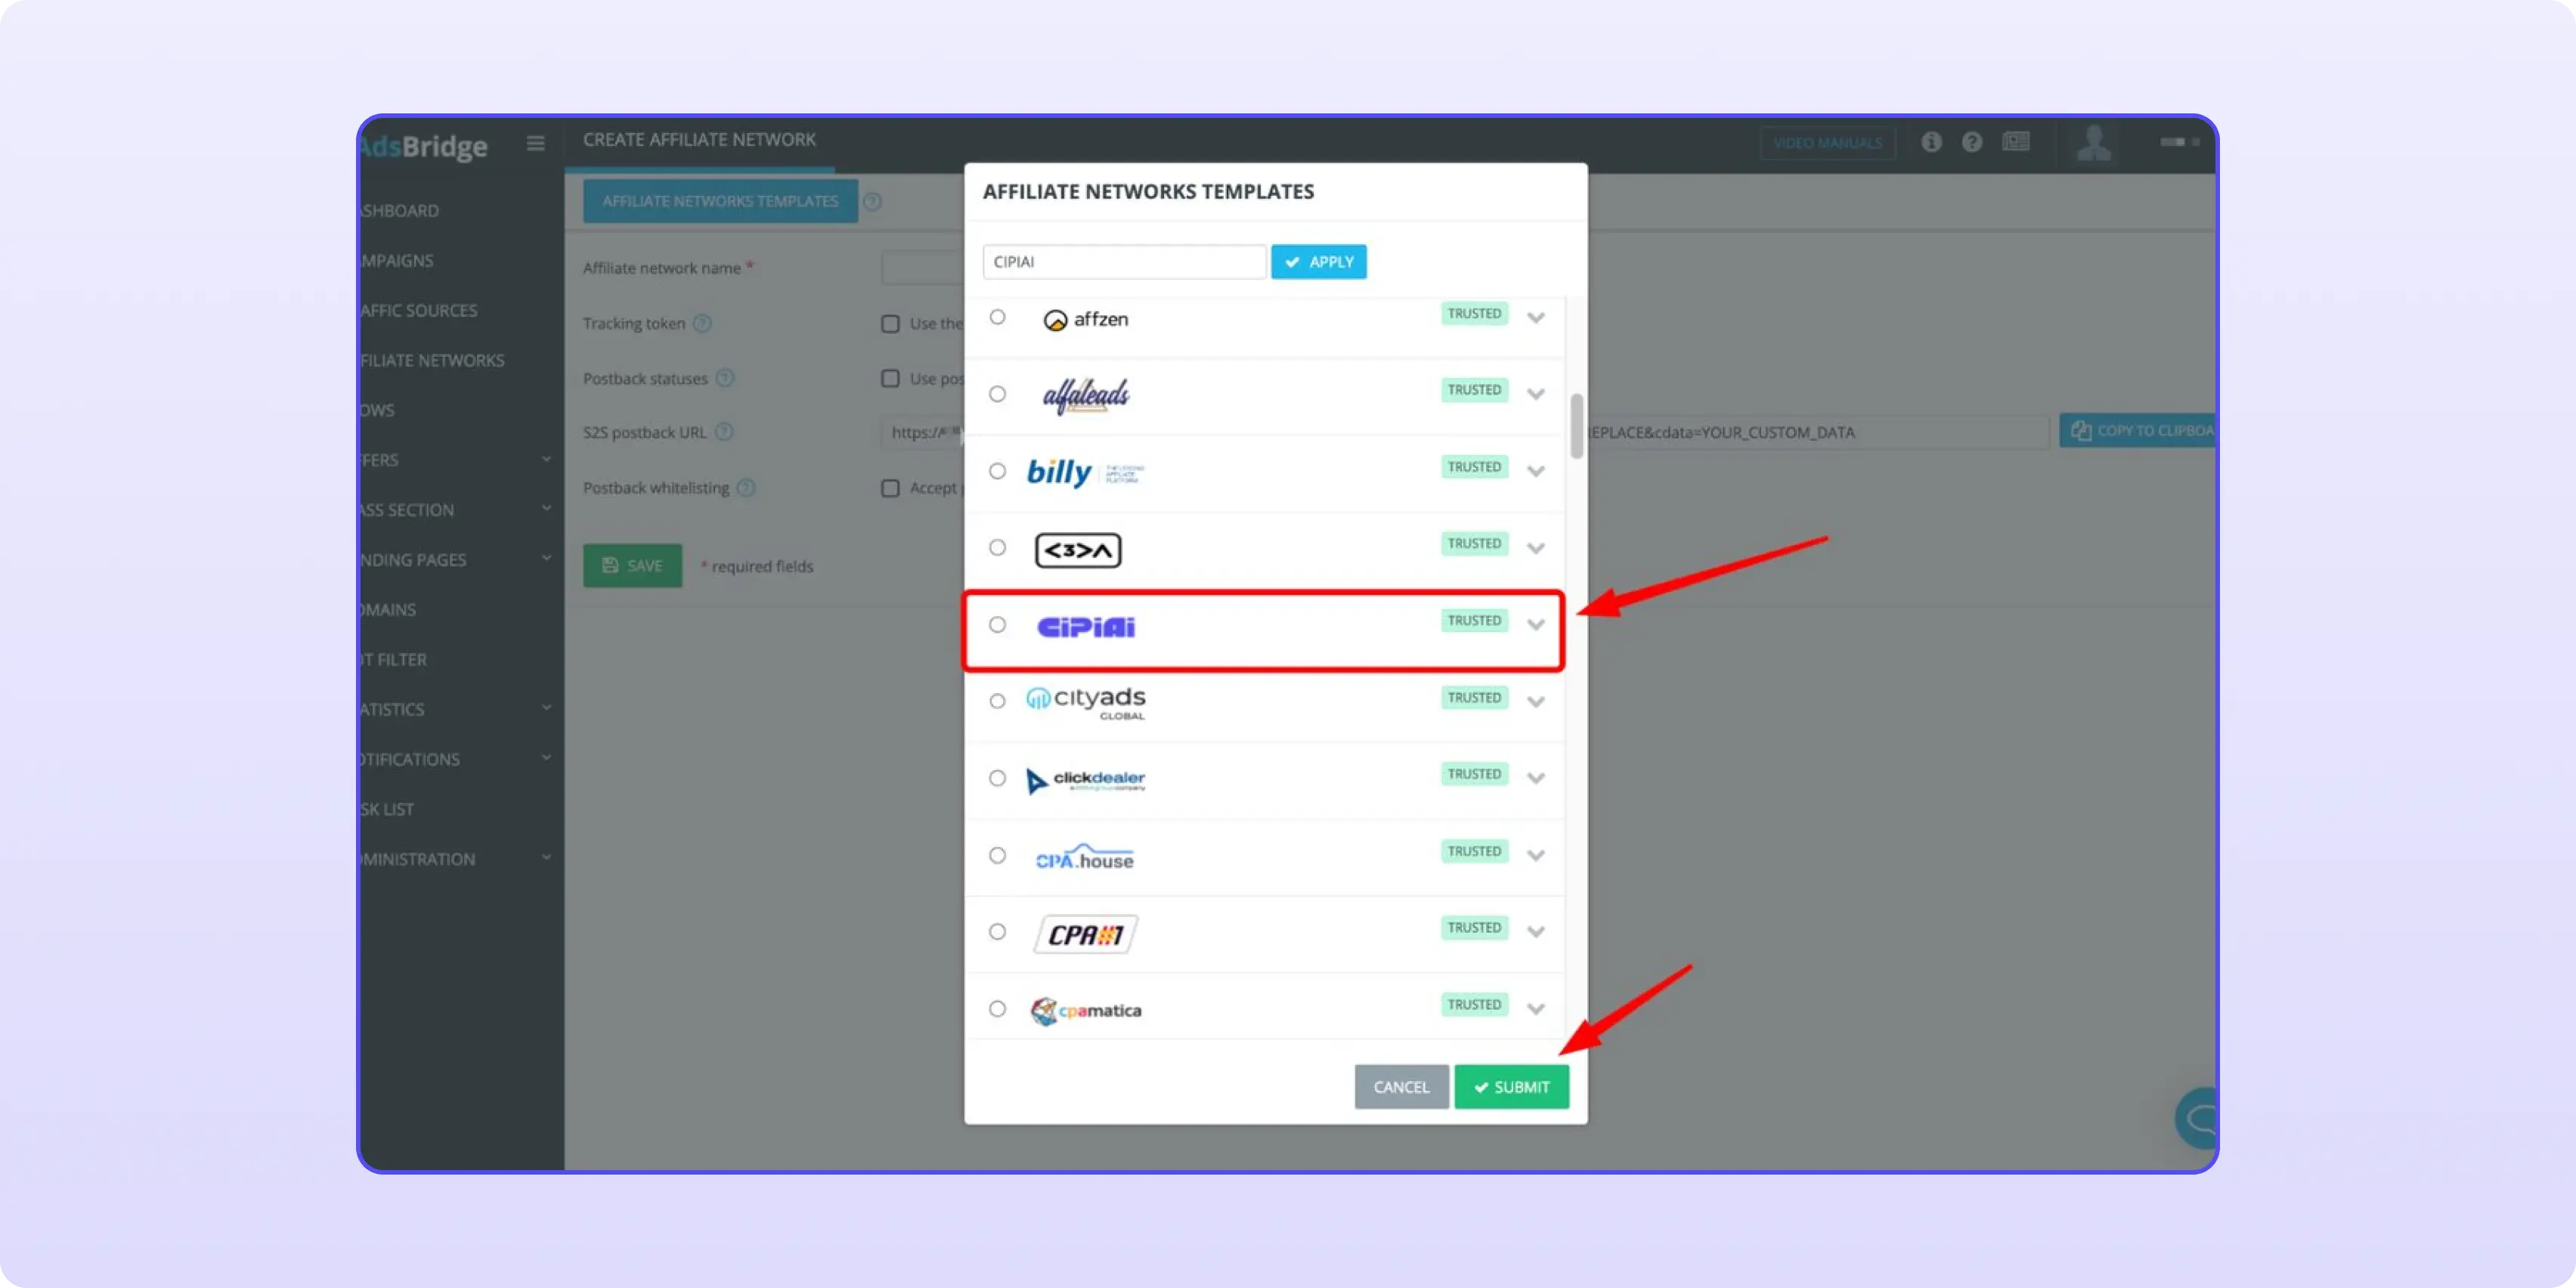
Type "CIPIAI" in the search, click Apply, select CIPIAI (marked Trusted) and click Submit.
Pick the CIPIAI template and submit.
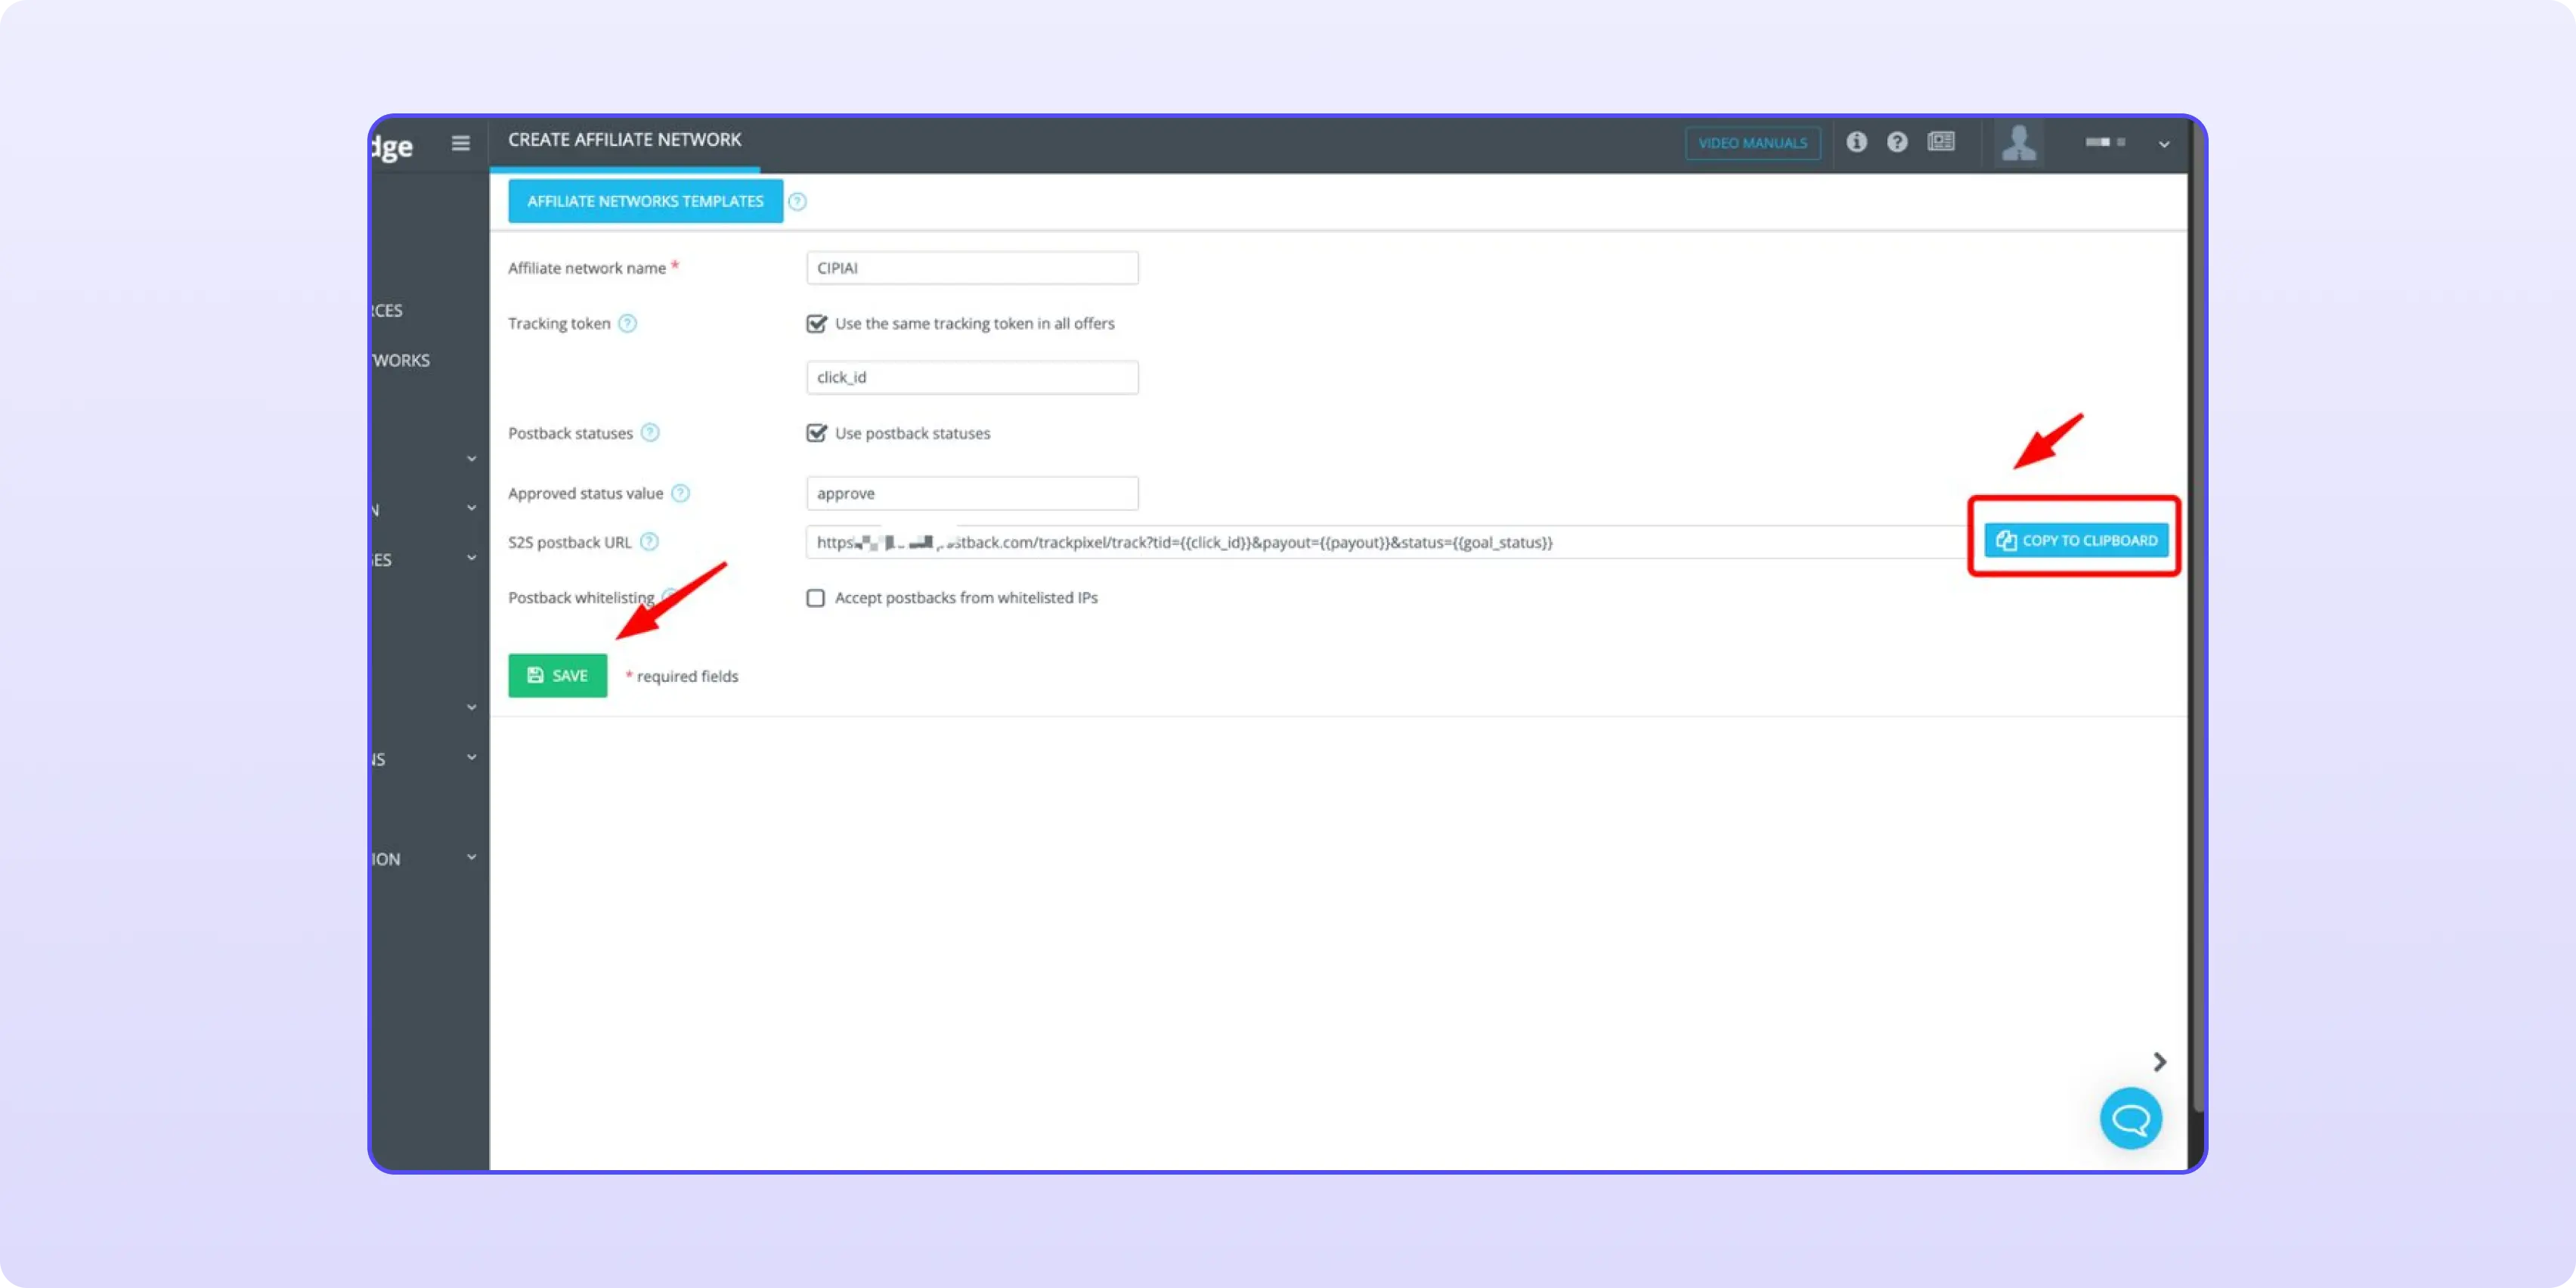
The template fills the form for you:
Tracking token: "Use the same tracking token in all offers" is on, with click_id. AdsBridge adds it to every CIPIAI offer URL, which is how your click ID reaches CIPIAI and comes back in the postback.
Postback statuses is on, with Approved status valueapprove. By default the template accepts conversions with the APPROVE status.
S2S postback URL already has CIPIAI tokens in it.
Click Copy to clipboard next to the postback URL, then Save. You add the network once per AdsBridge account.
The CIPIAI template: click_id, approve and a ready postback. Copy it, then Save.
The copied URL looks like this, with your own subdomain in front of abpostback.com: https://your-subdomain.abpostback.com/trackpixel/track?tid={{click_id}}&payout={{payout}}&status={{goal_status}}
Don't post it in public chats: anyone who has it can send conversions to your tracker.
Paste the postback into CIPIAI Tracking Tools
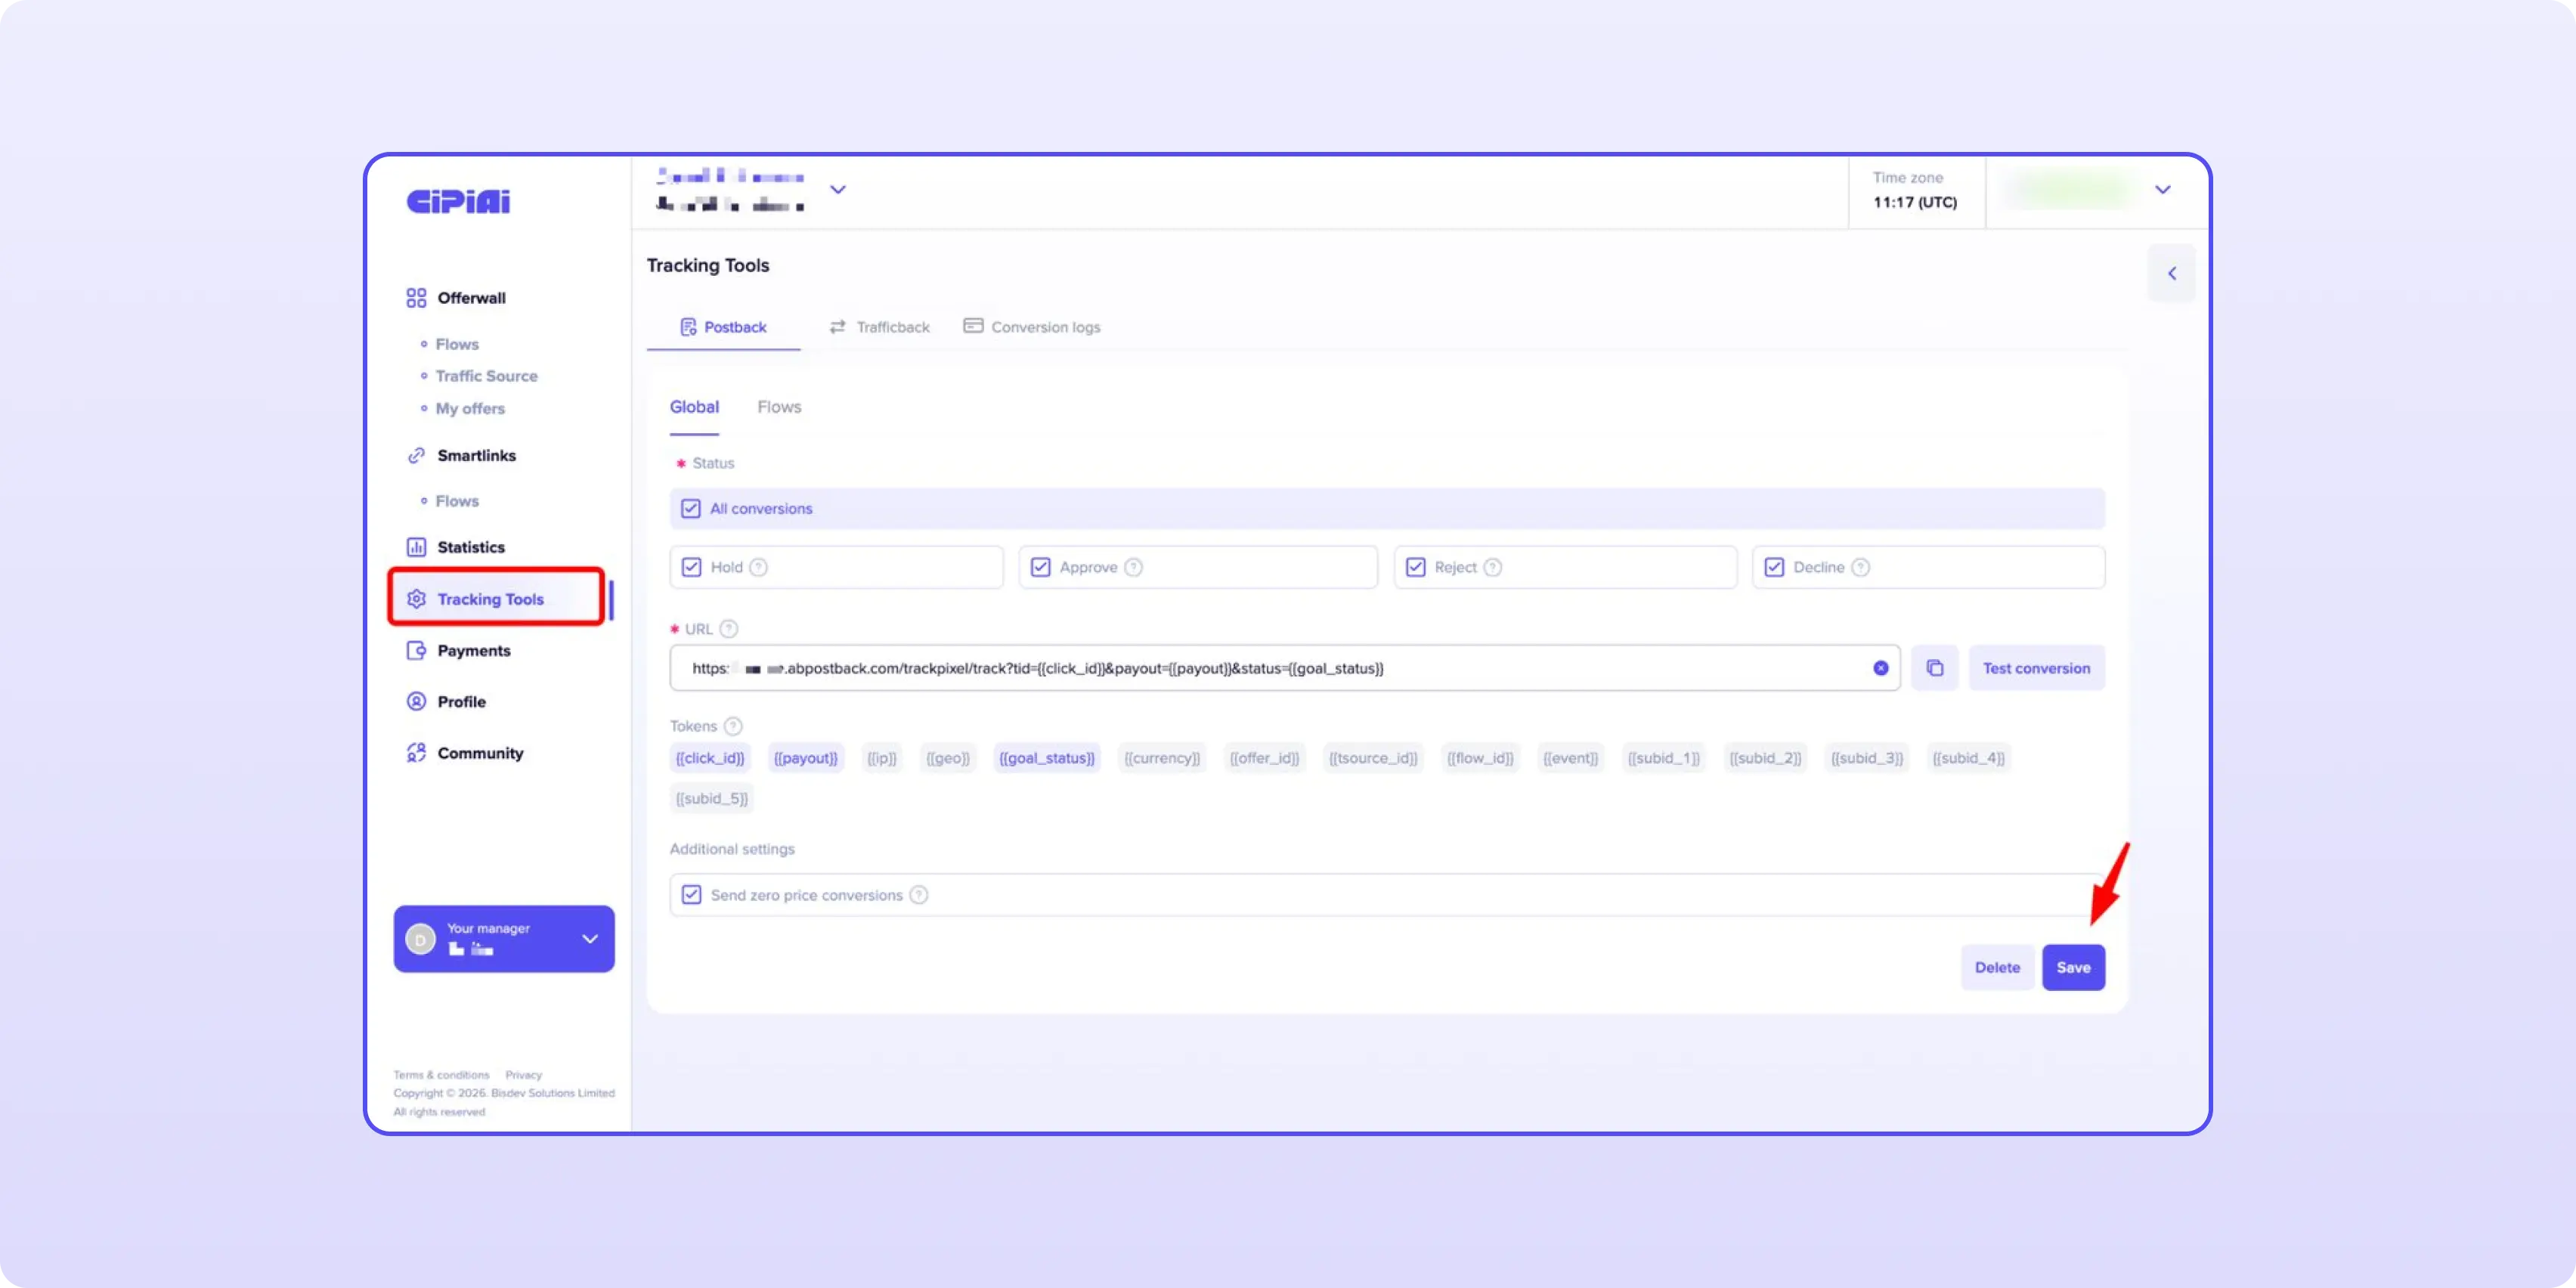
In your CIPIAI account go to Tracking Tools → Postback → Global and paste the URL into the URL field as is. Unlike most trackers, there's nothing to replace: the template already uses CIPIAI tokens.
AdsBridge parameter
CIPIAI token
What it carries
tid
{{click_id}}
The AdsBridge click ID that CIPIAI received in the offer URL
payout
{{payout}}
Your payout for the conversion
status
{{goal_status}}
Conversion status in CIPIAI
Under Status, tick the statuses you want sent to the tracker. The AdsBridge template counts conversions with the approve status, so Approve is the one you can't skip. Then click Save.
CIPIAI → Tracking Tools → Postback → Global with the AdsBridge URL pasted.
Create a flow for your offer in CIPIAI
A flow is how CIPIAI ties one offer, one traffic source and one postback together.
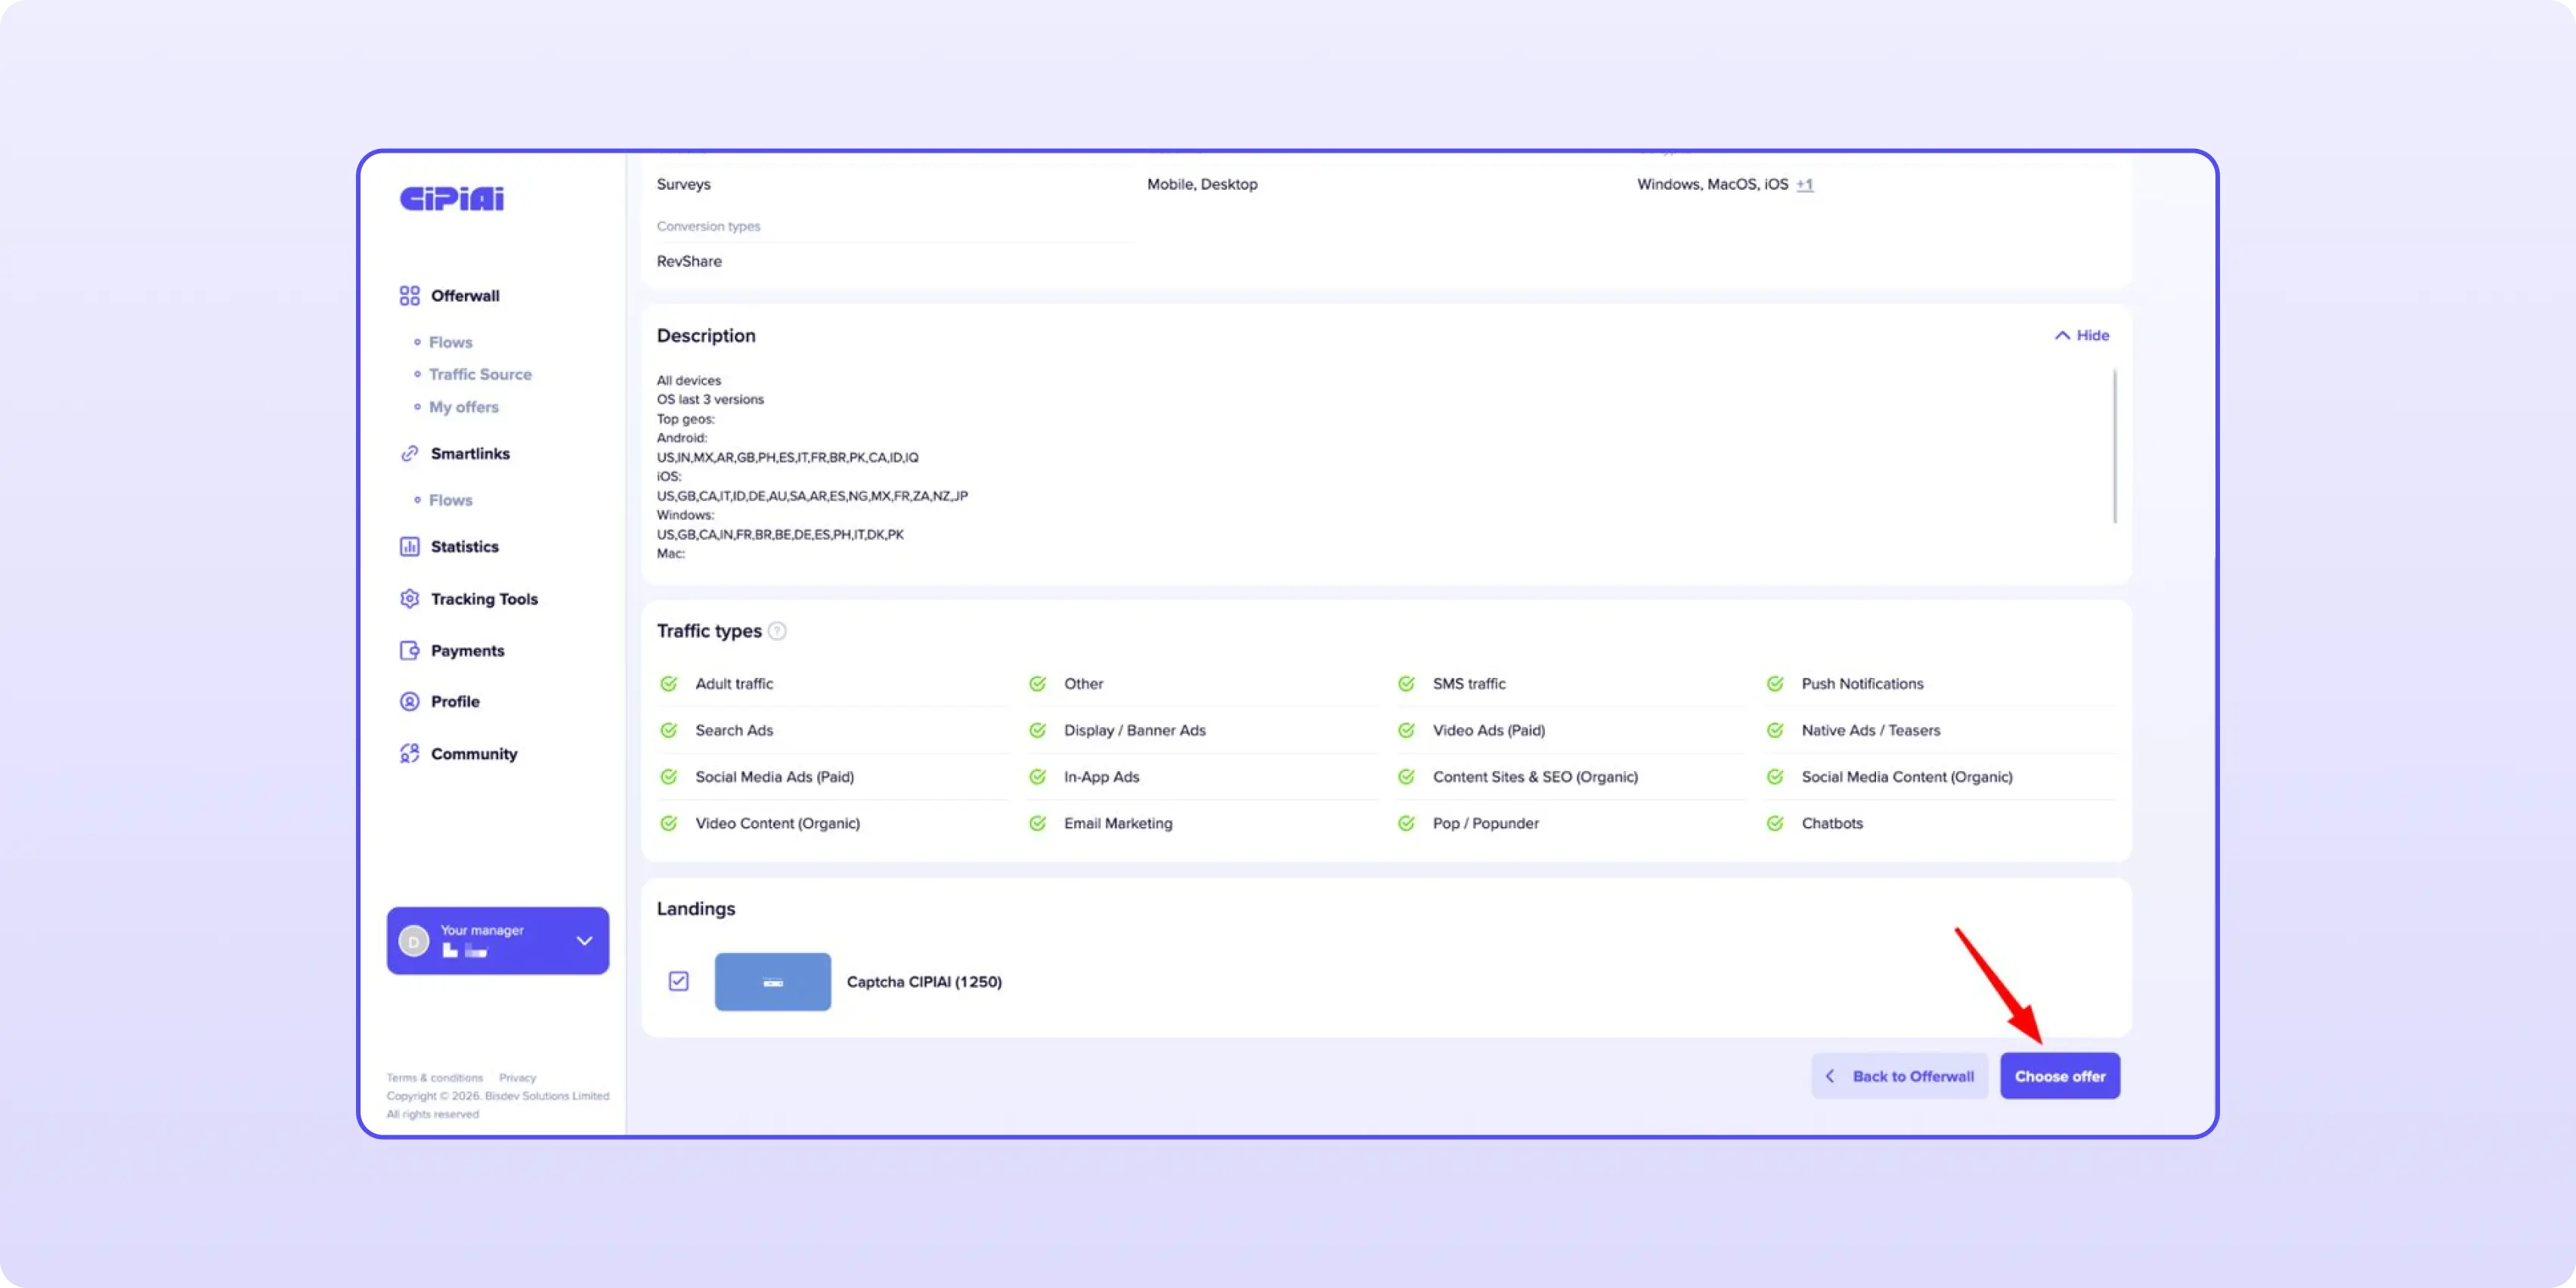
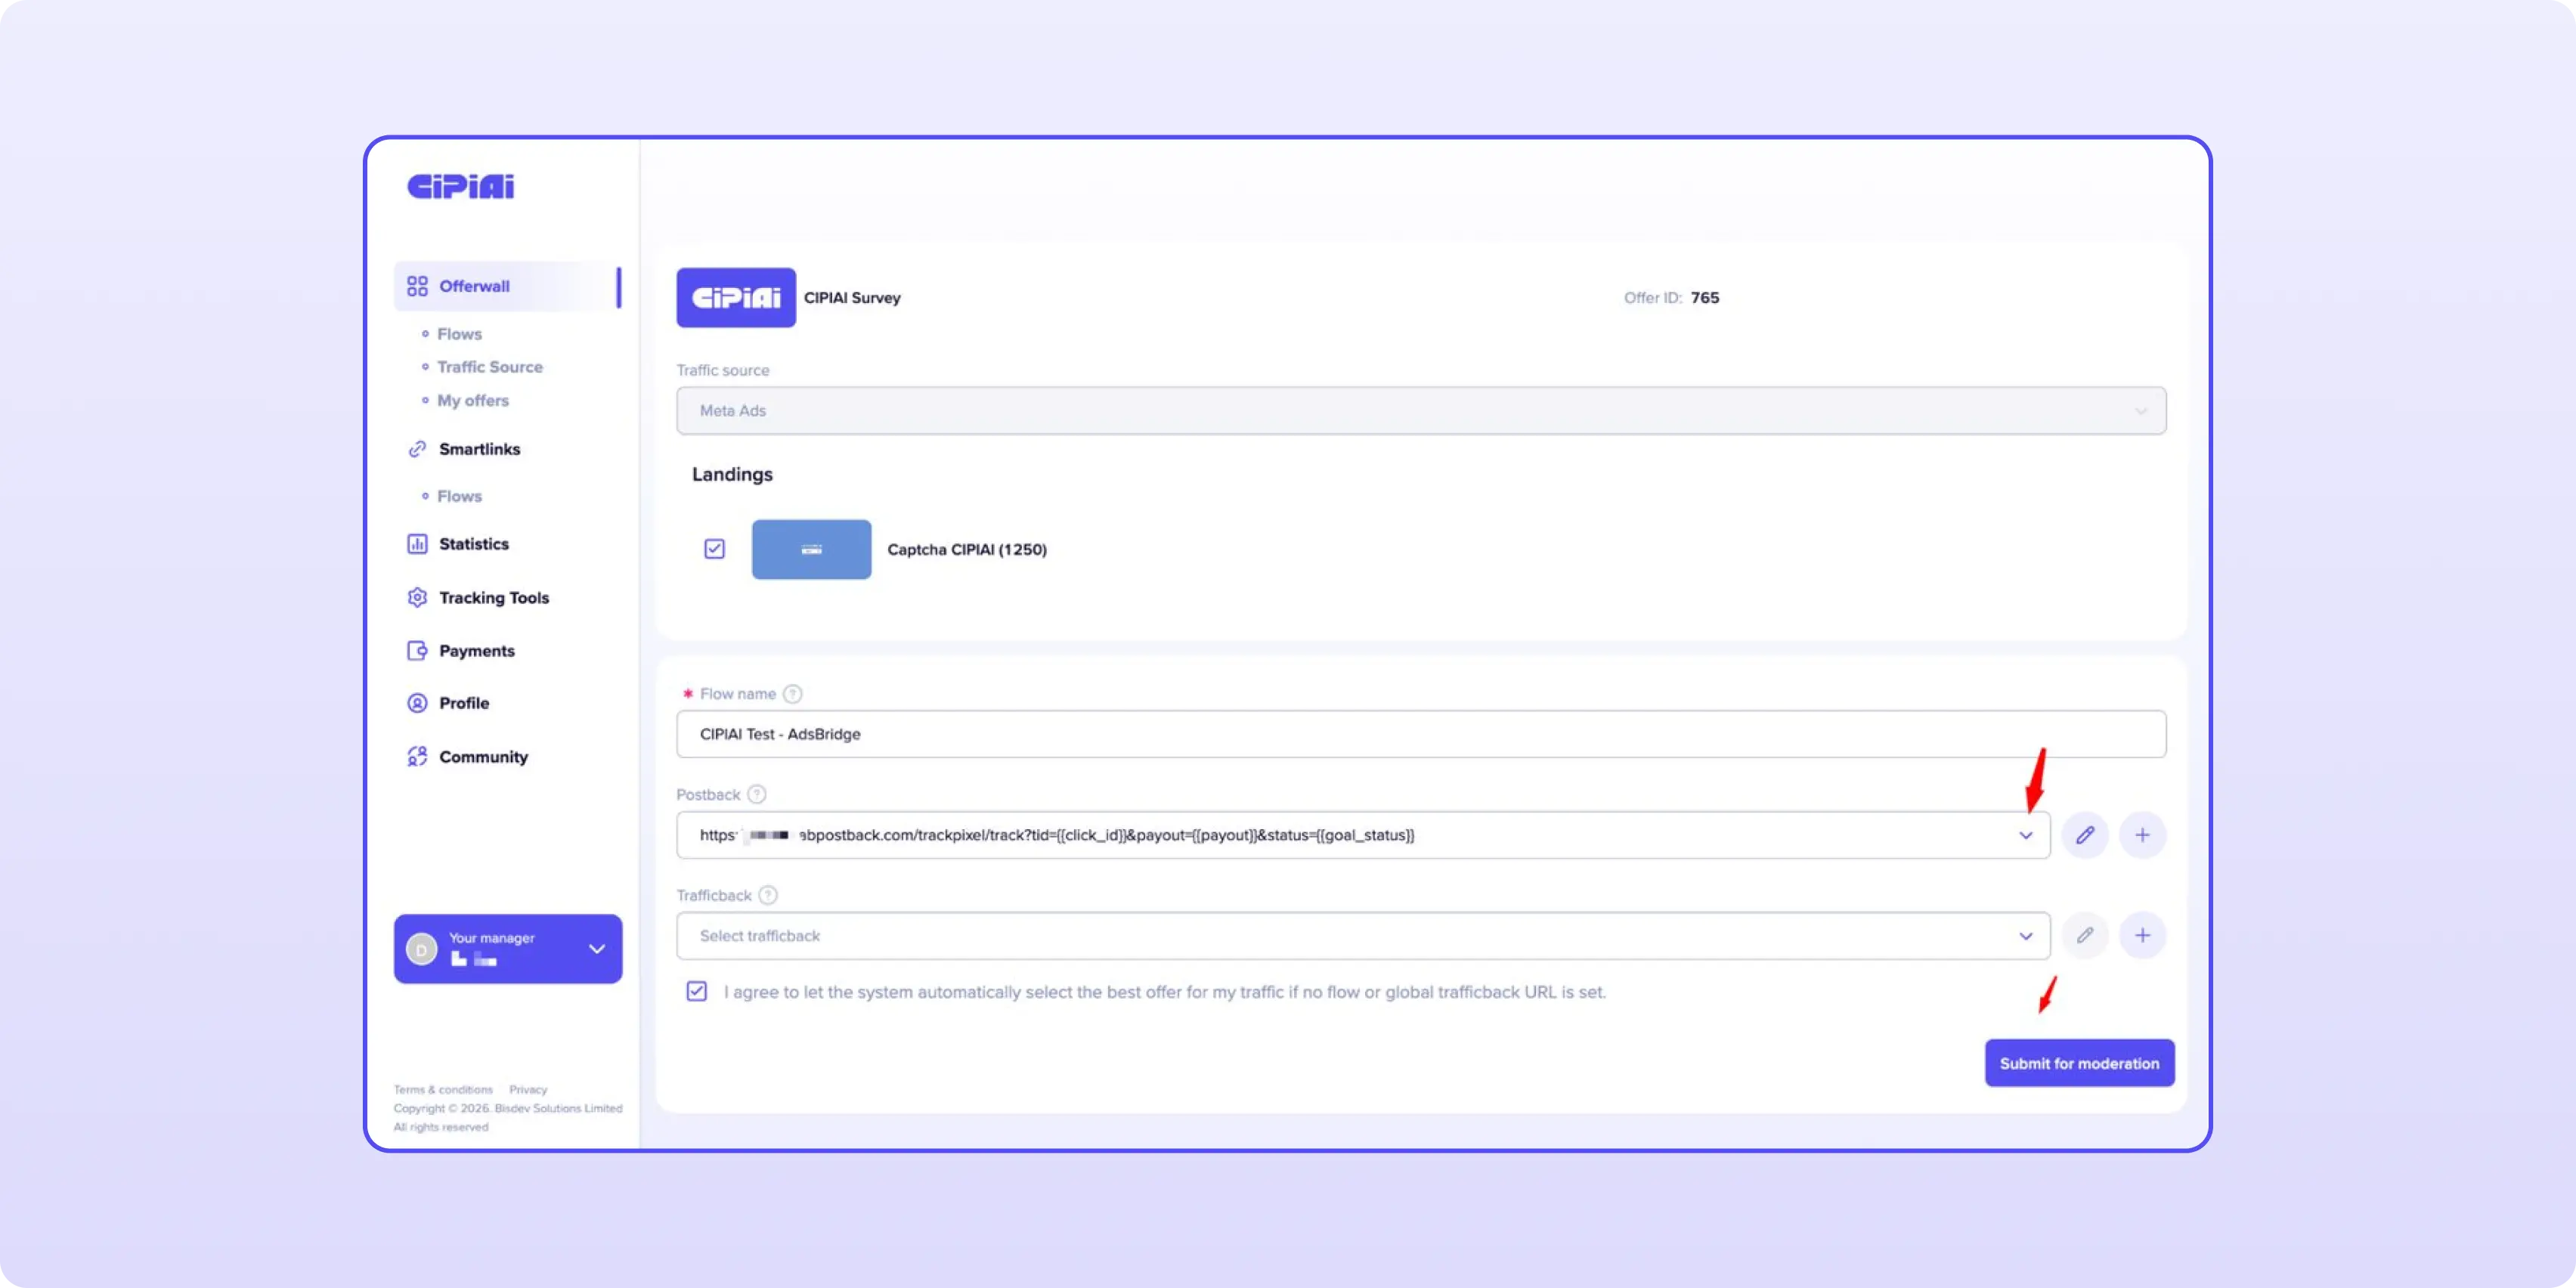
1. Open Offerwall, pick the offer, select a landing and click Choose offer.
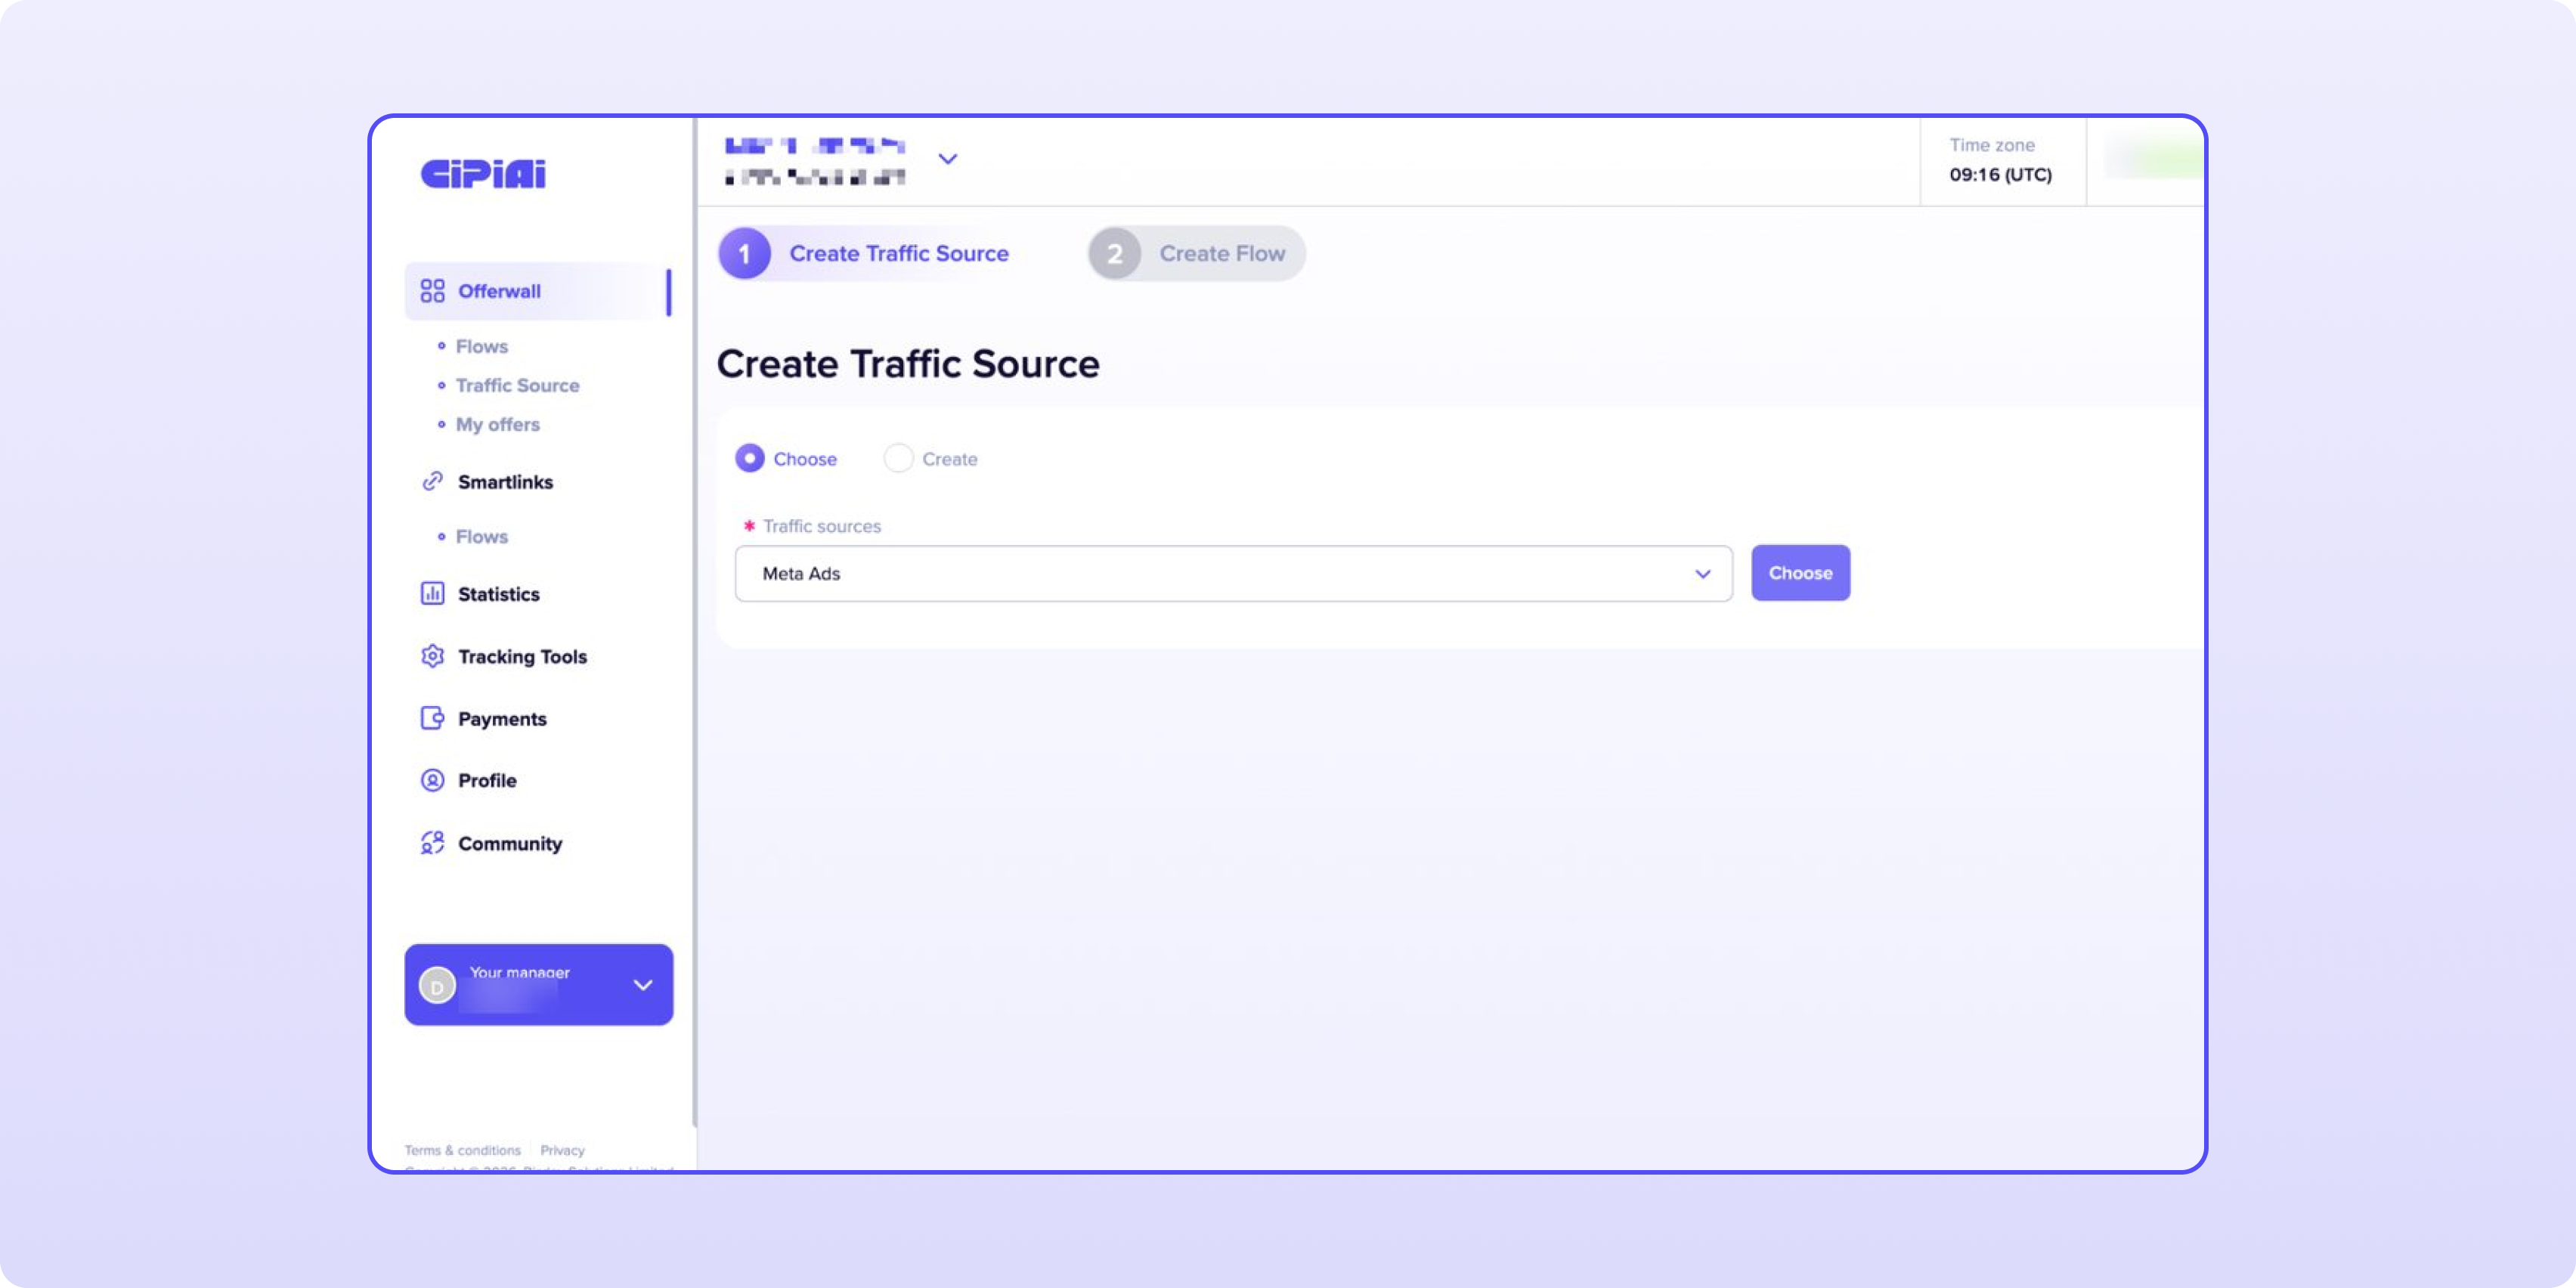
2. Choose an existing traffic source or create one.
3. Name the flow so you can find it later, e.g. "VPN US Propeller AdsBridge".
4. In the Postback field, select the global postback you saved in Step 2.
5.Click Submit for moderation. Once the flow is approved, you get a tracking link.
Select a landing and choose the offer.
Choose or create the traffic source for the flow.
Select the AdsBridge postback in the flow and submit it for moderation.
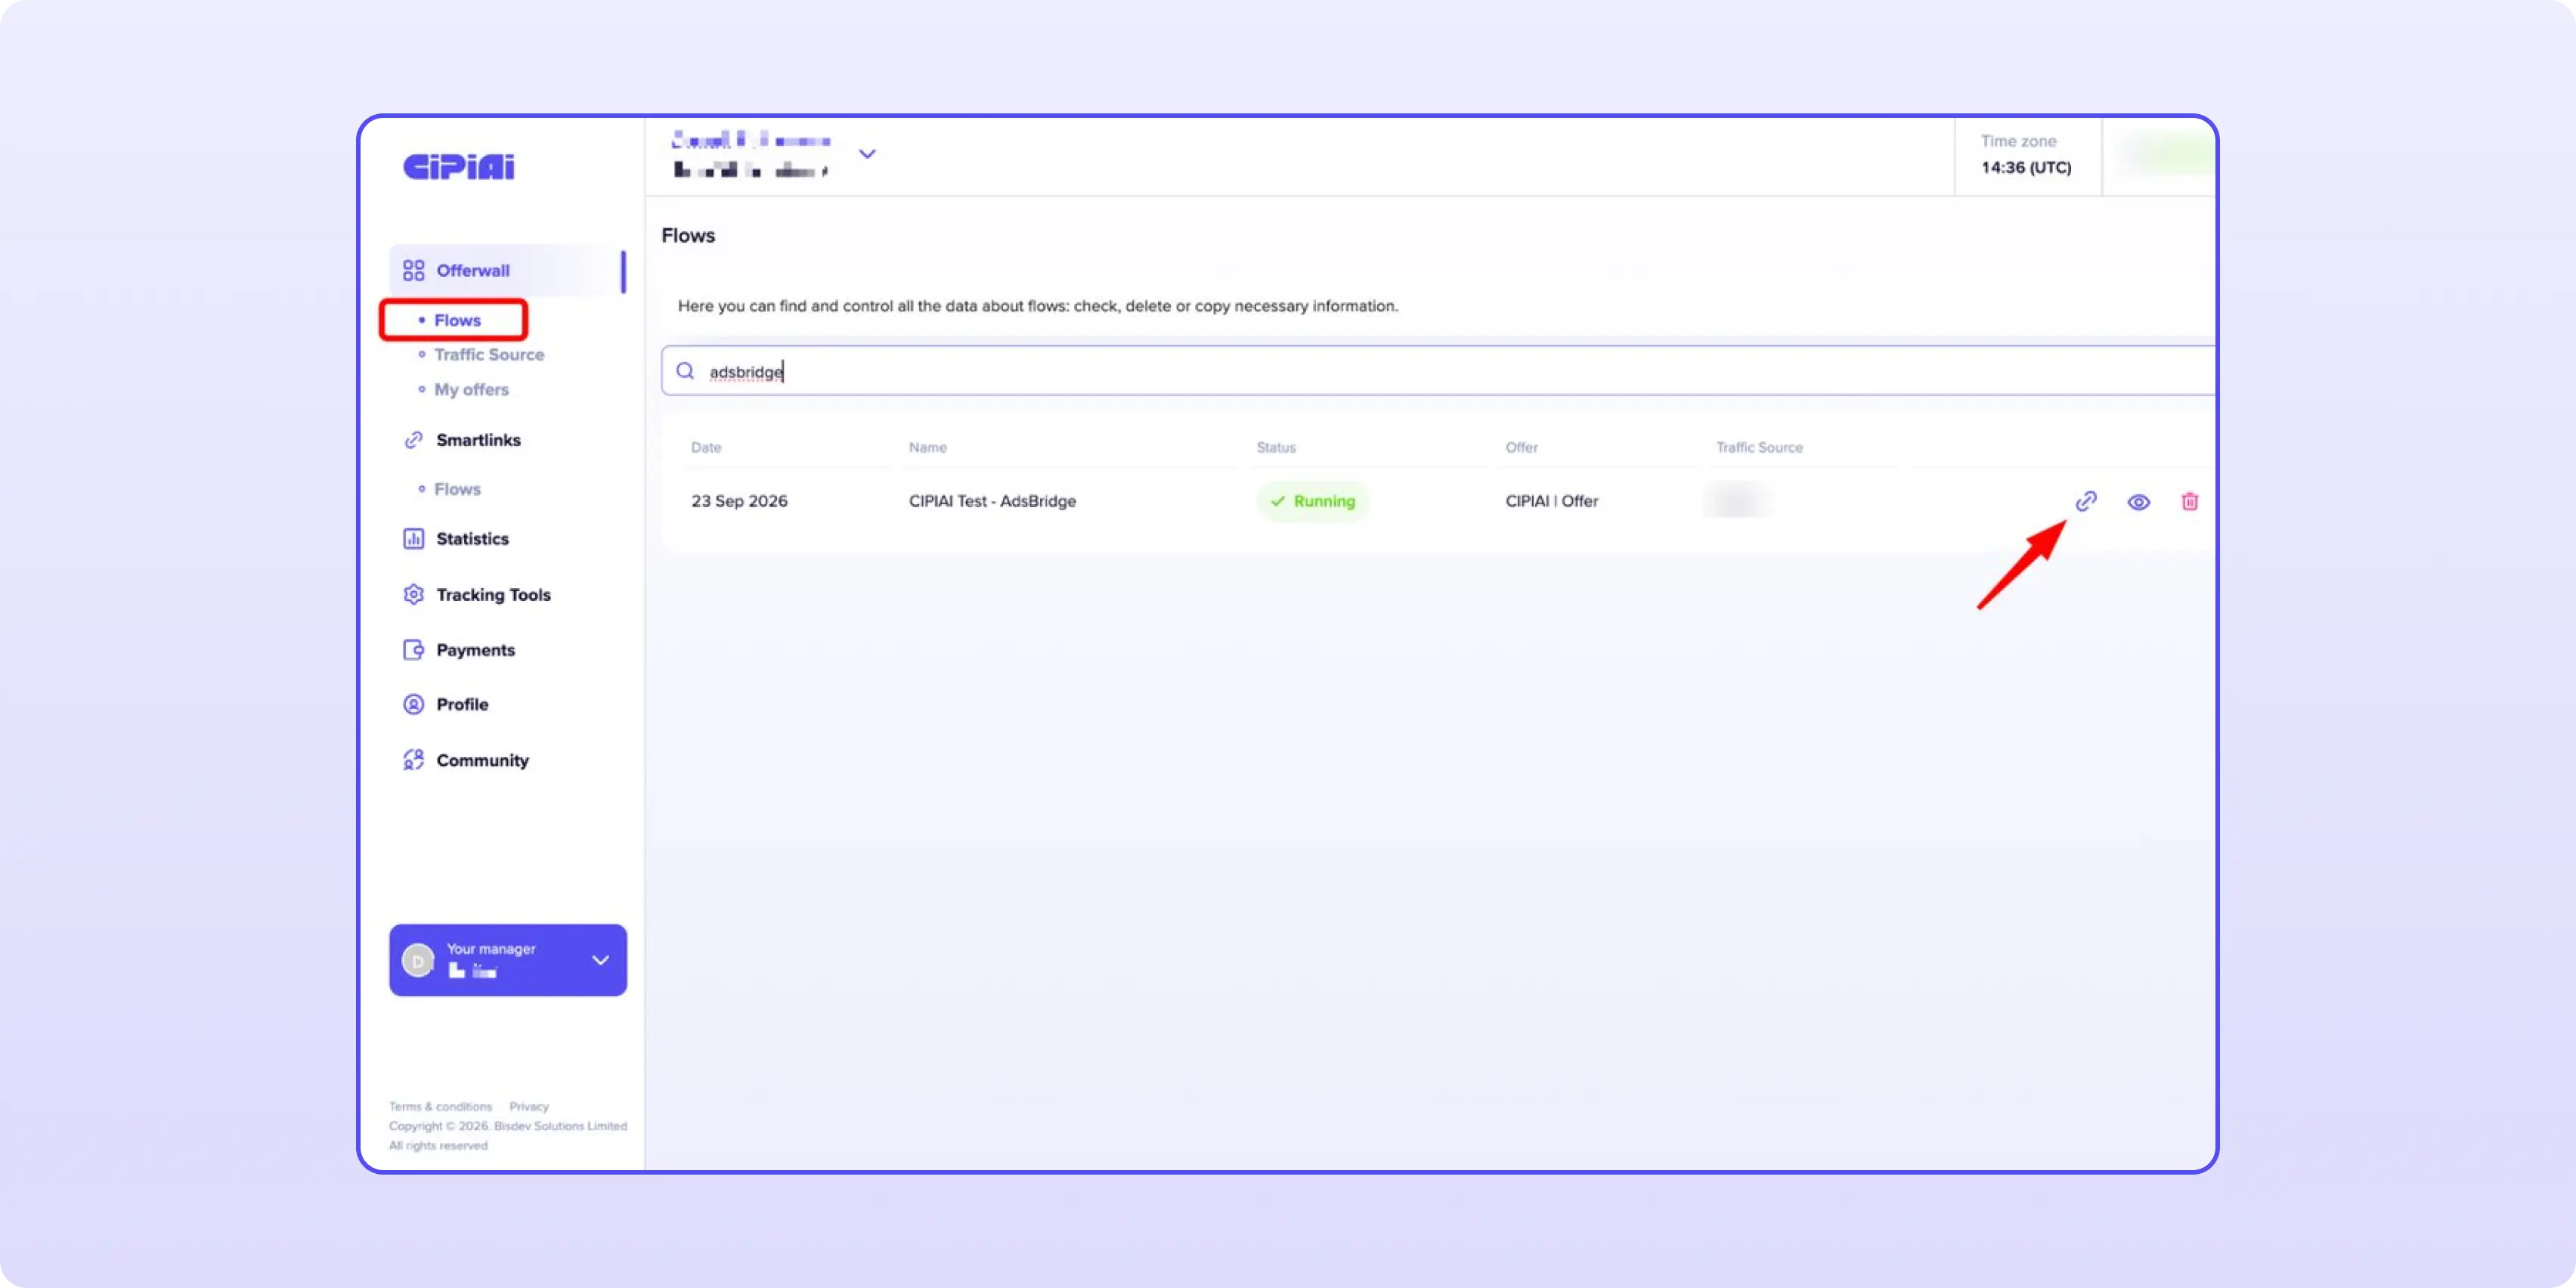
After approval, go to Offerwall → Flows, find the flow by name and click the link icon to copy the tracking link. You'll need it in Step 4.
Copy the tracking link from an approved flow.
Create the CIPIAI offer in AdsBridge
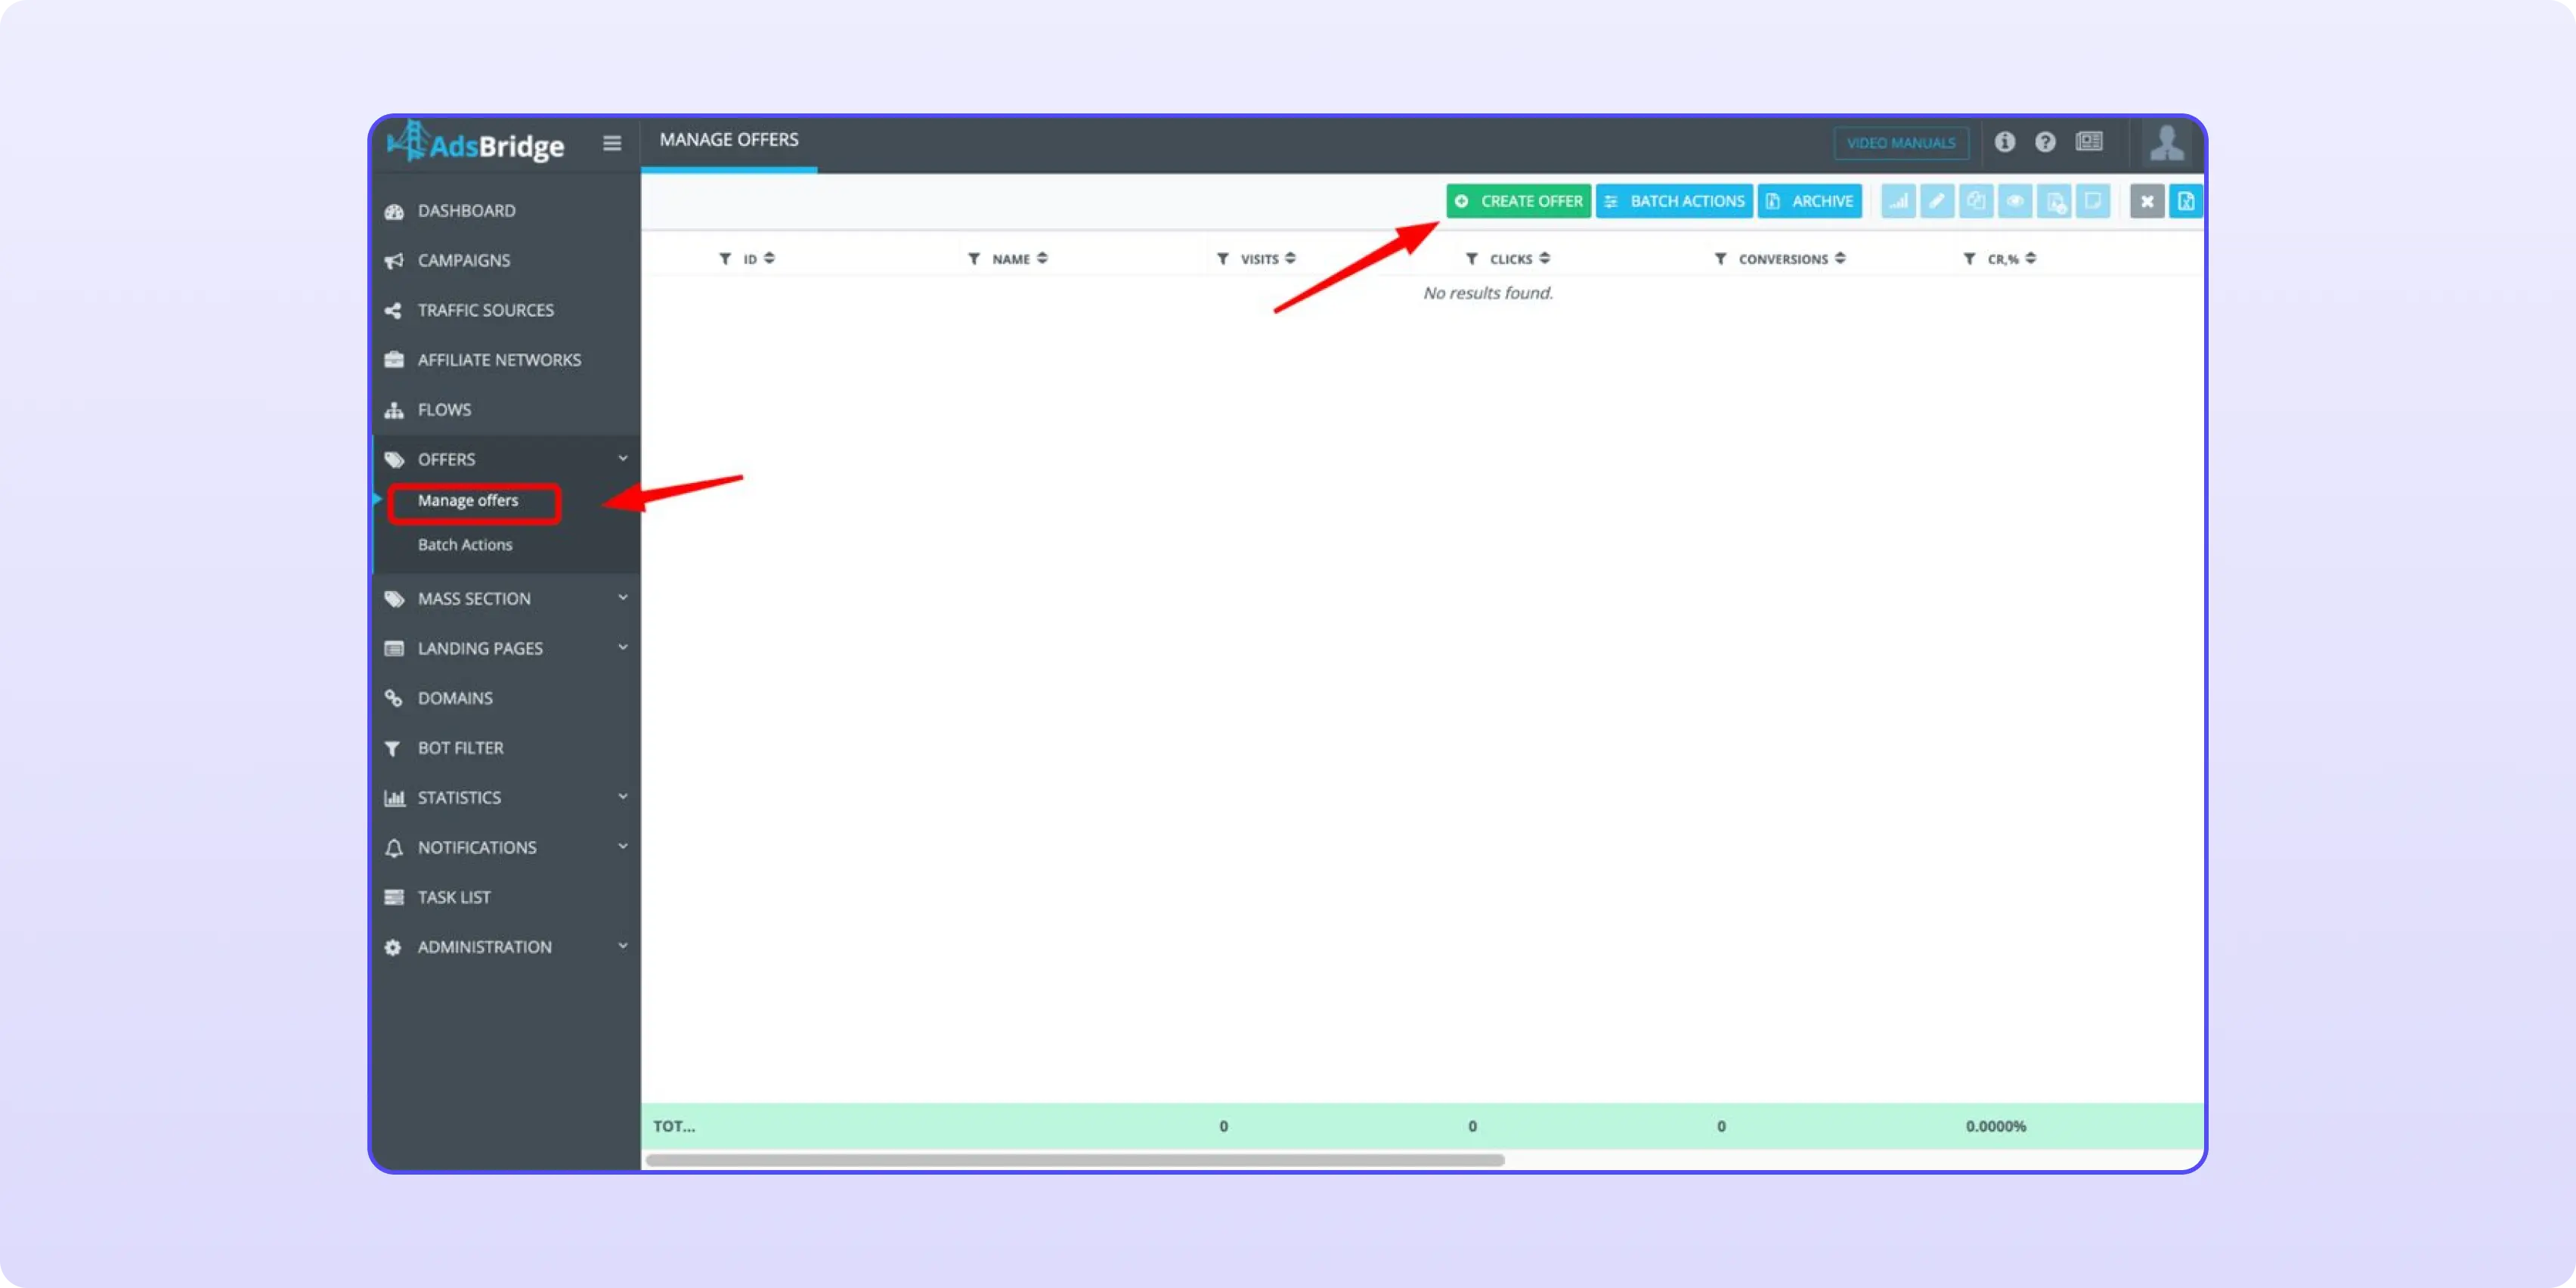
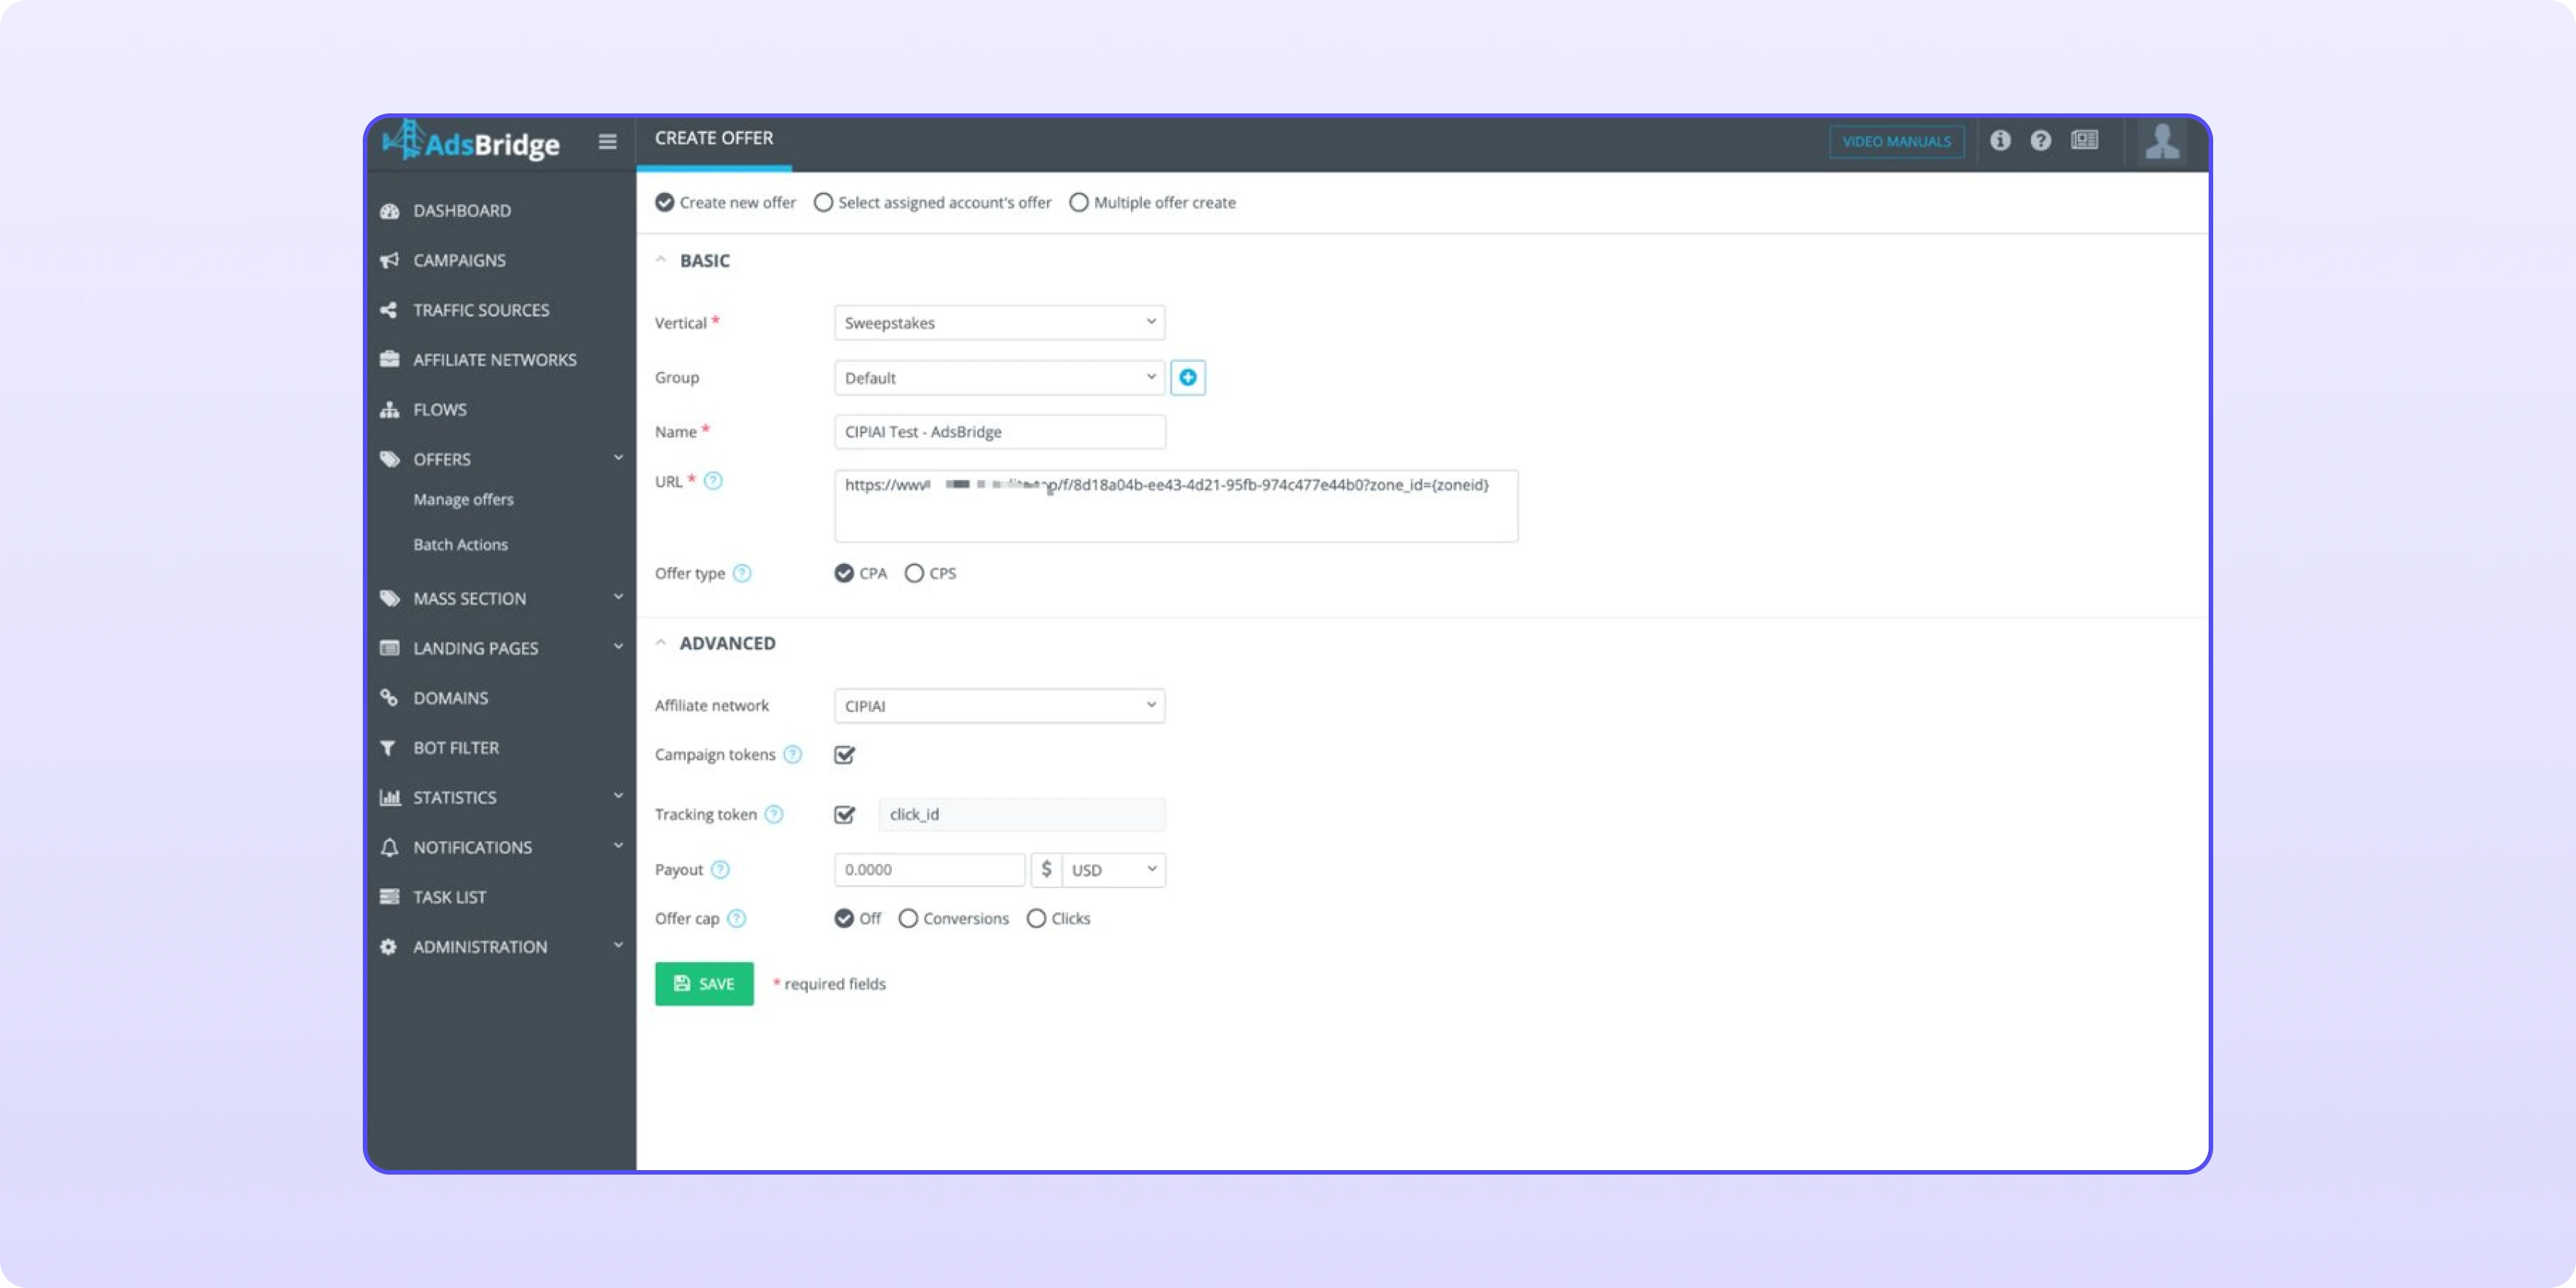
Back in AdsBridge, open Offers → Manage offers and click Create Offer.
Vertical and Name: anything readable, e.g. the same name as your CIPIAI flow.
URL: the flow tracking link from Step 3, plus the zone parameter described below.
Affiliate network: CIPIAI (the network from Step 1). Tracking token then shows click_id automatically. Skip the network and the click ID won't be appended, which breaks attribution.
Click Save.
Flow link with zone_id={zoneid} in URL, CIPIAI as the affiliate network.
How to pass zones and placements with zone_id
Add zone_id={zoneid} to the end of the flow link so CIPIAI statistics show which zone, placement or publisher each conversion came from:
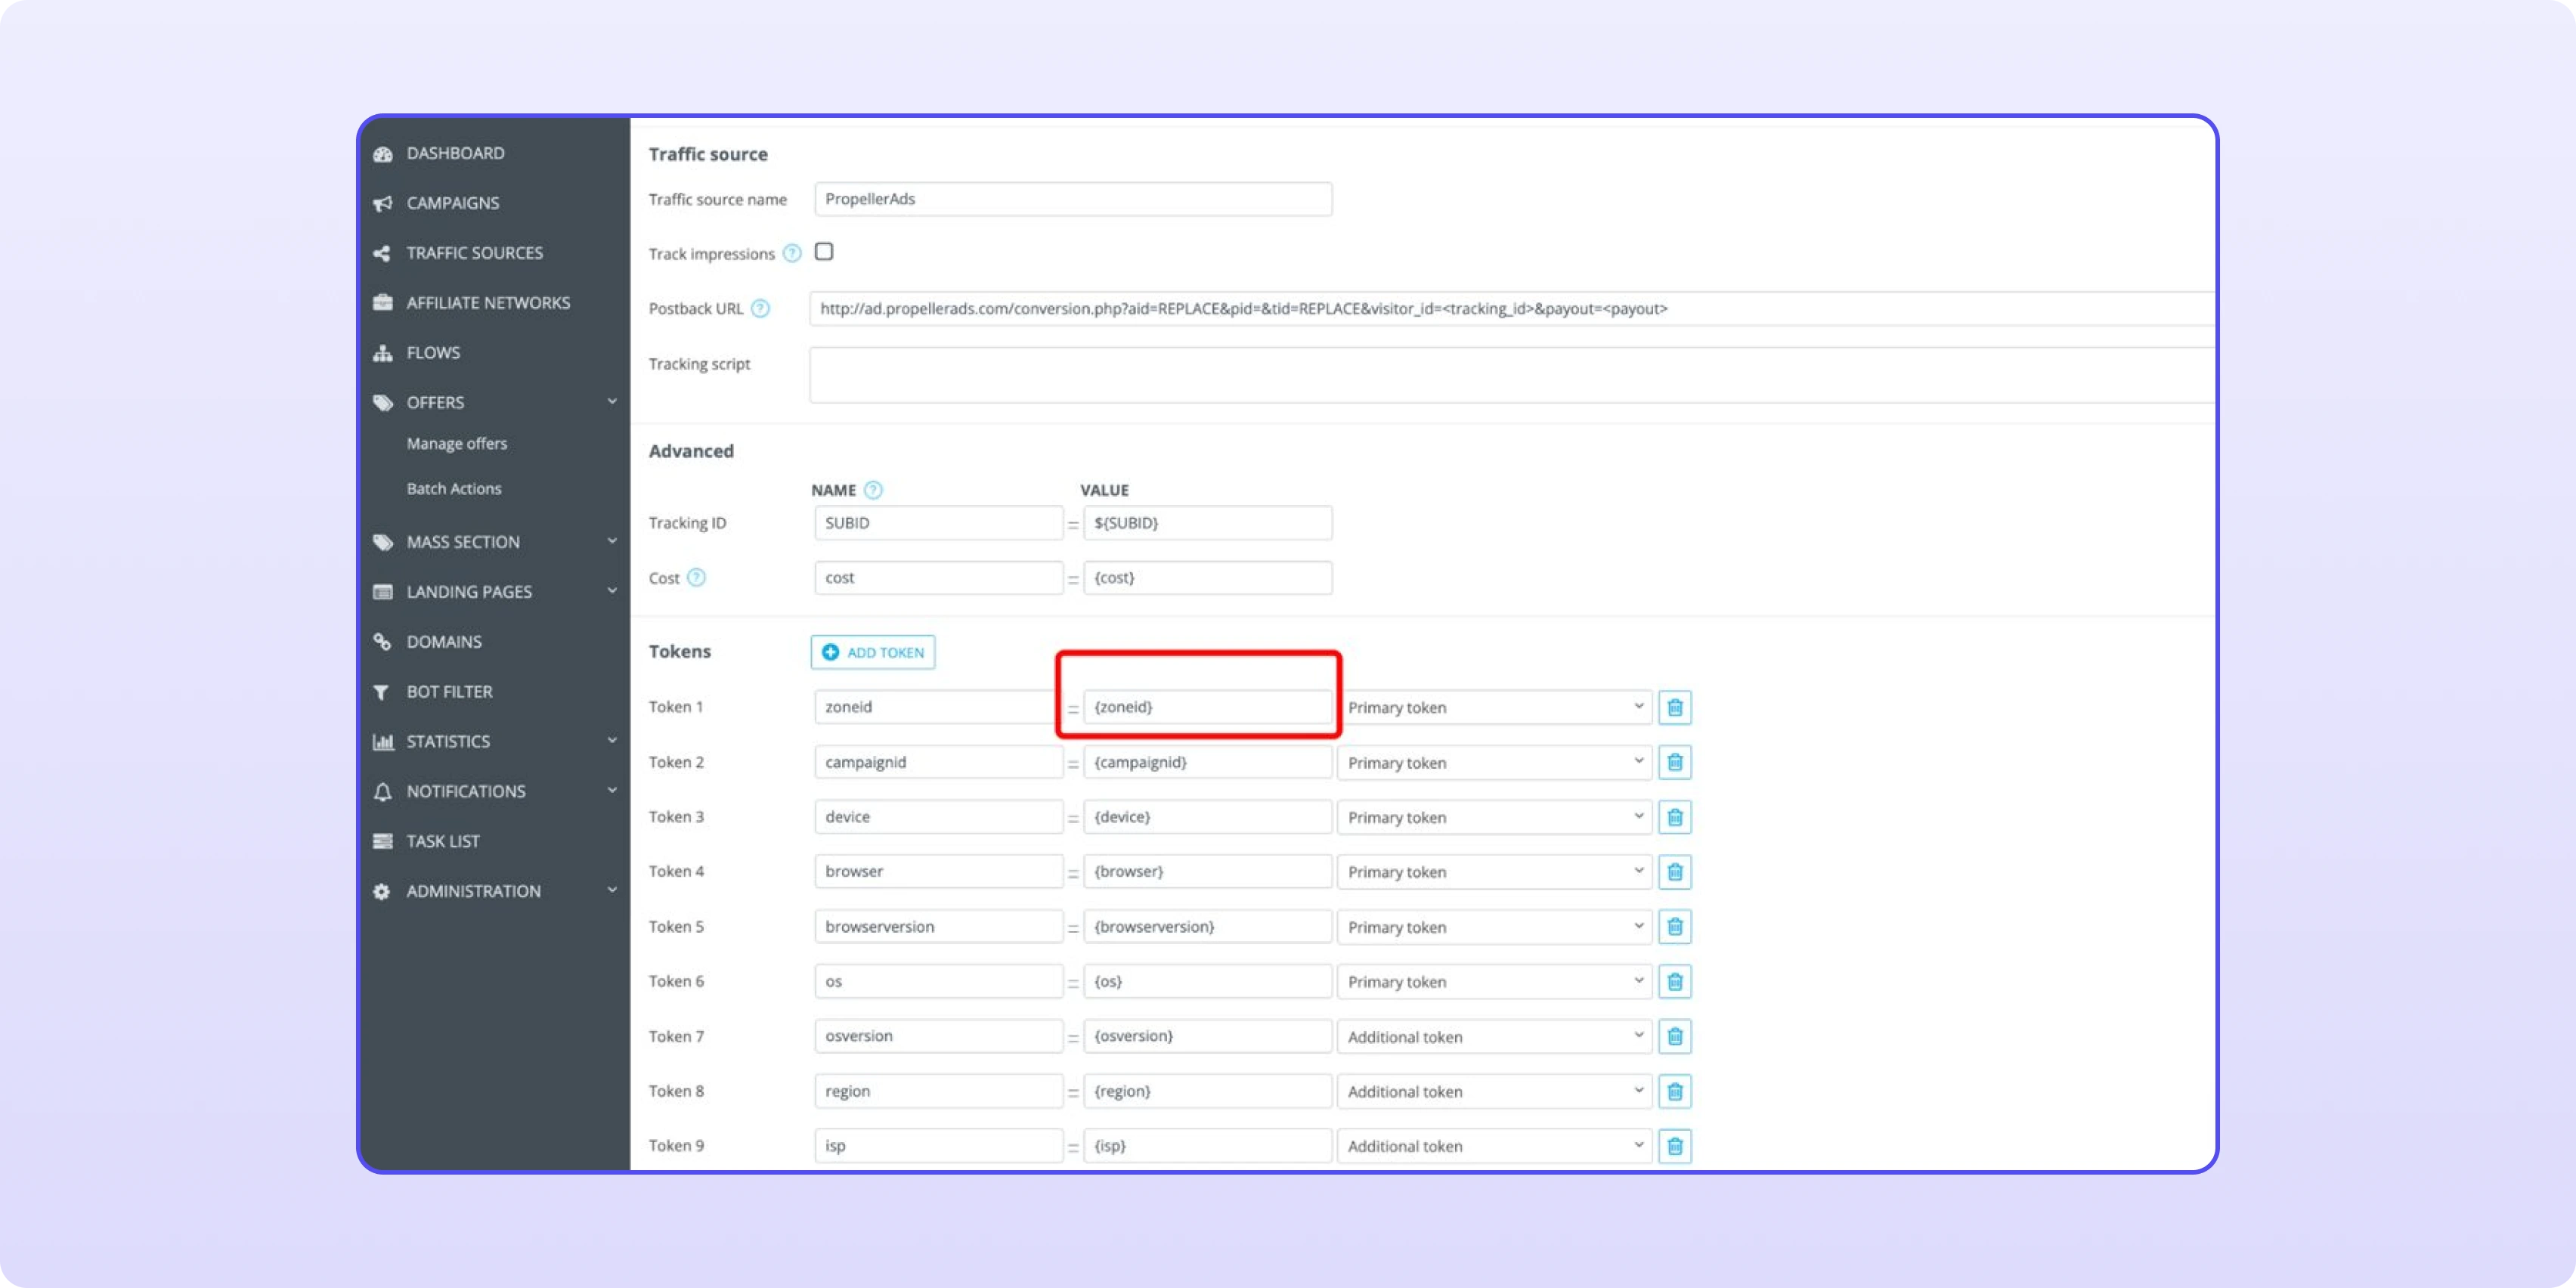
{zoneid} is a dynamic macro, and its name depends on your traffic source template. In most templates the zone is passed in Token 1, named Zone ID: check the source settings in AdsBridge. In the PropellerAds template, Token 1 is zoneid with the value {zoneid}. On pop and push traffic, zone-level data is what lets you blacklist losing zones quickly, which our popunder ads guide covers in more detail.
PropellerAds in AdsBridge: Token 1 carries the zone ID.
Add your traffic source in AdsBridge
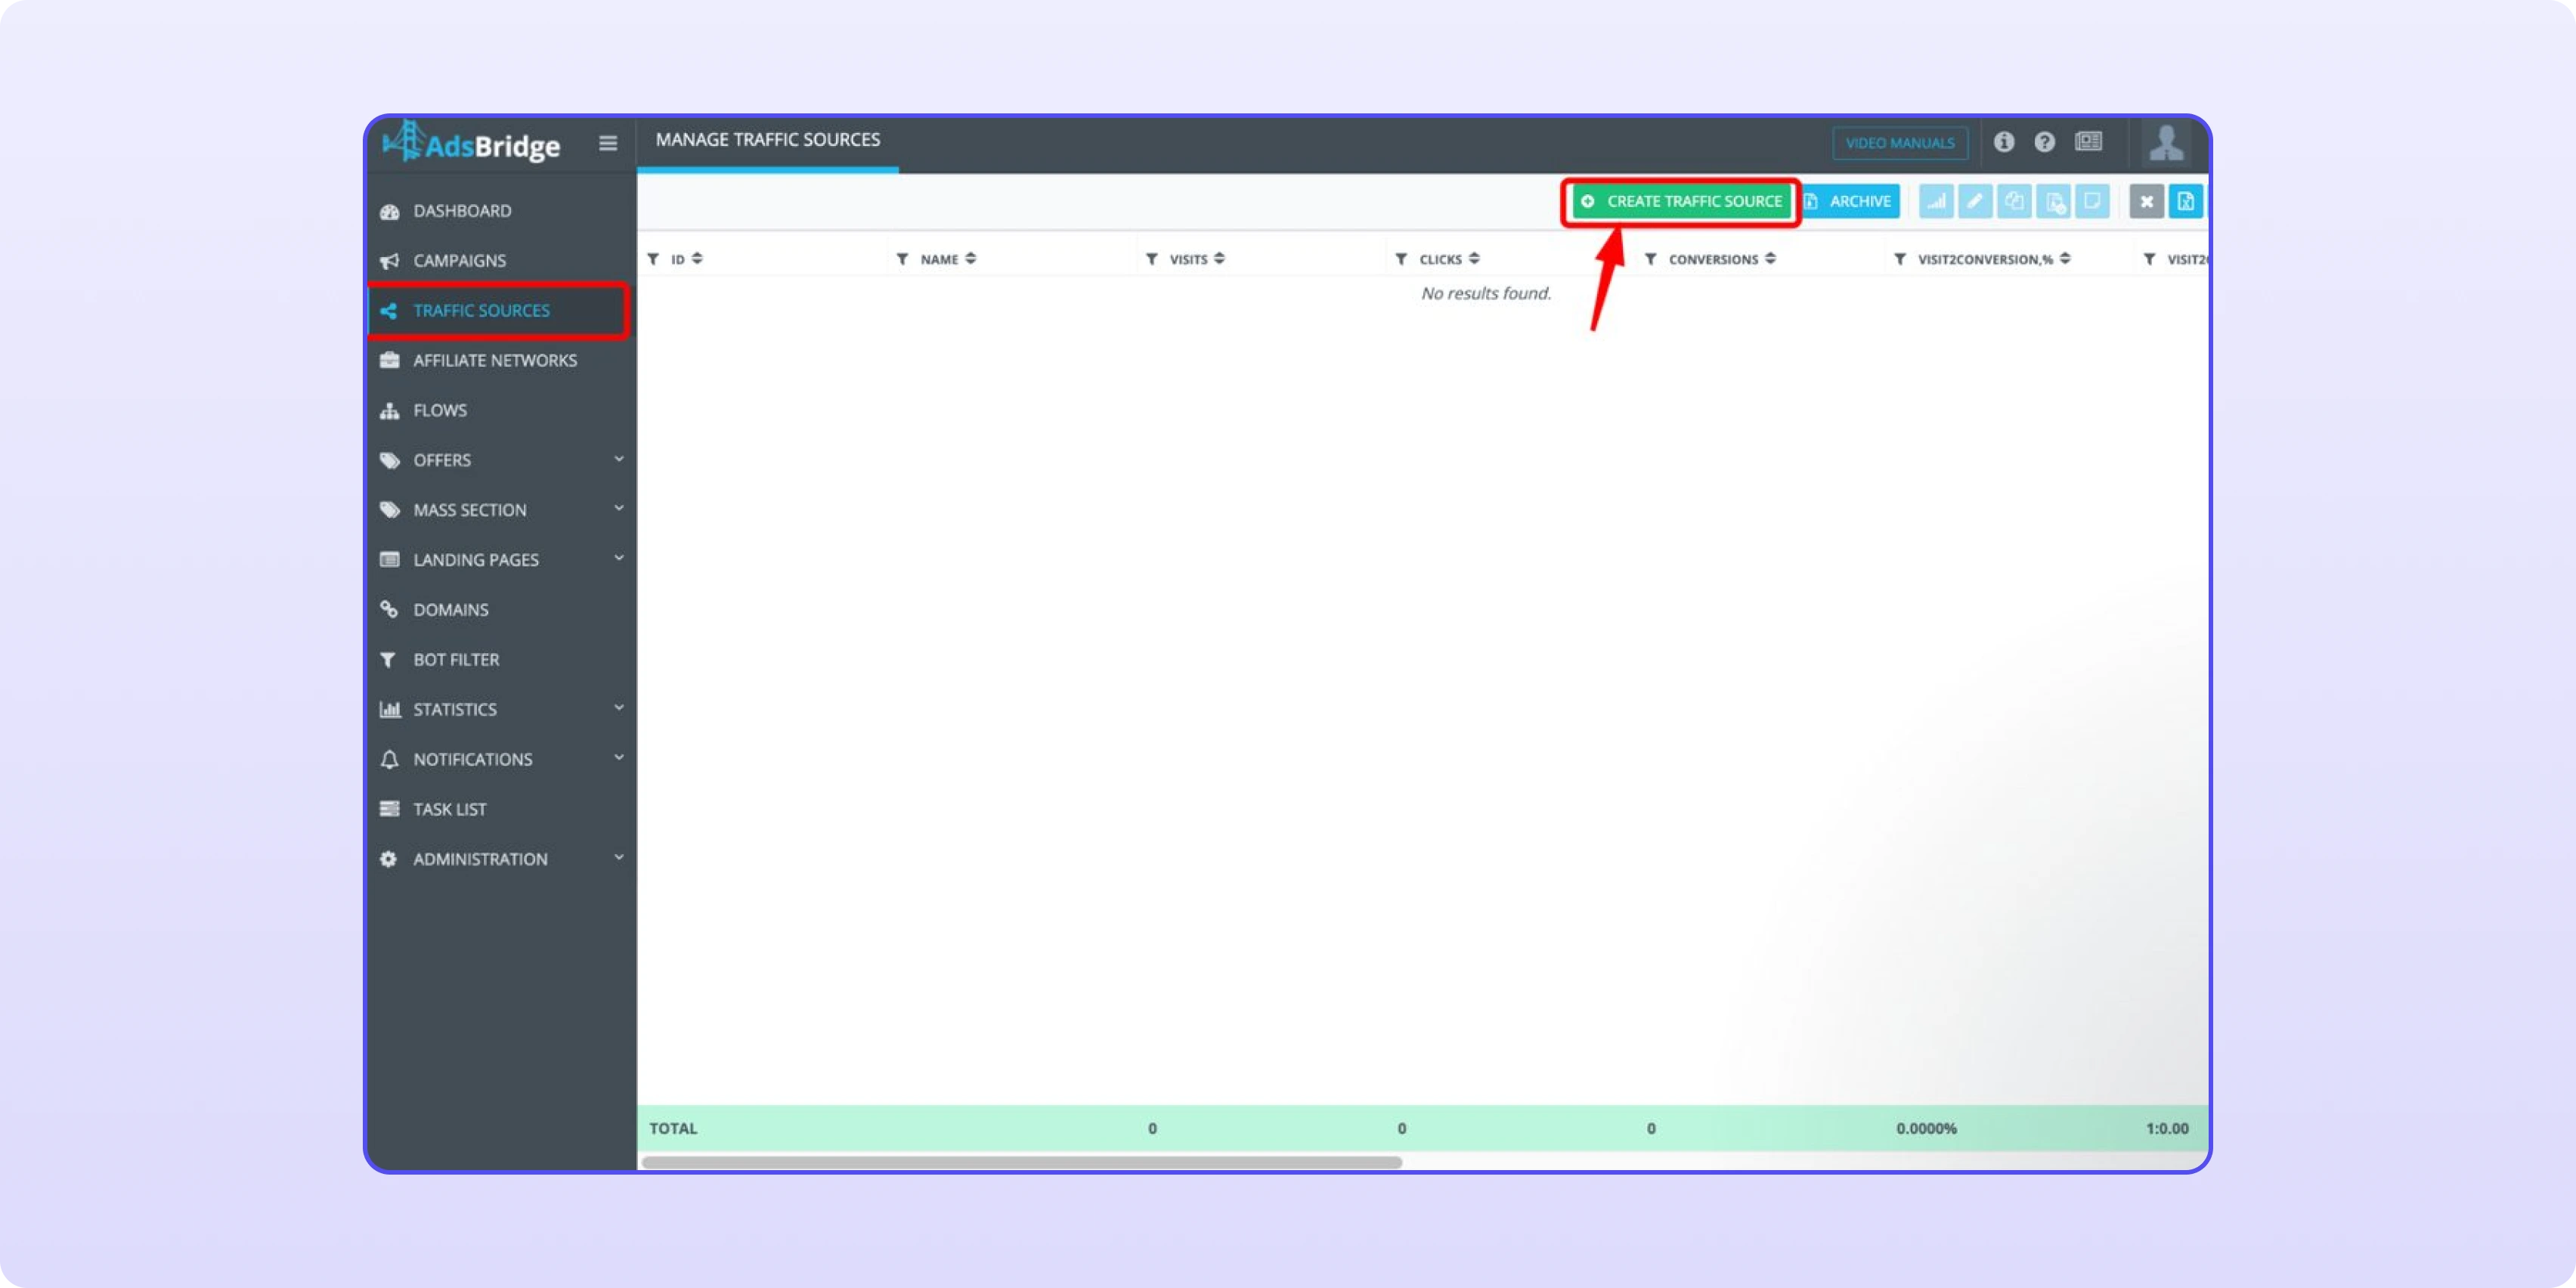
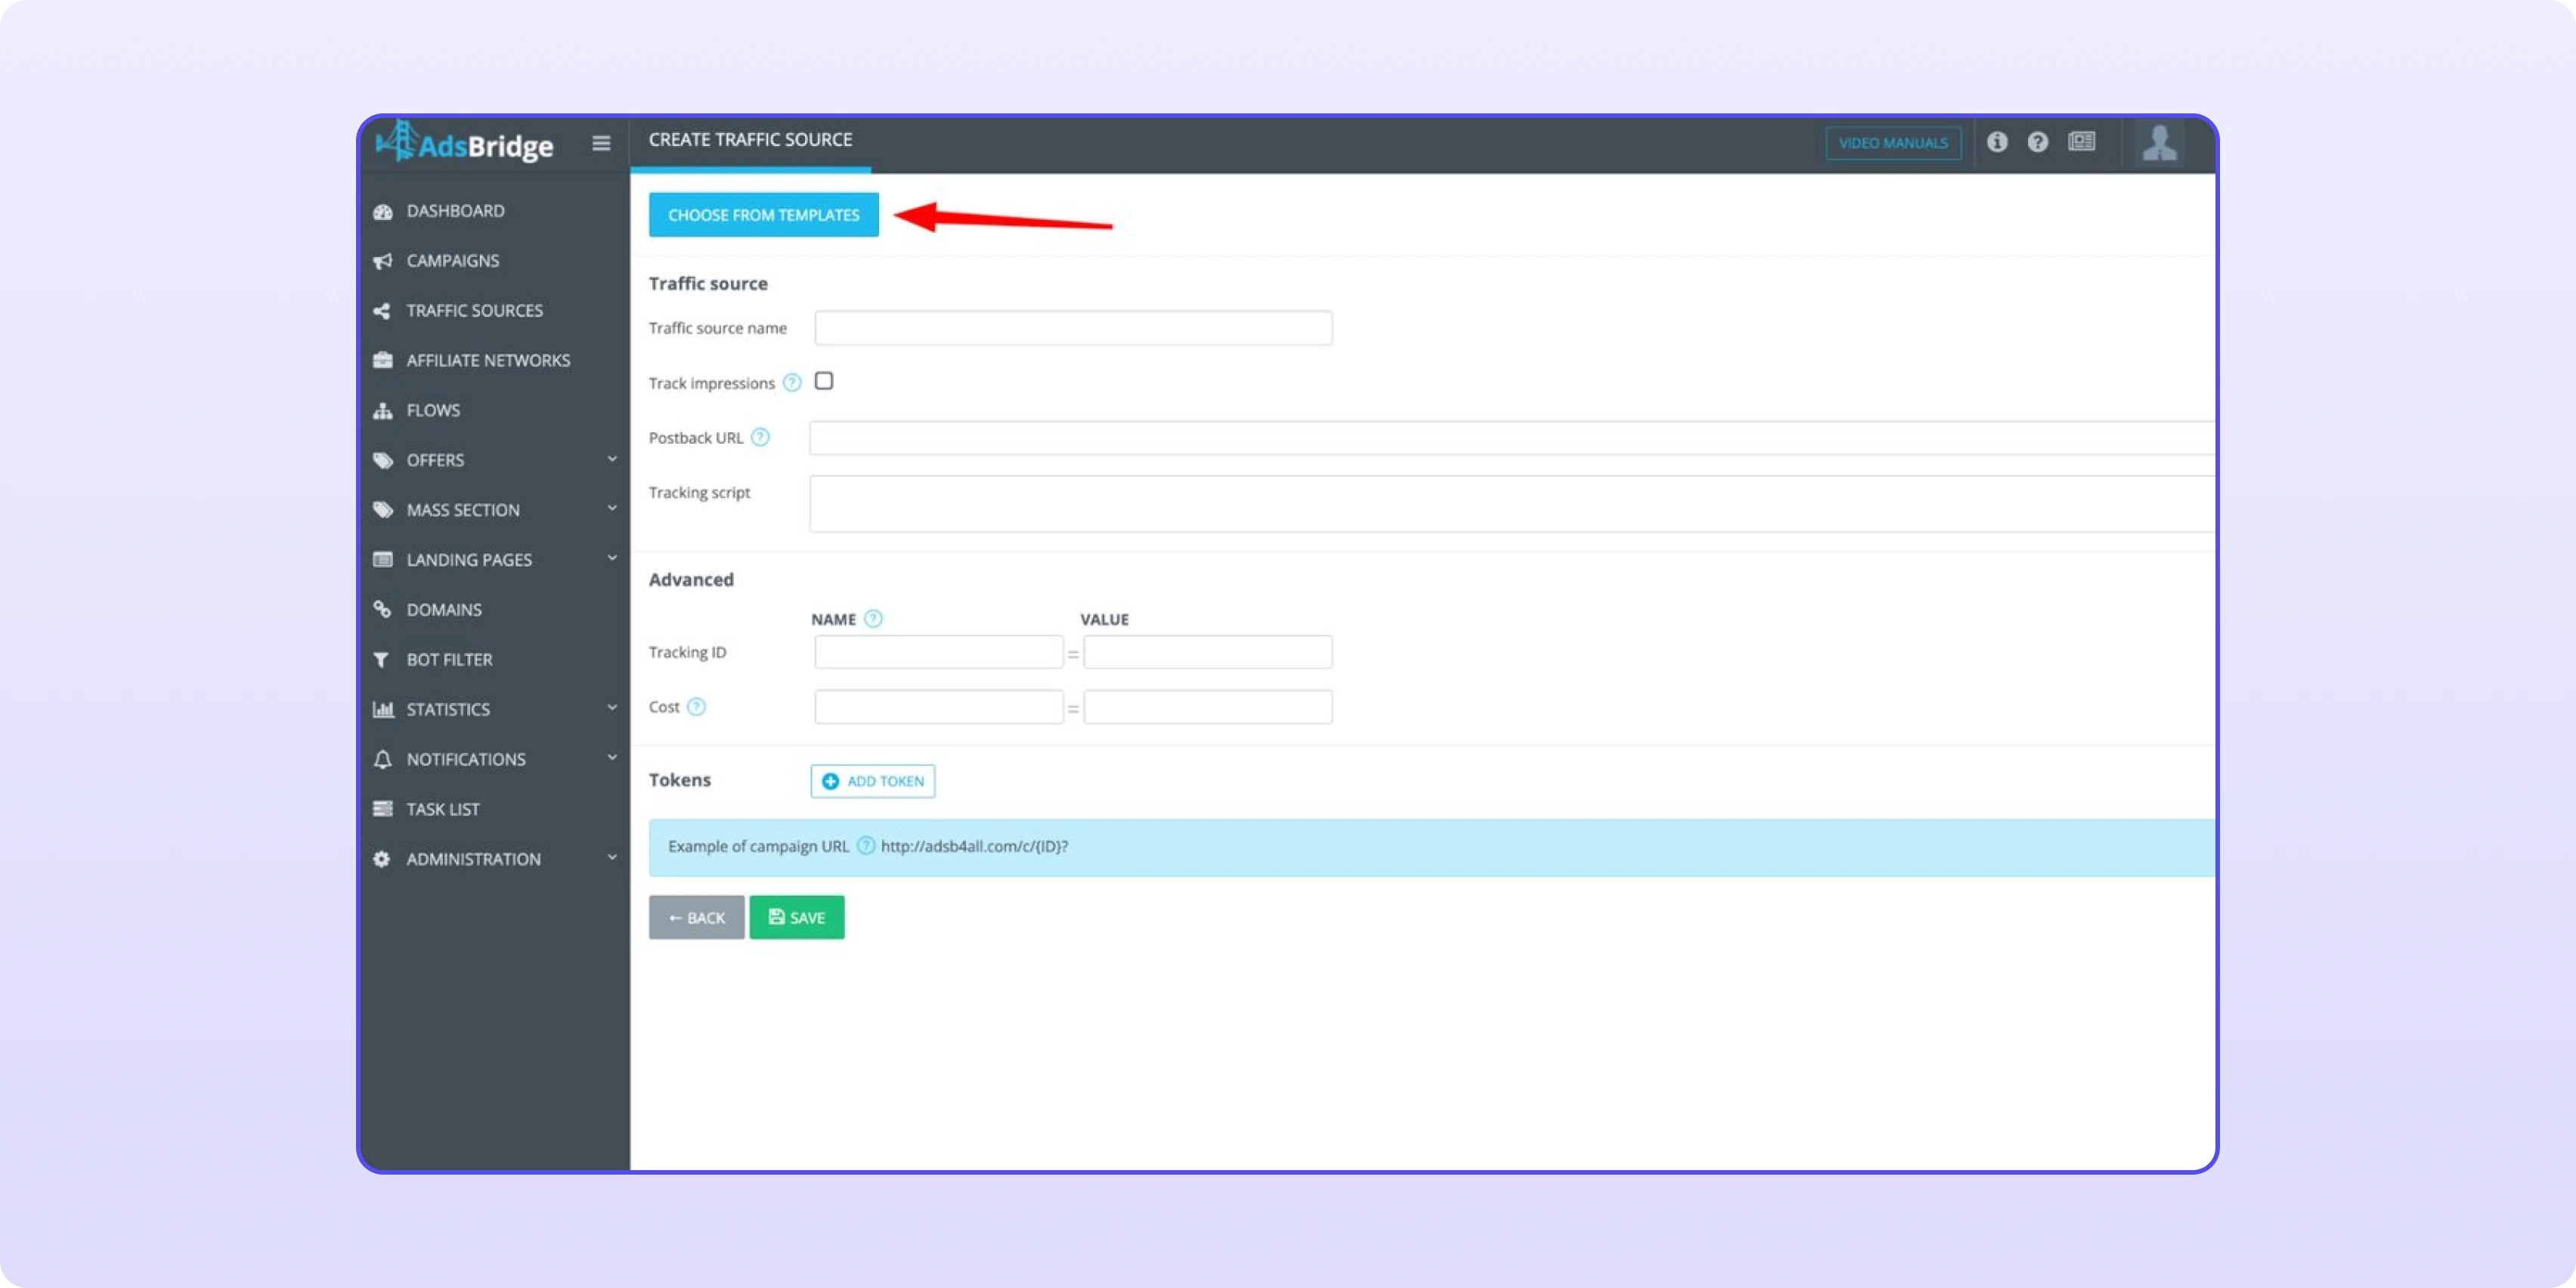
Open Traffic Sources, click Create Traffic Source, then Choose from Templates and pick the network you buy from, for example PropellerAds. The template fills in the postback to the source, the tracking ID, cost and tokens. Click Save.
Start from a template so tokens like {zoneid} are already set.
Create the AdsBridge campaign
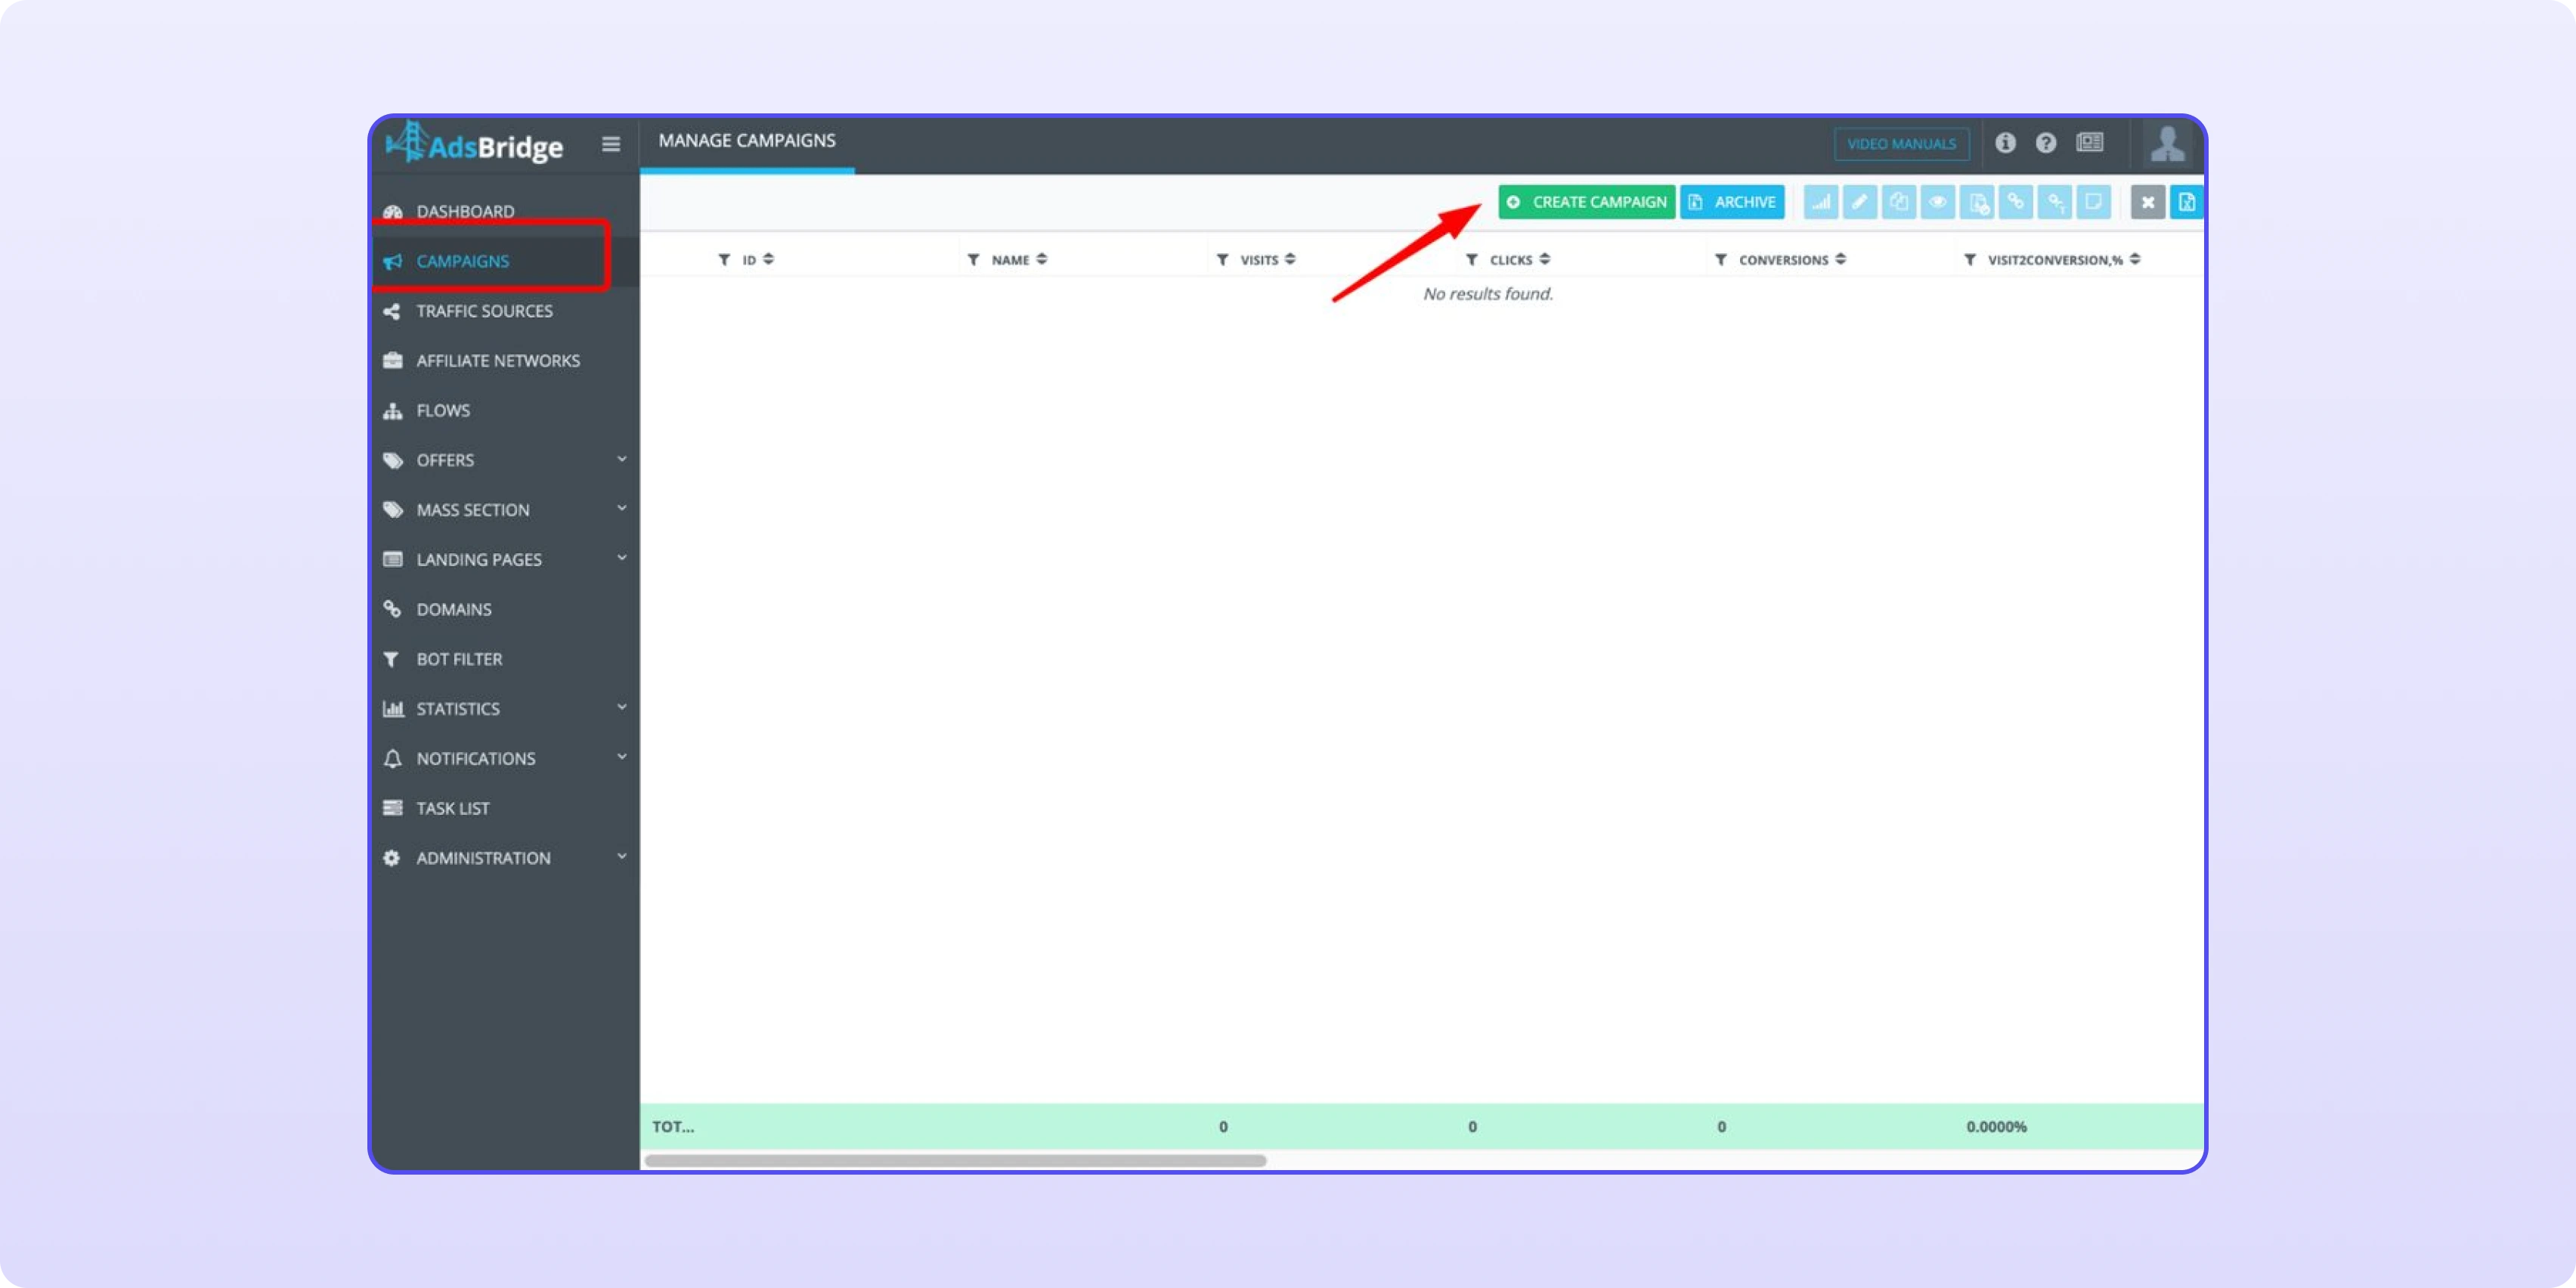
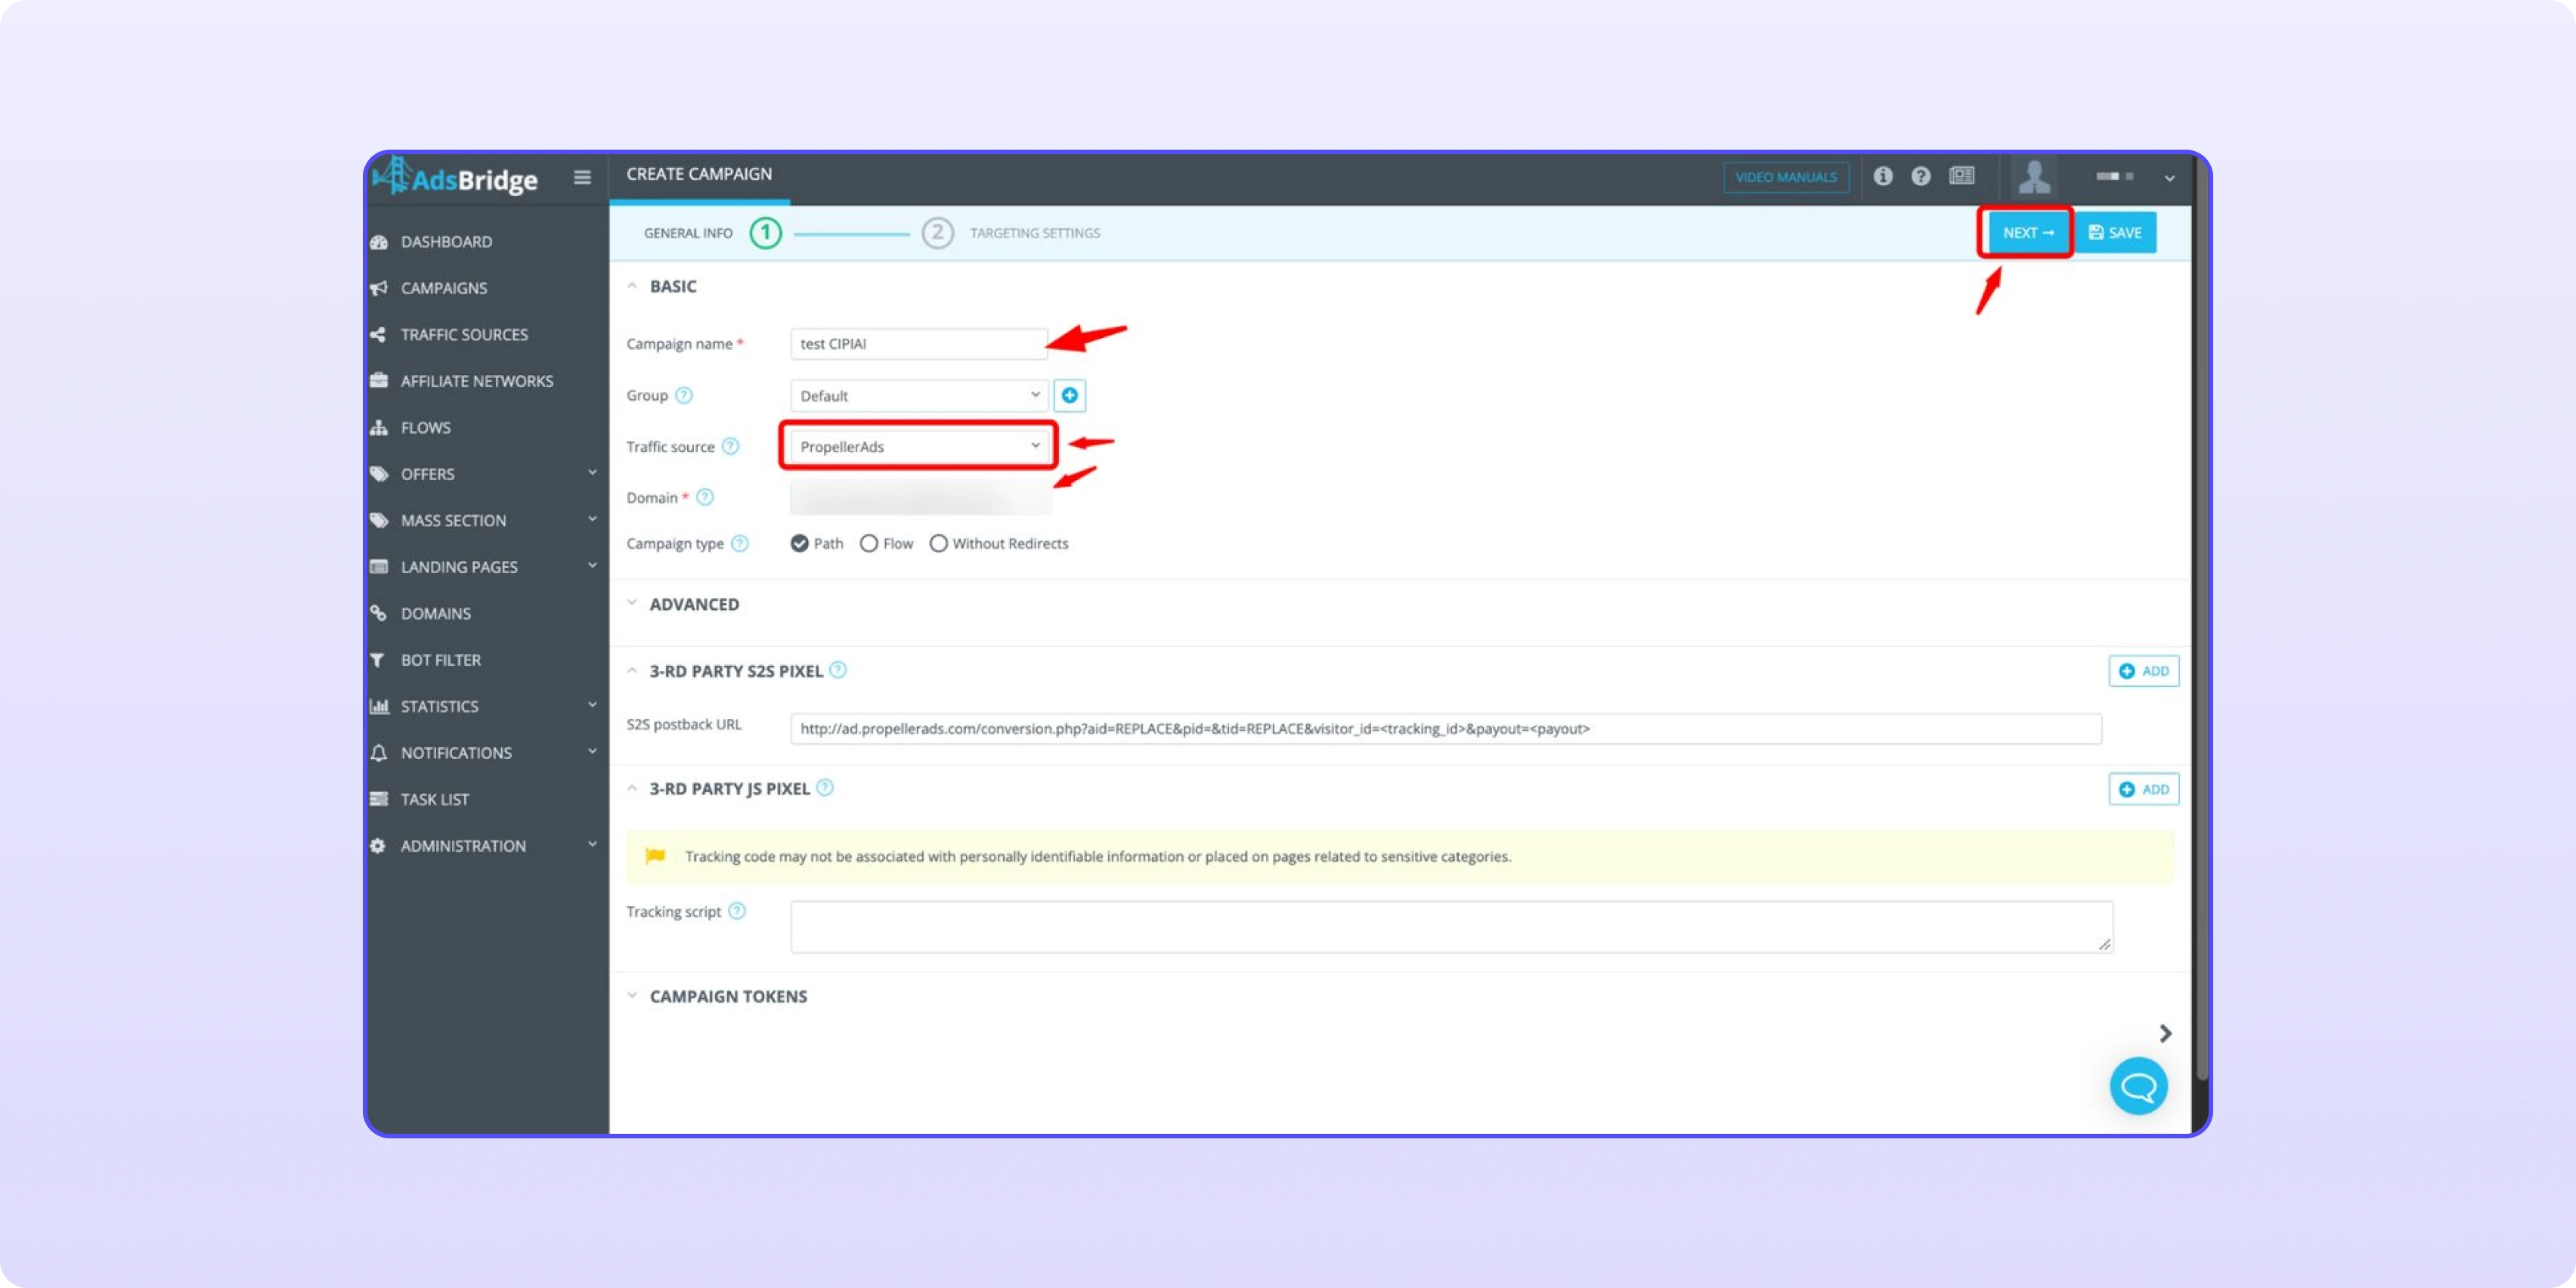
Go to Campaigns and click Create Campaign.
AdsBridge → Campaigns → Create Campaign.
On General Info, enter a Campaign name, select the Traffic source from Step 5 and your Domain, keep Campaign type on Path and click Next. The source's postback is picked up from the template under 3-rd Party S2S Pixel.
Name, traffic source and domain, then Next.
Set up the path to the CIPIAI offer
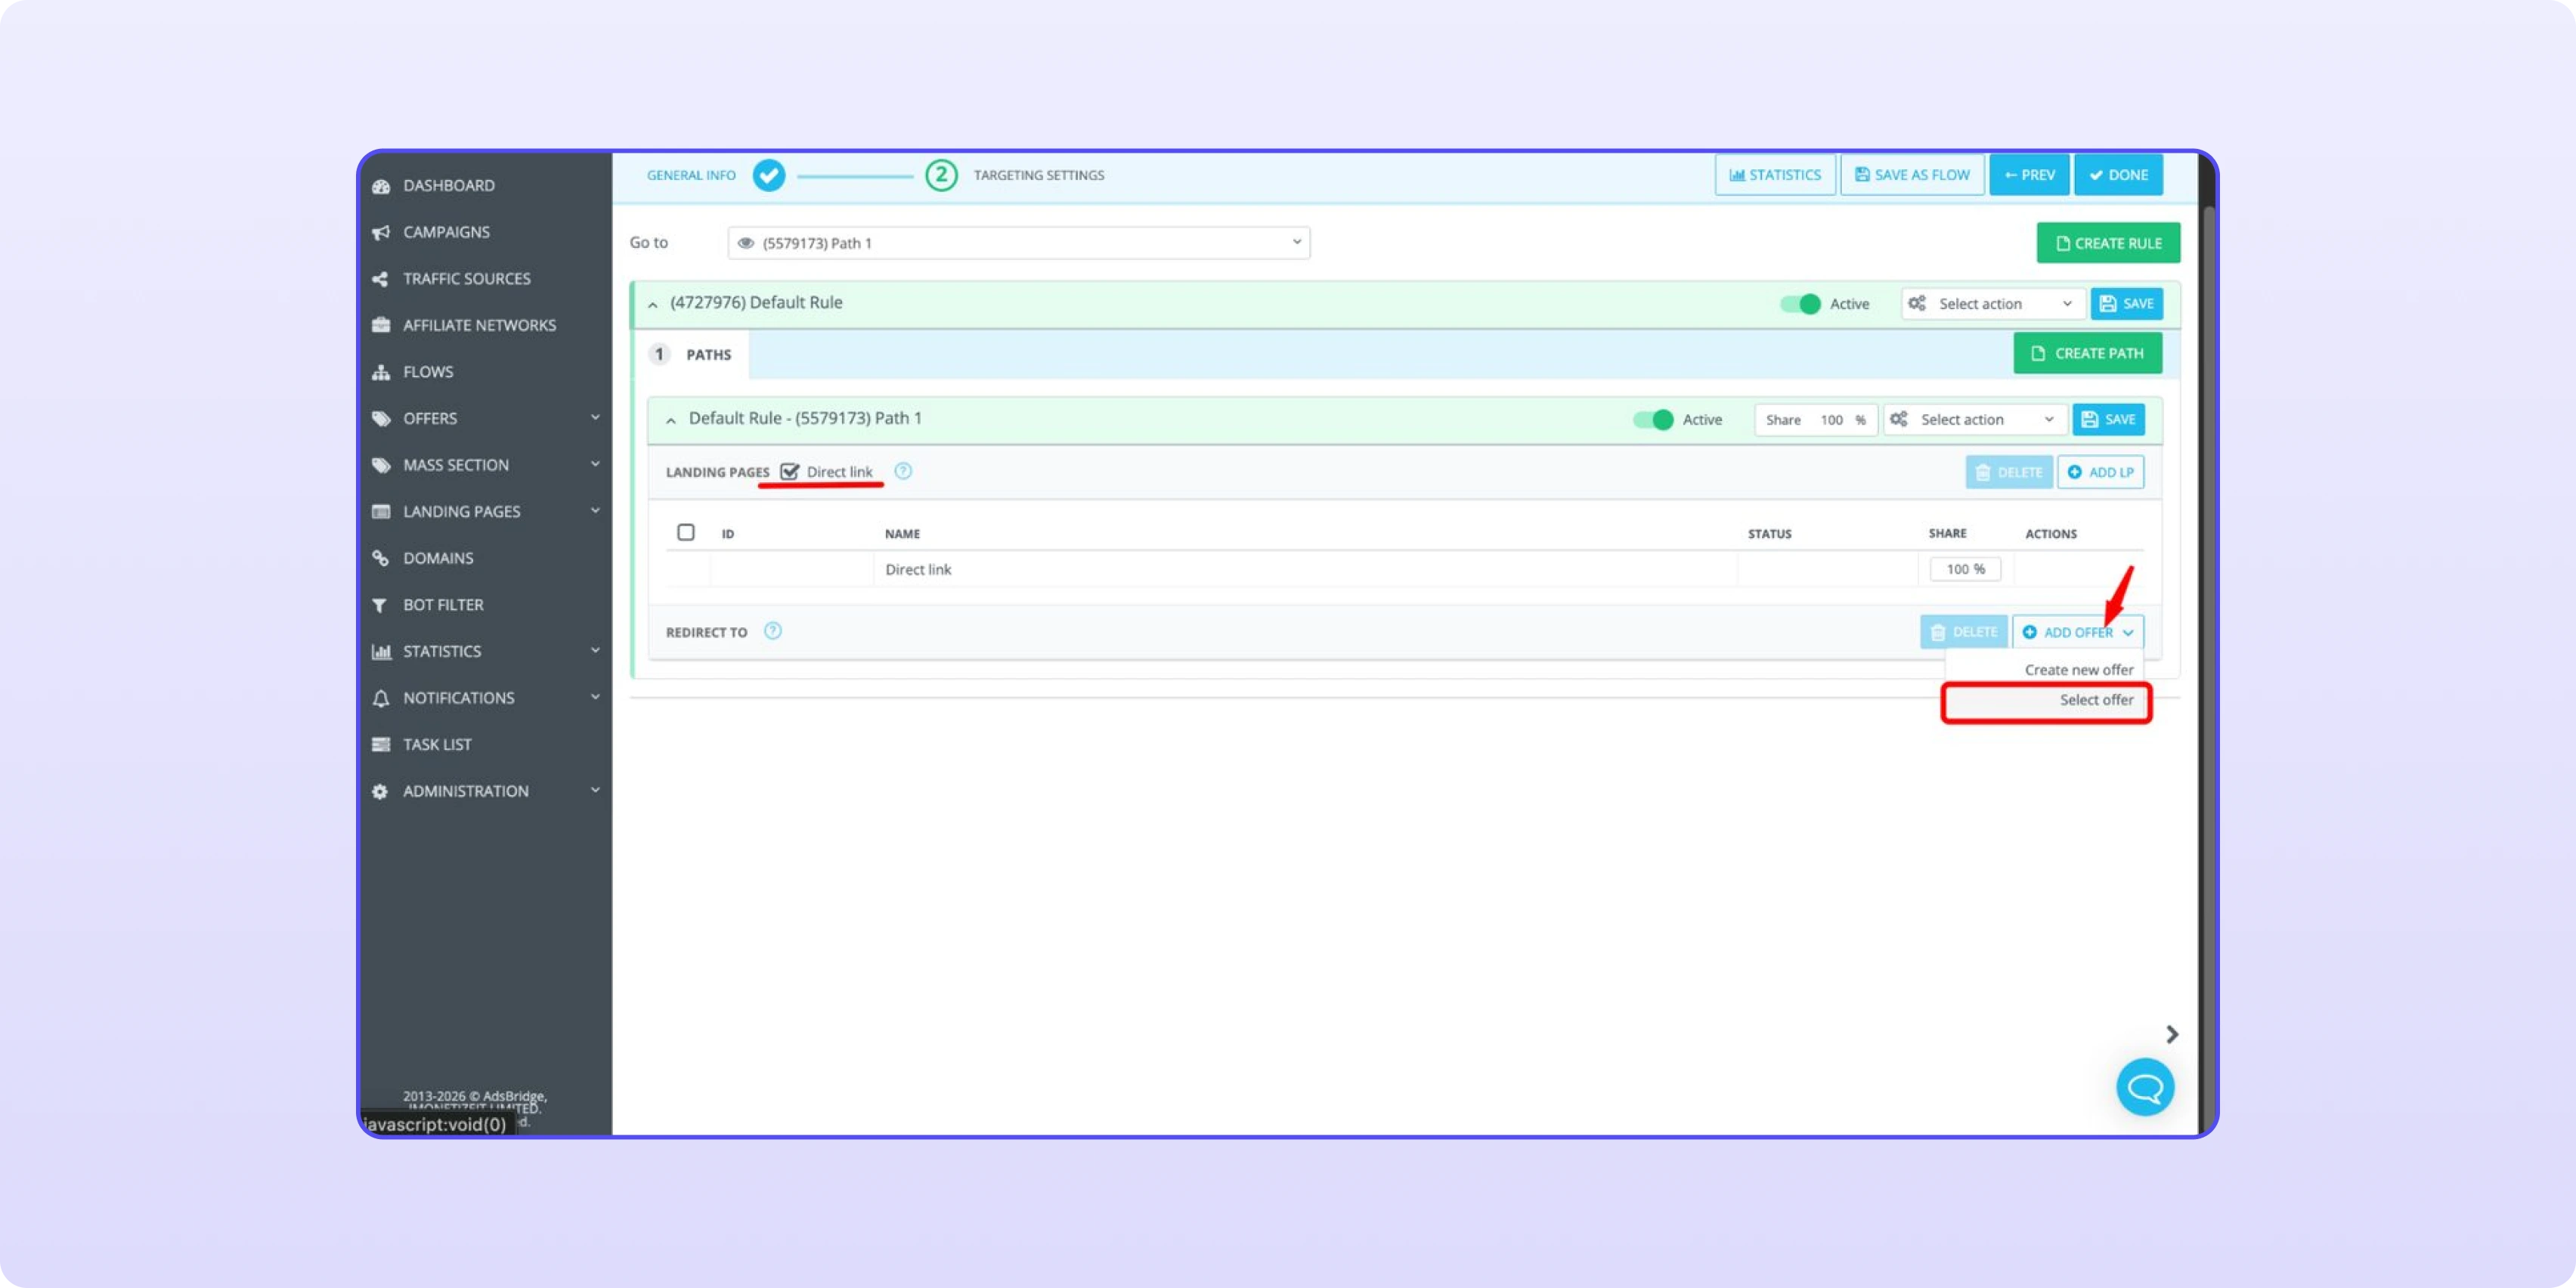
On Targeting Settings, configure the default path:
1. If you send traffic straight to the offer without your own landing page, tick Direct link under Landing Pages.
2. Under Redirect to, click Add Offer → Select offer.
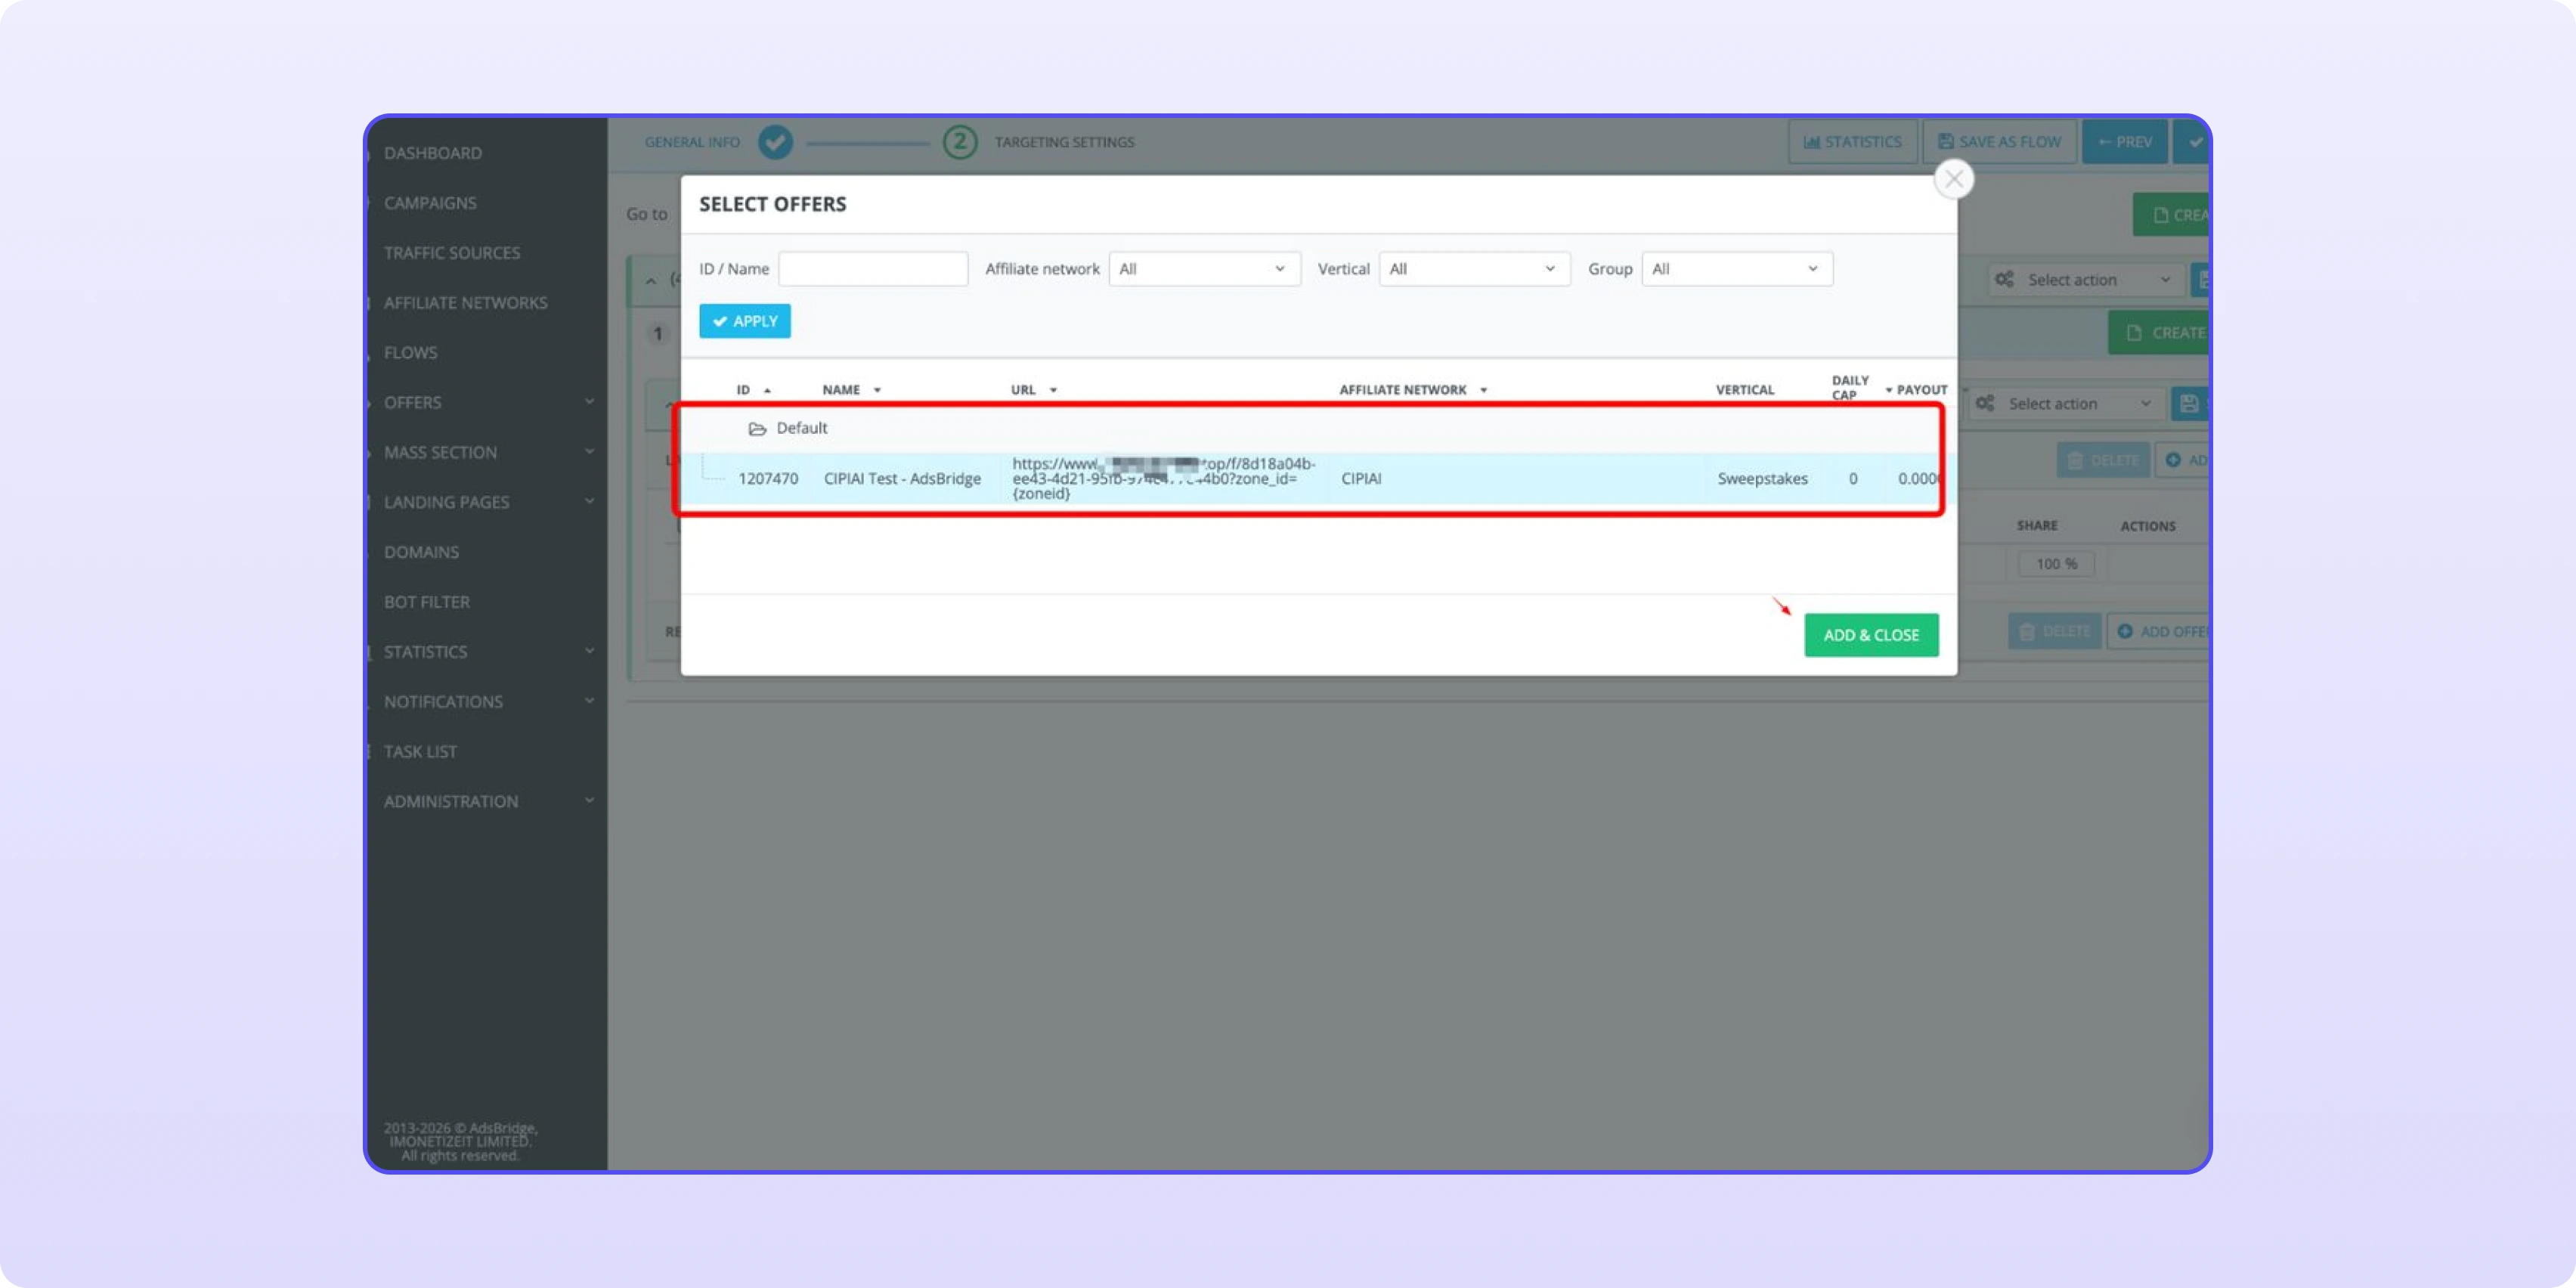
3. Select the CIPIAI offer from Step 4 and click Add & Close.
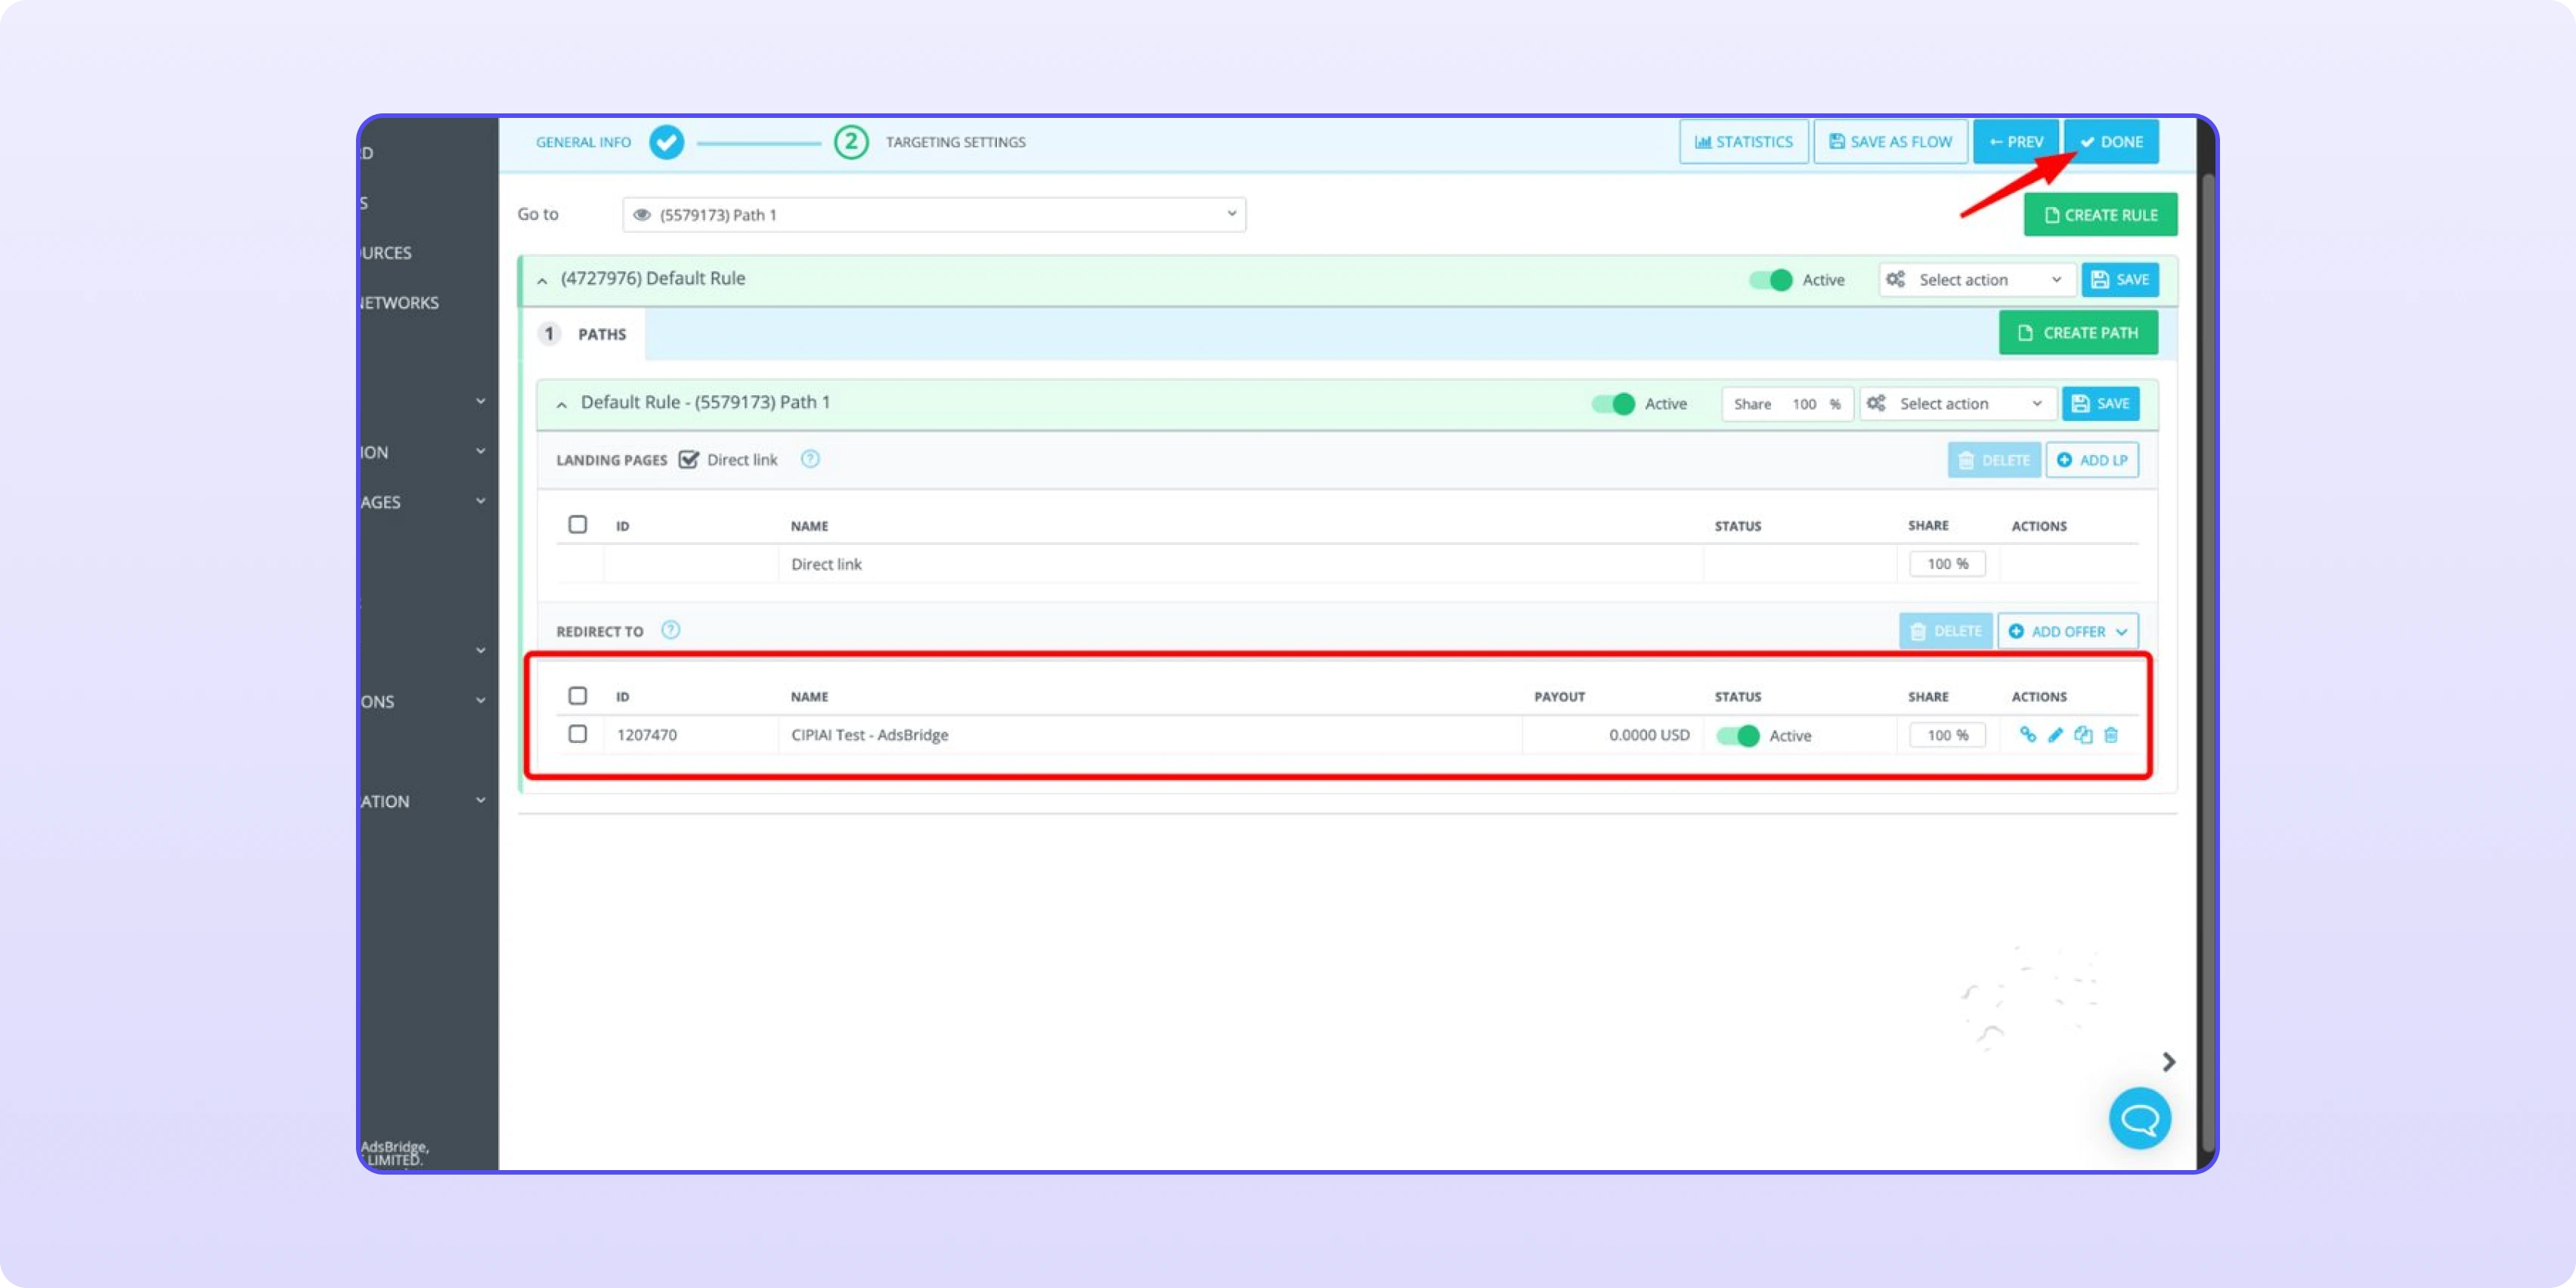
4. Check that the offer is in the path with 100% share and Active status, then click Done.
Direct link on, then Add Offer → Select offer.
Pick the CIPIAI offer and click Add & Close.
The offer is in the path. Click Done.
Copy the campaign URL and send traffic
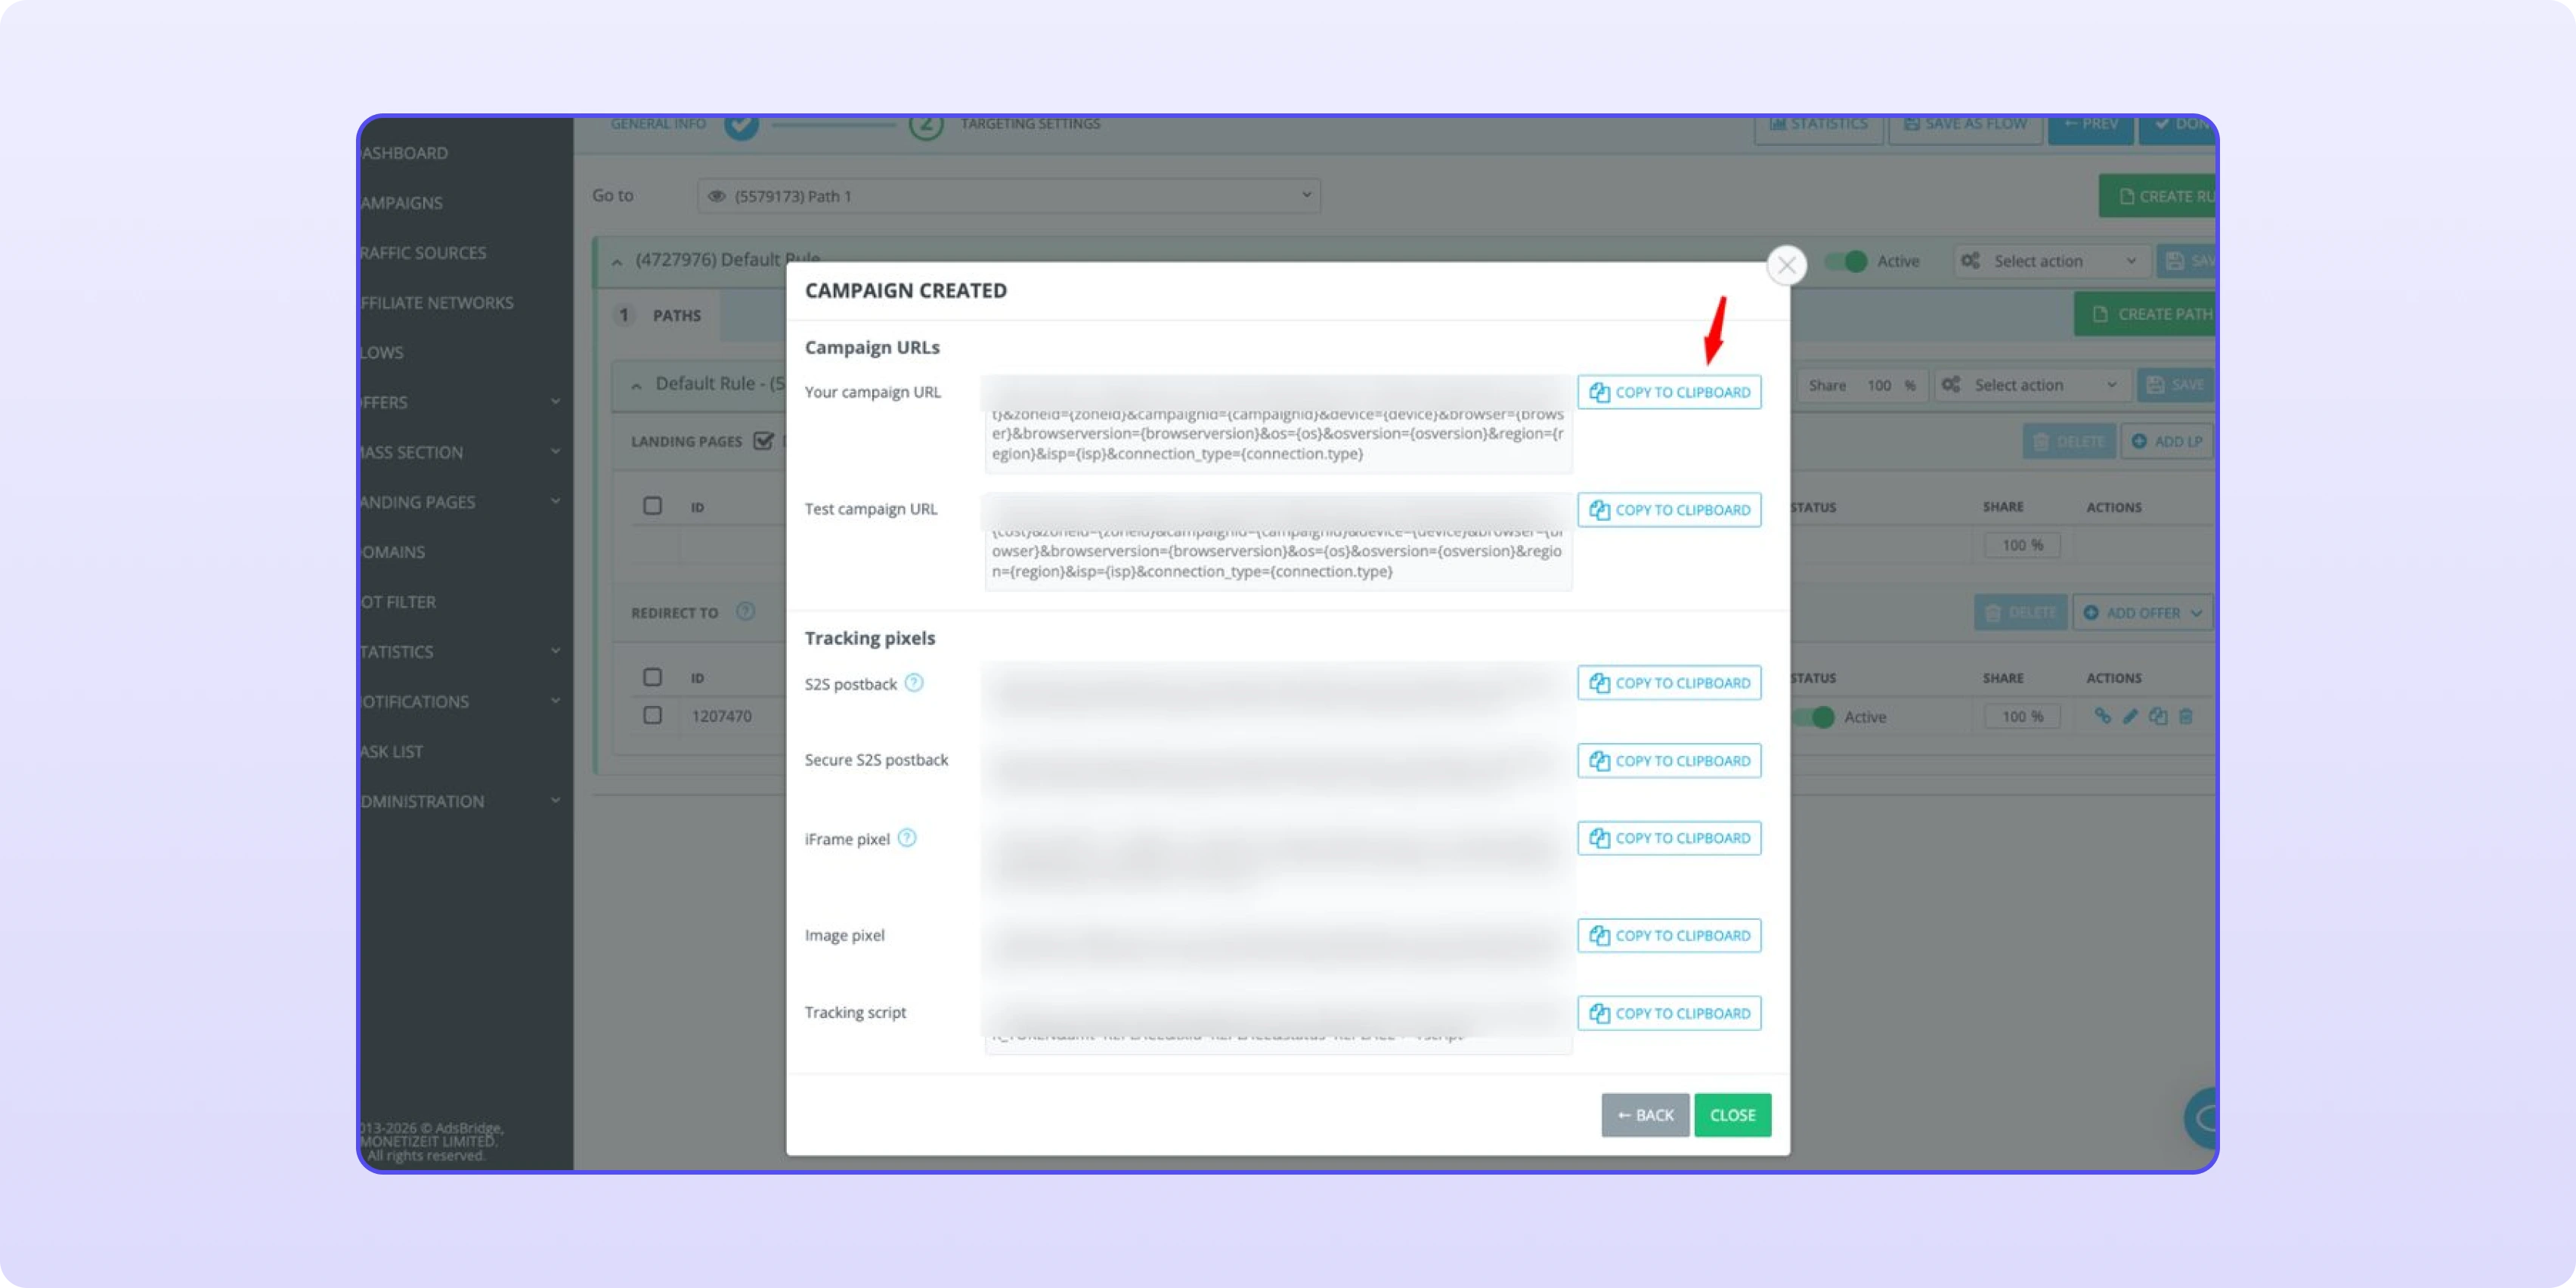
After saving, AdsBridge opens Campaign Created. Click Copy to clipboard next to Your campaign URL and paste it into your traffic source as the destination URL. The URL already carries the source tokens, including zoneid={zoneid}.
Copy Your campaign URL into the traffic source.
FAQ: AdsBridge and CIPIAI
Does AdsBridge have a ready-made template for CIPIAI?
Yes. CIPIAI is in AdsBridge's Affiliate Networks Templates, marked Trusted. The template sets click_id as the tracking token, approve as the approved status value and a postback URL with CIPIAI tokens.
Do I need to edit the AdsBridge postback before pasting it into CIPIAI?
No. The postback from the CIPIAI template already contains tid={{click_id}}, payout={{payout}} and status={{goal_status}}. Paste it into Tracking Tools → Postback → Global as is.
Which conversion statuses does AdsBridge accept from CIPIAI?
By default, the AdsBridge template accepts conversions with the APPROVE status: its approved status value is approve. Tick Approve in CIPIAI Tracking Tools; the other statuses are up to you.
What is zone_id in the CIPIAI offer URL?
zone_id passes the zone, placement or publisher ID from your traffic source to CIPIAI statistics. Add zone_id={zoneid} to the flow link in the AdsBridge offer; if your source template names the Zone ID token differently, use that token instead.
Can I use a landing page instead of Direct link?
Yes. Untick Direct link and add your landing under Landing Pages in the path; the CIPIAI offer stays under Redirect to.
Start with one flow, then scale
Set up the global postback once, confirm one real conversion in AdsBridge, and only then clone the campaign across sources and GEOs. Running a different tracker? The same setup is in our Keitaro, Binom and BeMob guides. CIPIAI runs direct tech offers (VPN, utilities, extensions) and SmartLinks for mixed traffic, covered in our SmartLink guide. NET30 with autopayments, from $50 via payment services.