Same Traffic, Different Economics: VPN vs. Utility vs. E-Commerce on Adsterra Pop and Push
New VPN, AdsLocker, and Shein on the same Adsterra pop and push traffic — CR, ROI, and EPC compared. Why CR alone doesn't decide ROI.



If CIPIAI shows conversions and your Keitaro reports stay at zero, the problem is almost always one of three things: the postback, the click ID or the conversion status. This guide walks through the full Keitaro and CIPIAI setup in the order that avoids all three, using the Cipiai.com affiliate network template that already ships inside Keitaro. By the end you'll have one global postback, one approved flow and one campaign link ready to paste into your traffic source.
A Keitaro postback for CIPIAI is a server-to-server request that CIPIAI sends to your Keitaro tracker each time a conversion changes status. It carries the Keitaro click ID (subid), the status, the payout and the currency, so Keitaro can attach the conversion to the exact click, source and zone that produced it. You set it once as a global postback in CIPIAI Tracking Tools, and every flow can reuse it.The setup moves data in two directions. Keitaro passes its click ID to CIPIAI through the offer URL; CIPIAI returns that click ID with the conversion through the postback.
Setting up Keitaro for CPA campaigns takes five stages, and the network side (stages 4 and 5) is where most tracking breaks. This guide covers those two stages for CIPIAI; the first three are covered in Keitaro's Get Started docs.
Before you start, have three things ready: a working Keitaro install with a connected domain, an approved CIPIAI webmaster account, and the traffic source you plan to run already added in Keitaro under Traffic Sources.
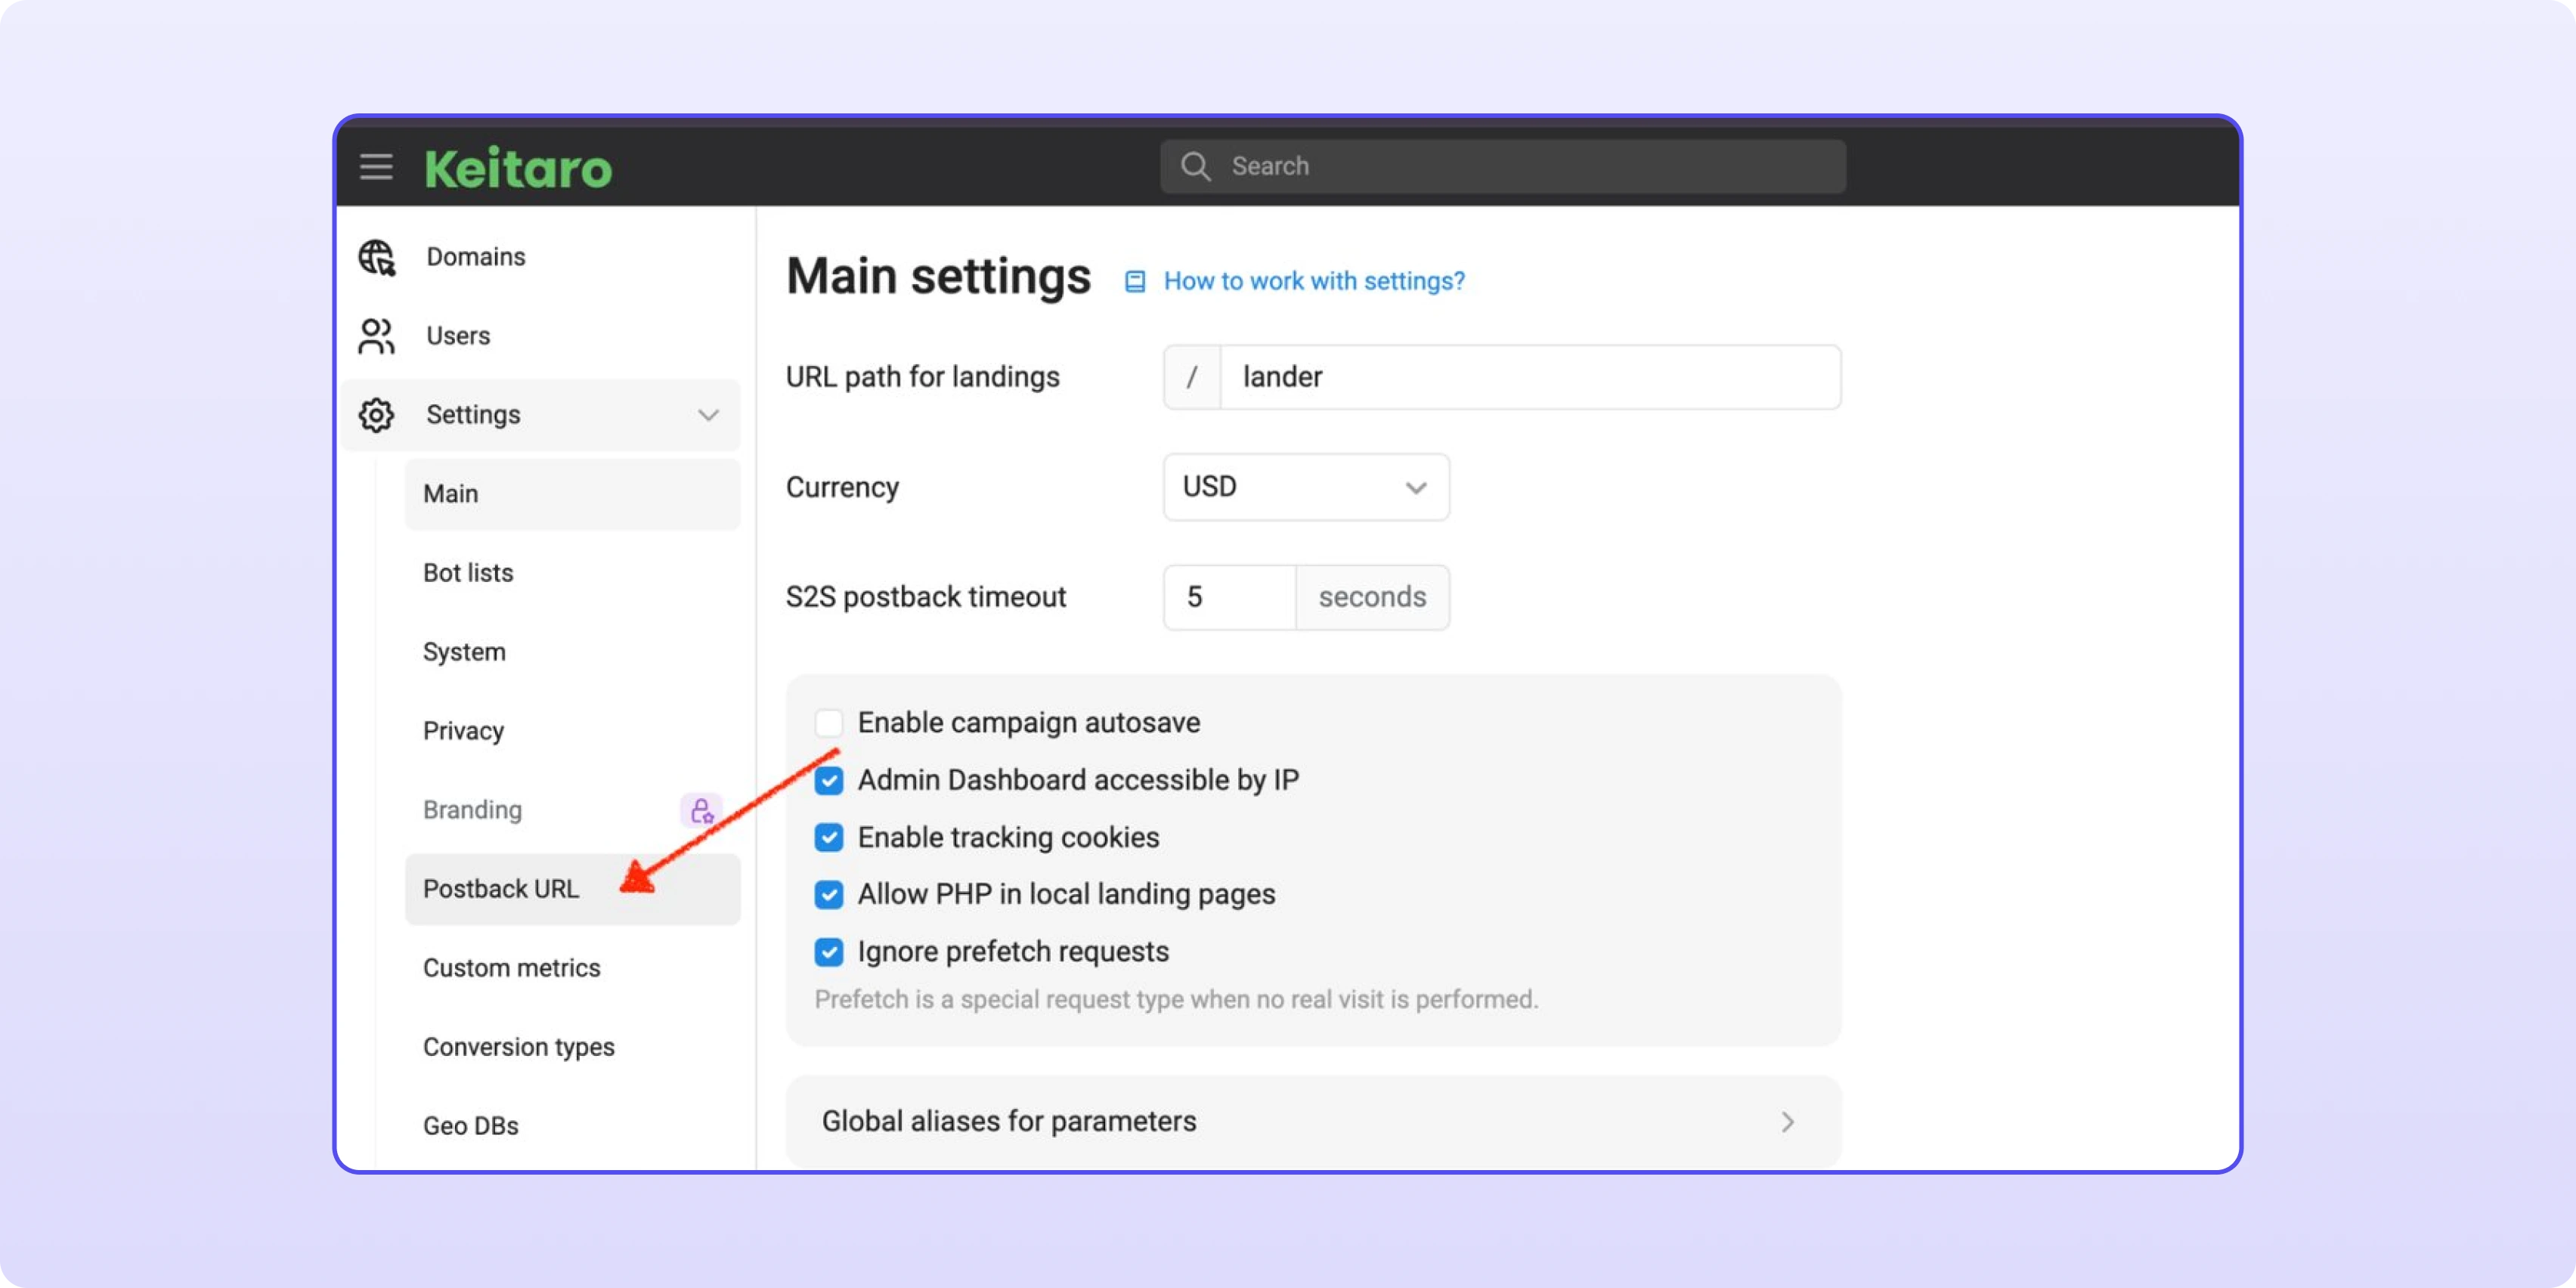
Open Settings → Postback URL in Keitaro and copy the URL with the clipboard button. It looks like this:
https://your-tracker-domain/ef7e937/postback?subid=REPLACE&status=REPLACE&payout=REPLACE
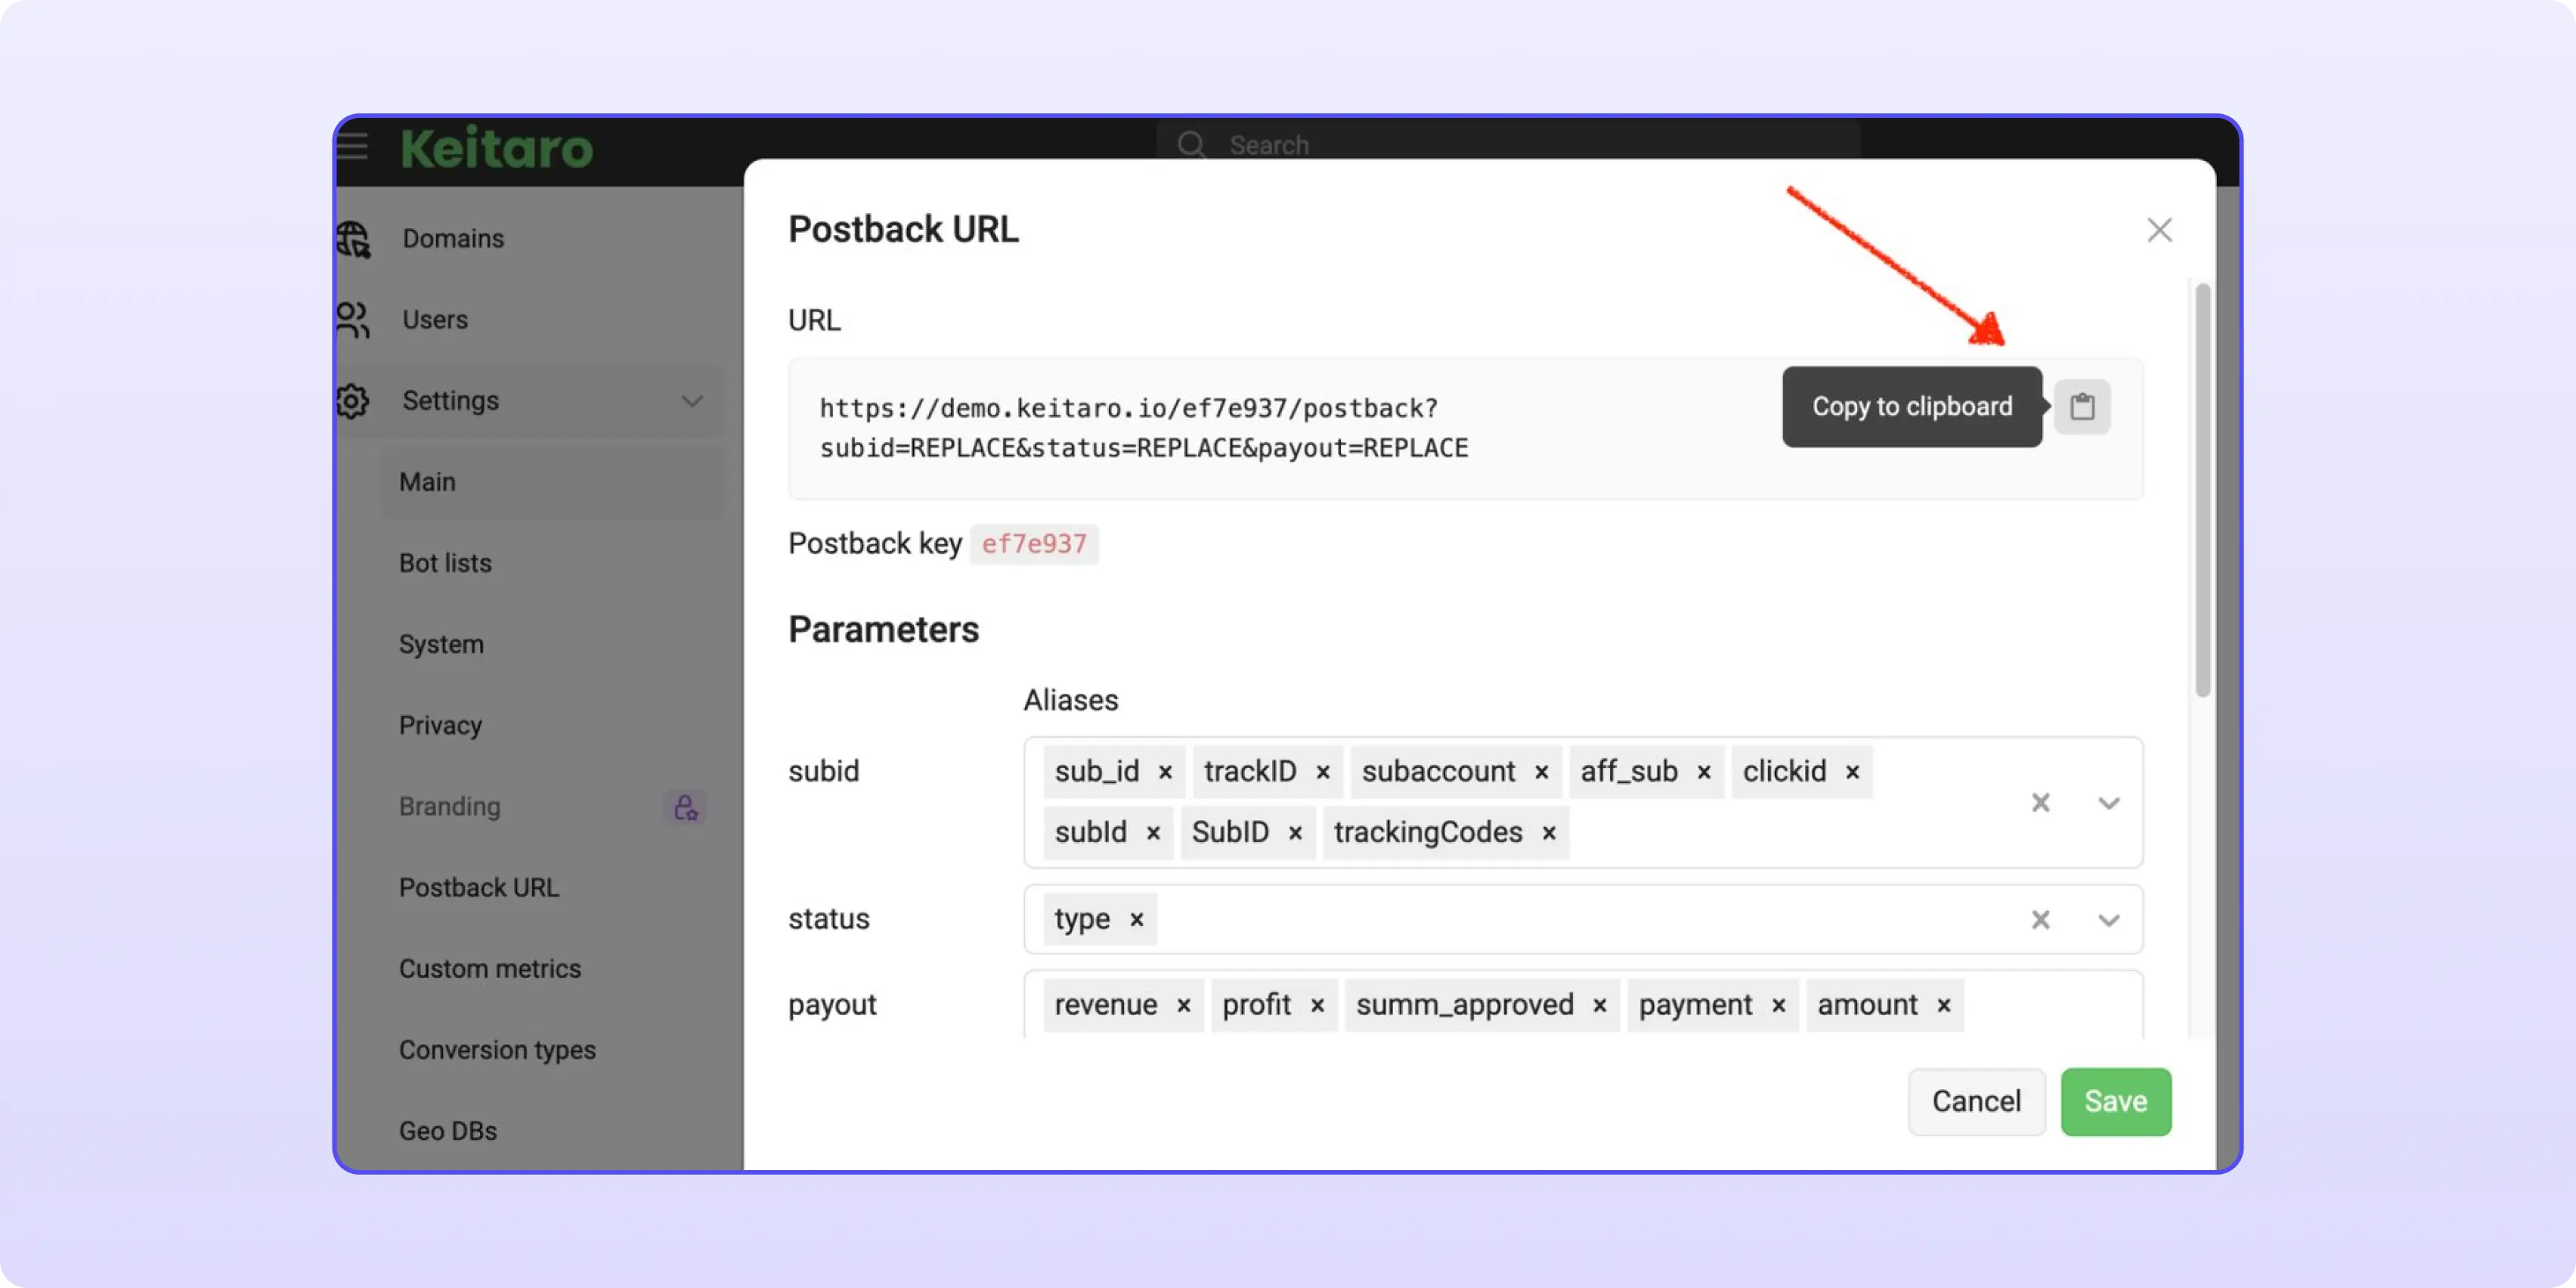
The short code after the domain is your postback key. Keitaro's documentation describes it as a unique identifier that authenticates incoming requests, so treat it like a password and don't post screenshots of it in chats.
In your CIPIAI account go to Tracking Tools → Postback → Global and paste the URL. Then replace every REPLACE with a CIPIAI token and add currency and event at the end:
https://your-tracker-domain/ef7e937/postback?subid={{click_id}}&status={{goal_status}}&payout={{payout}}¤cy={{currency}}&event={{event}}
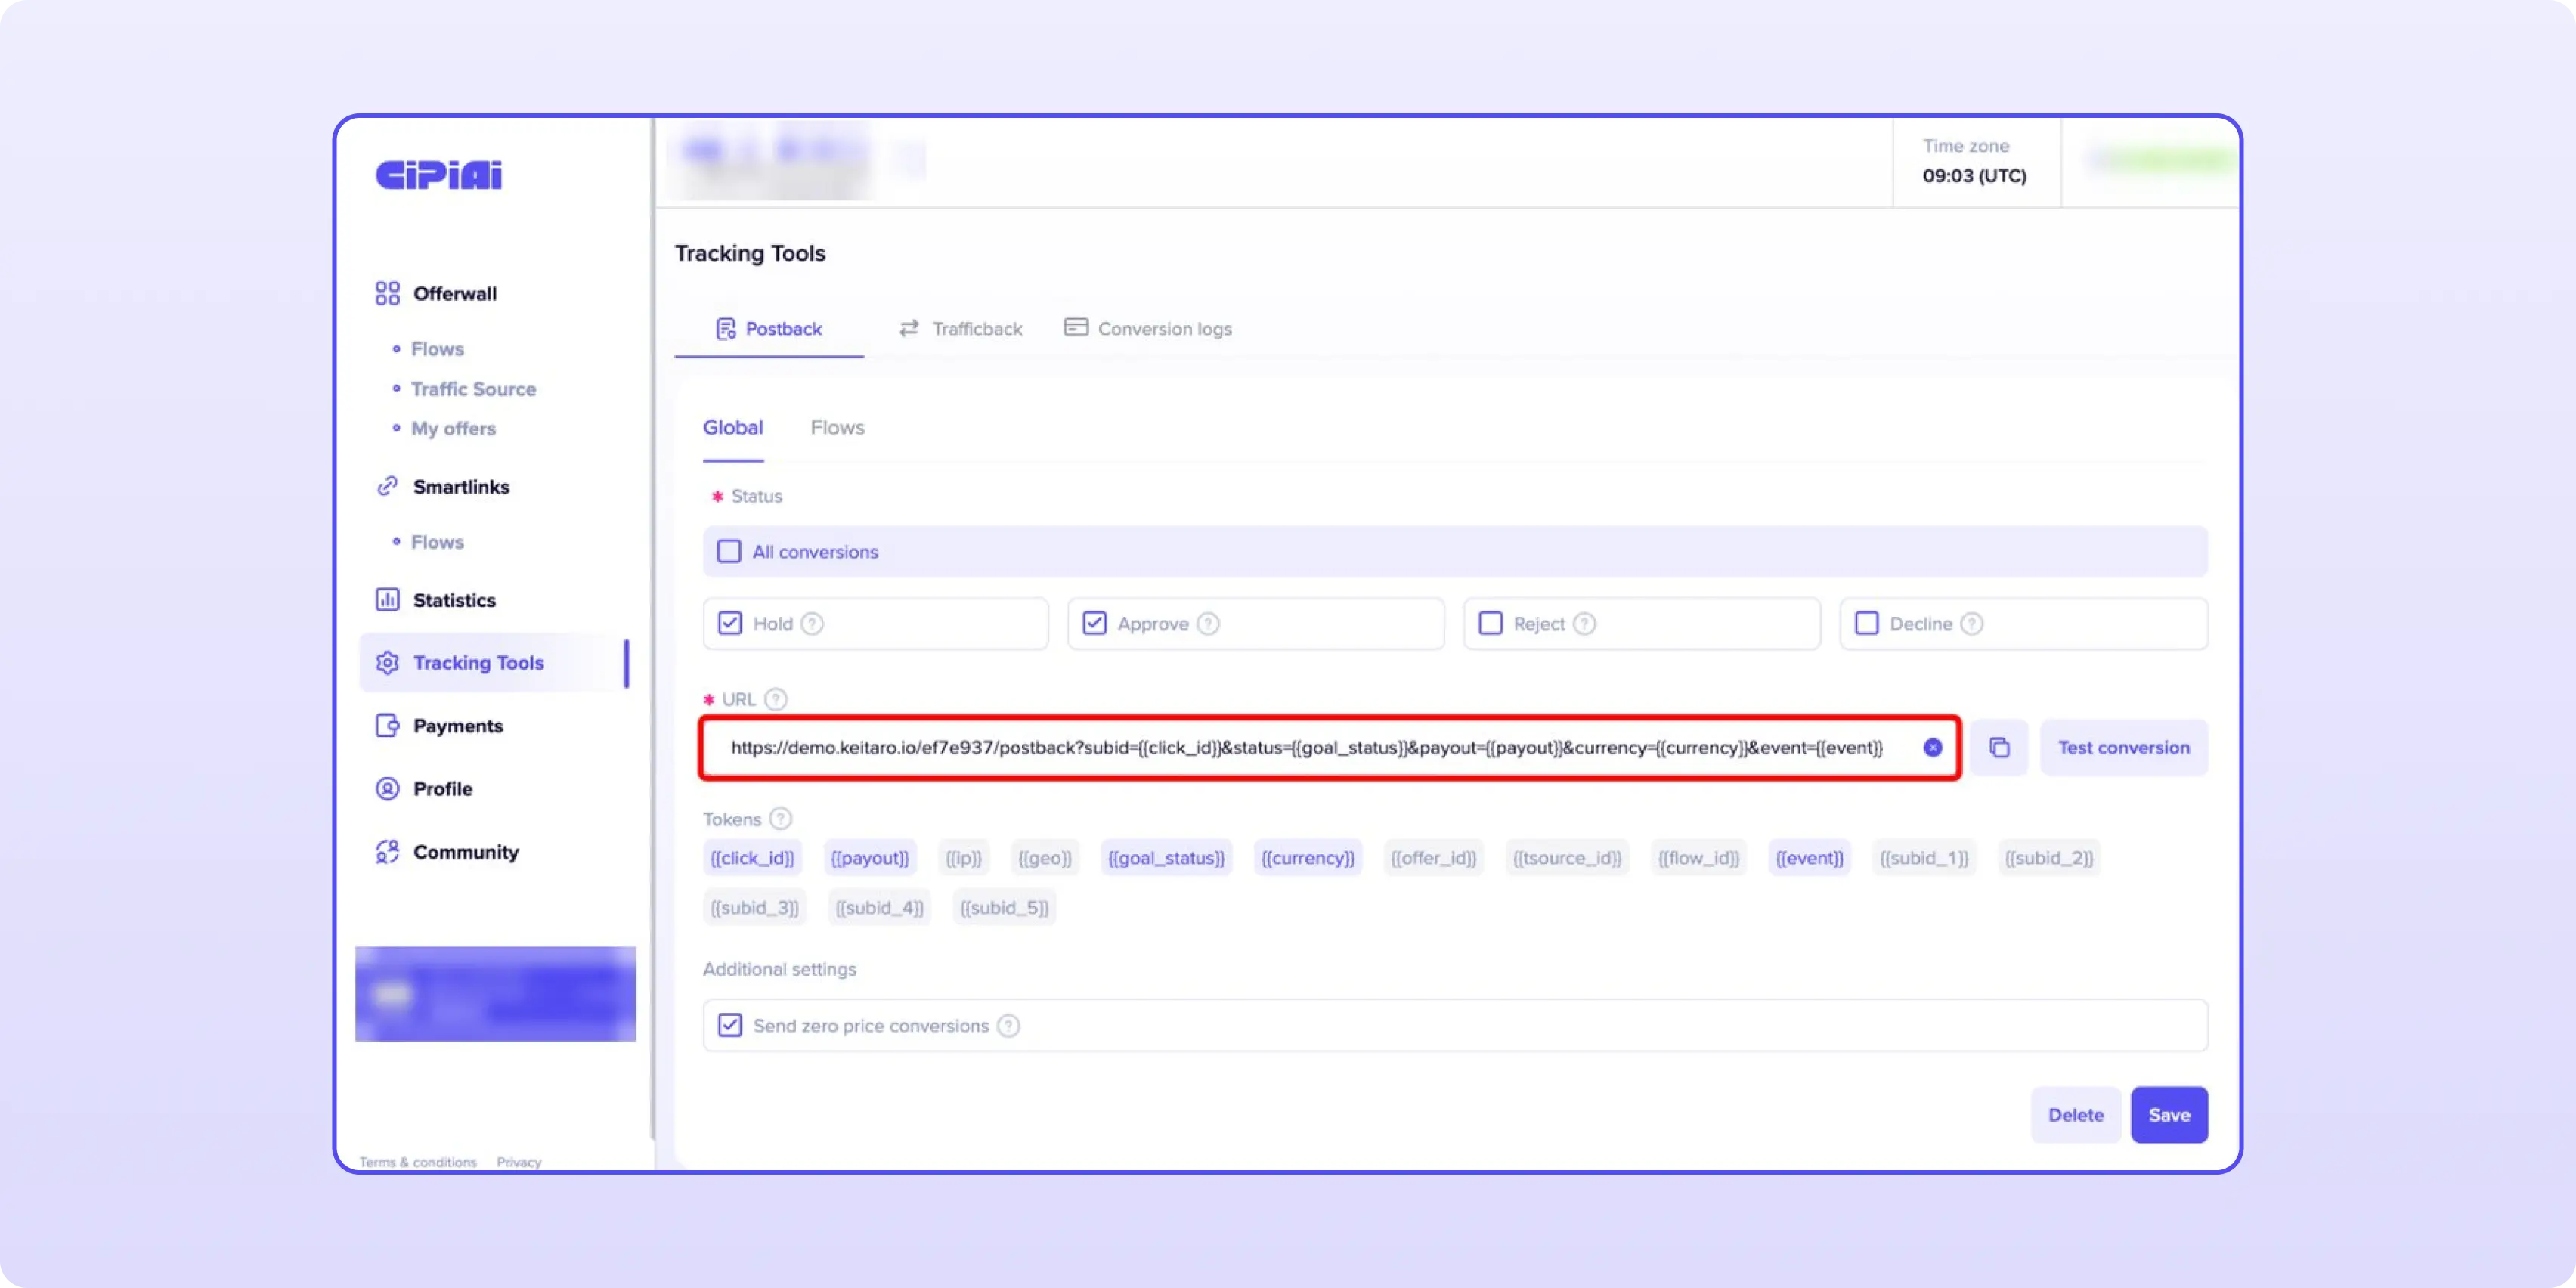
subid and status are the two parameters Keitaro can't work without. According to Keitaro's postback docs, a request with no status, or with a status the tracker doesn't recognise, gets ignored.
Next, pick which statuses CIPIAI should send. Tick Hold and Approve to see a conversion the moment it happens and again when it's confirmed. Tick Reject and Decline as well if you want declined conversions visible in Keitaro; for cutting weak zones that view is worth having.
Other tokens are available too ({{geo}}, {{offer_id}}, {{flow_id}}, {{subid_1}} to {{subid_5}}) if you want more fields in your tracker reports.
Click Test conversion next to the URL field. When CIPIAI gets a valid response from your tracker, it shows: "The postback is successfully configured. Click the 'Save' button." Click Save.
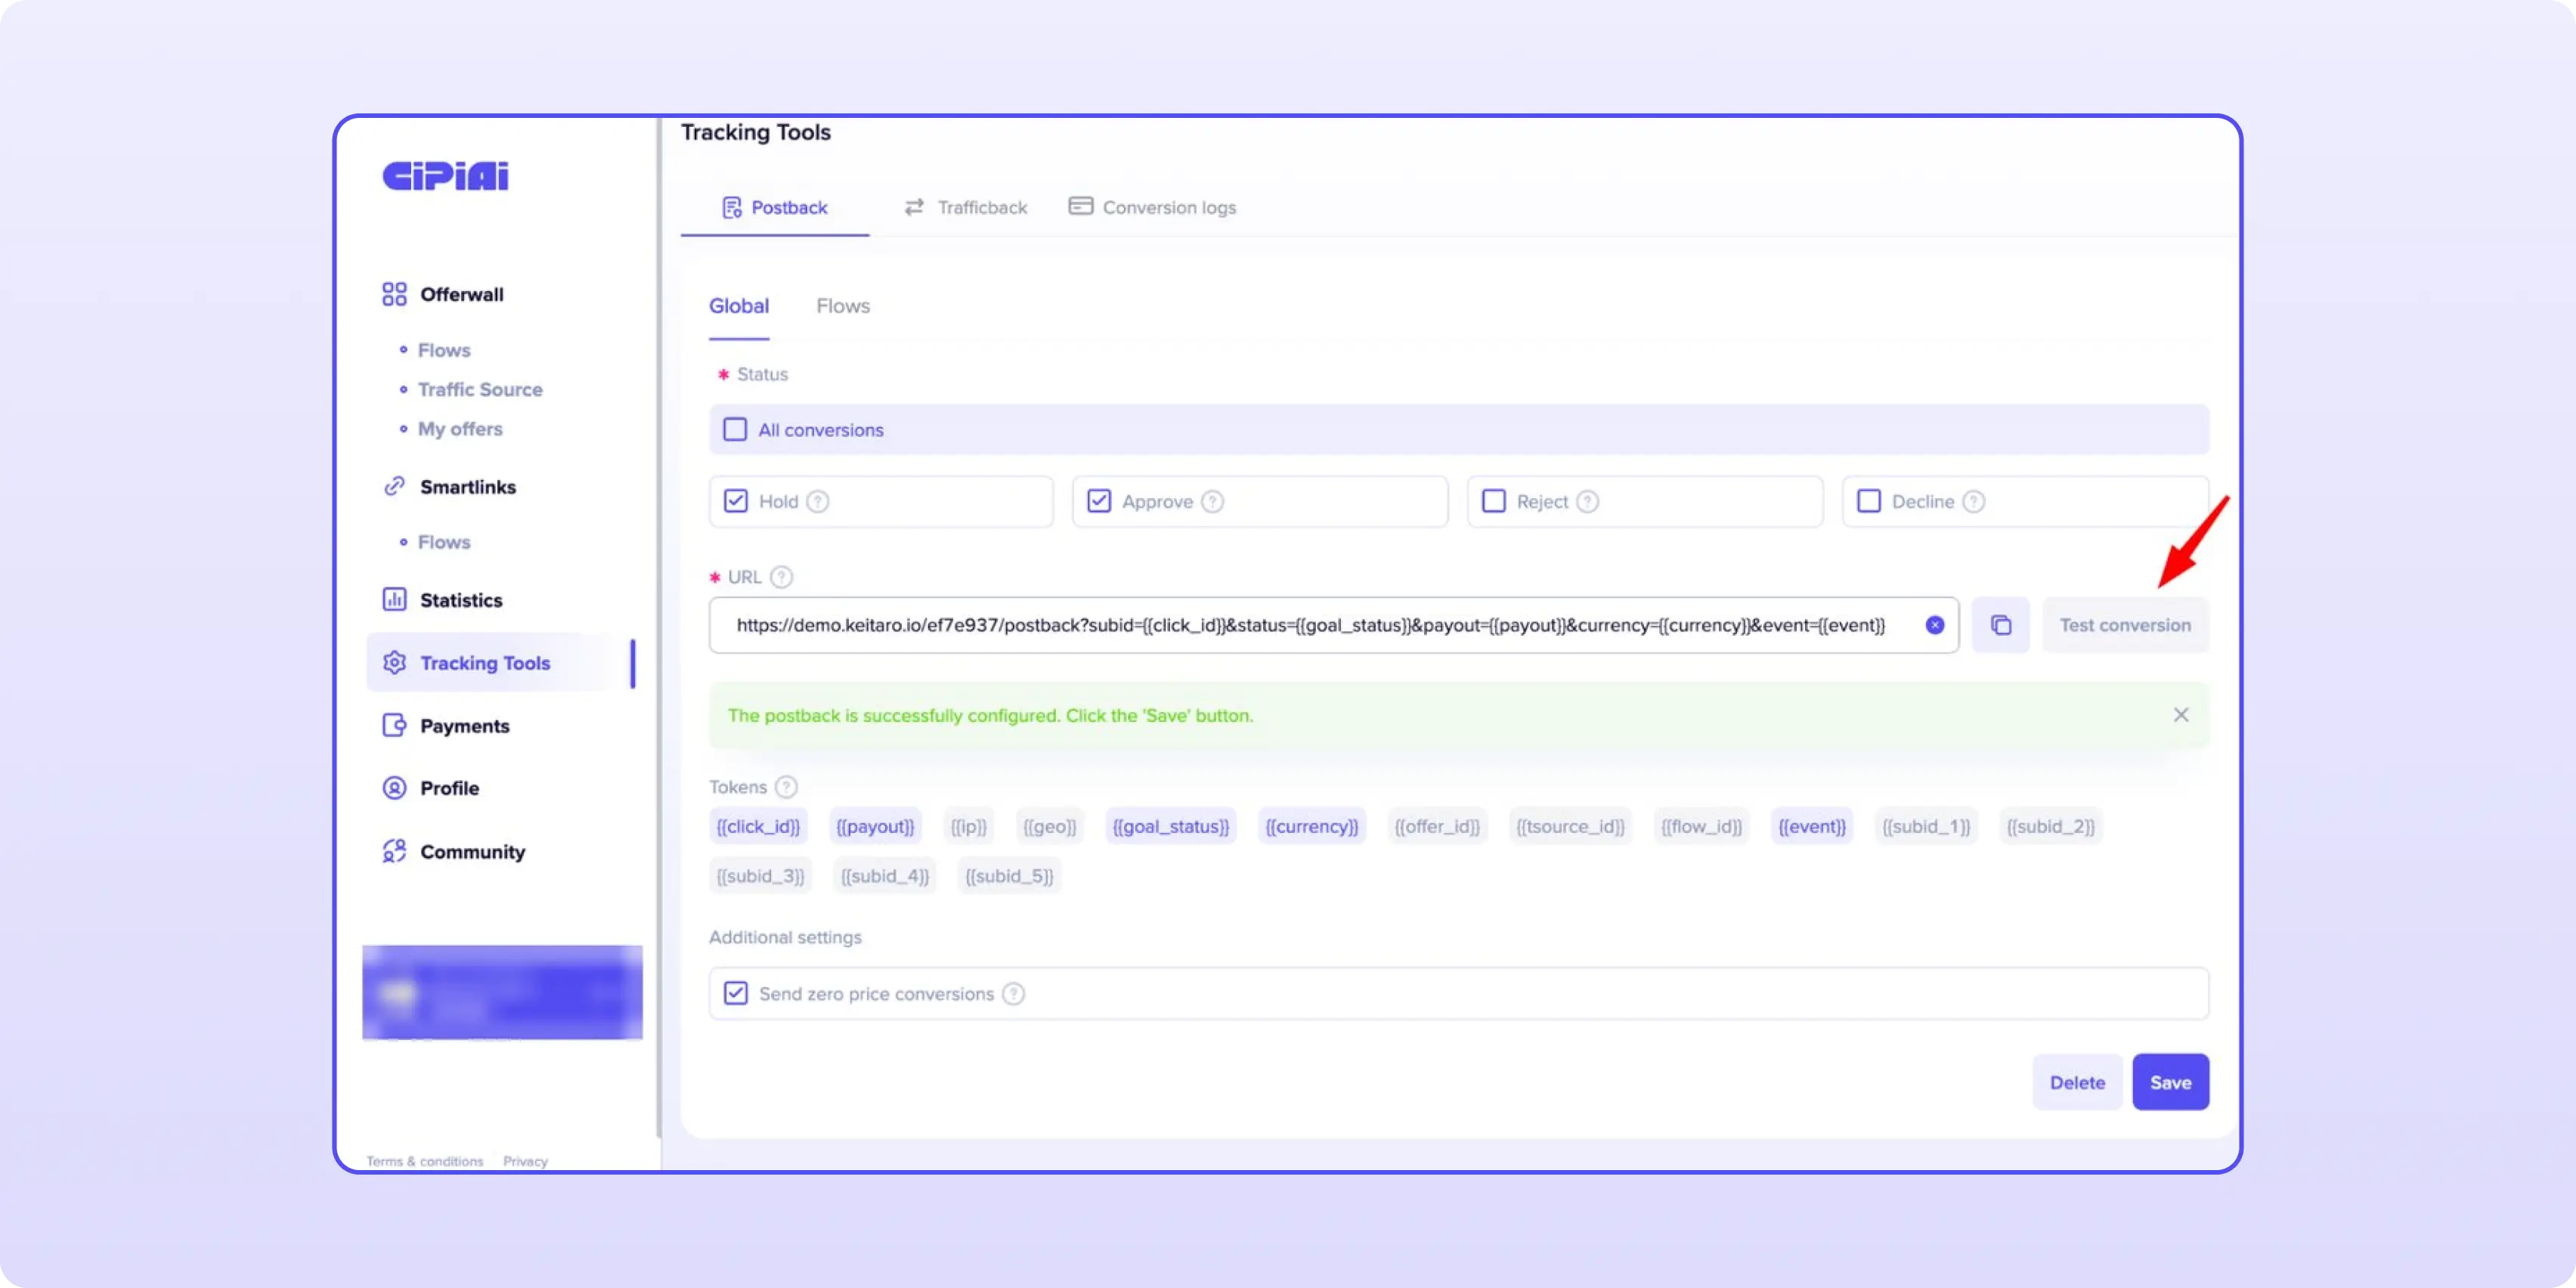
A green message here means Keitaro answered. It doesn't yet prove Keitaro recorded the conversion, so if the test never reaches your Keitaro reports, run the three checks below.
A flow is how CIPIAI ties one offer, one traffic source and one postback together.
1. Open Offerwall, pick the offer and start a new flow.
2. Choose an existing traffic source or create one (for example, Meta Ads).
3. Name the flow so you can find it later, e.g. "VPN US Meta Keitaro".
4. In the Postback field, select the global postback you saved in Step 2.
5. Optionally set a trafficback URL for traffic the offer doesn't accept.
6. Click Submit for moderation.
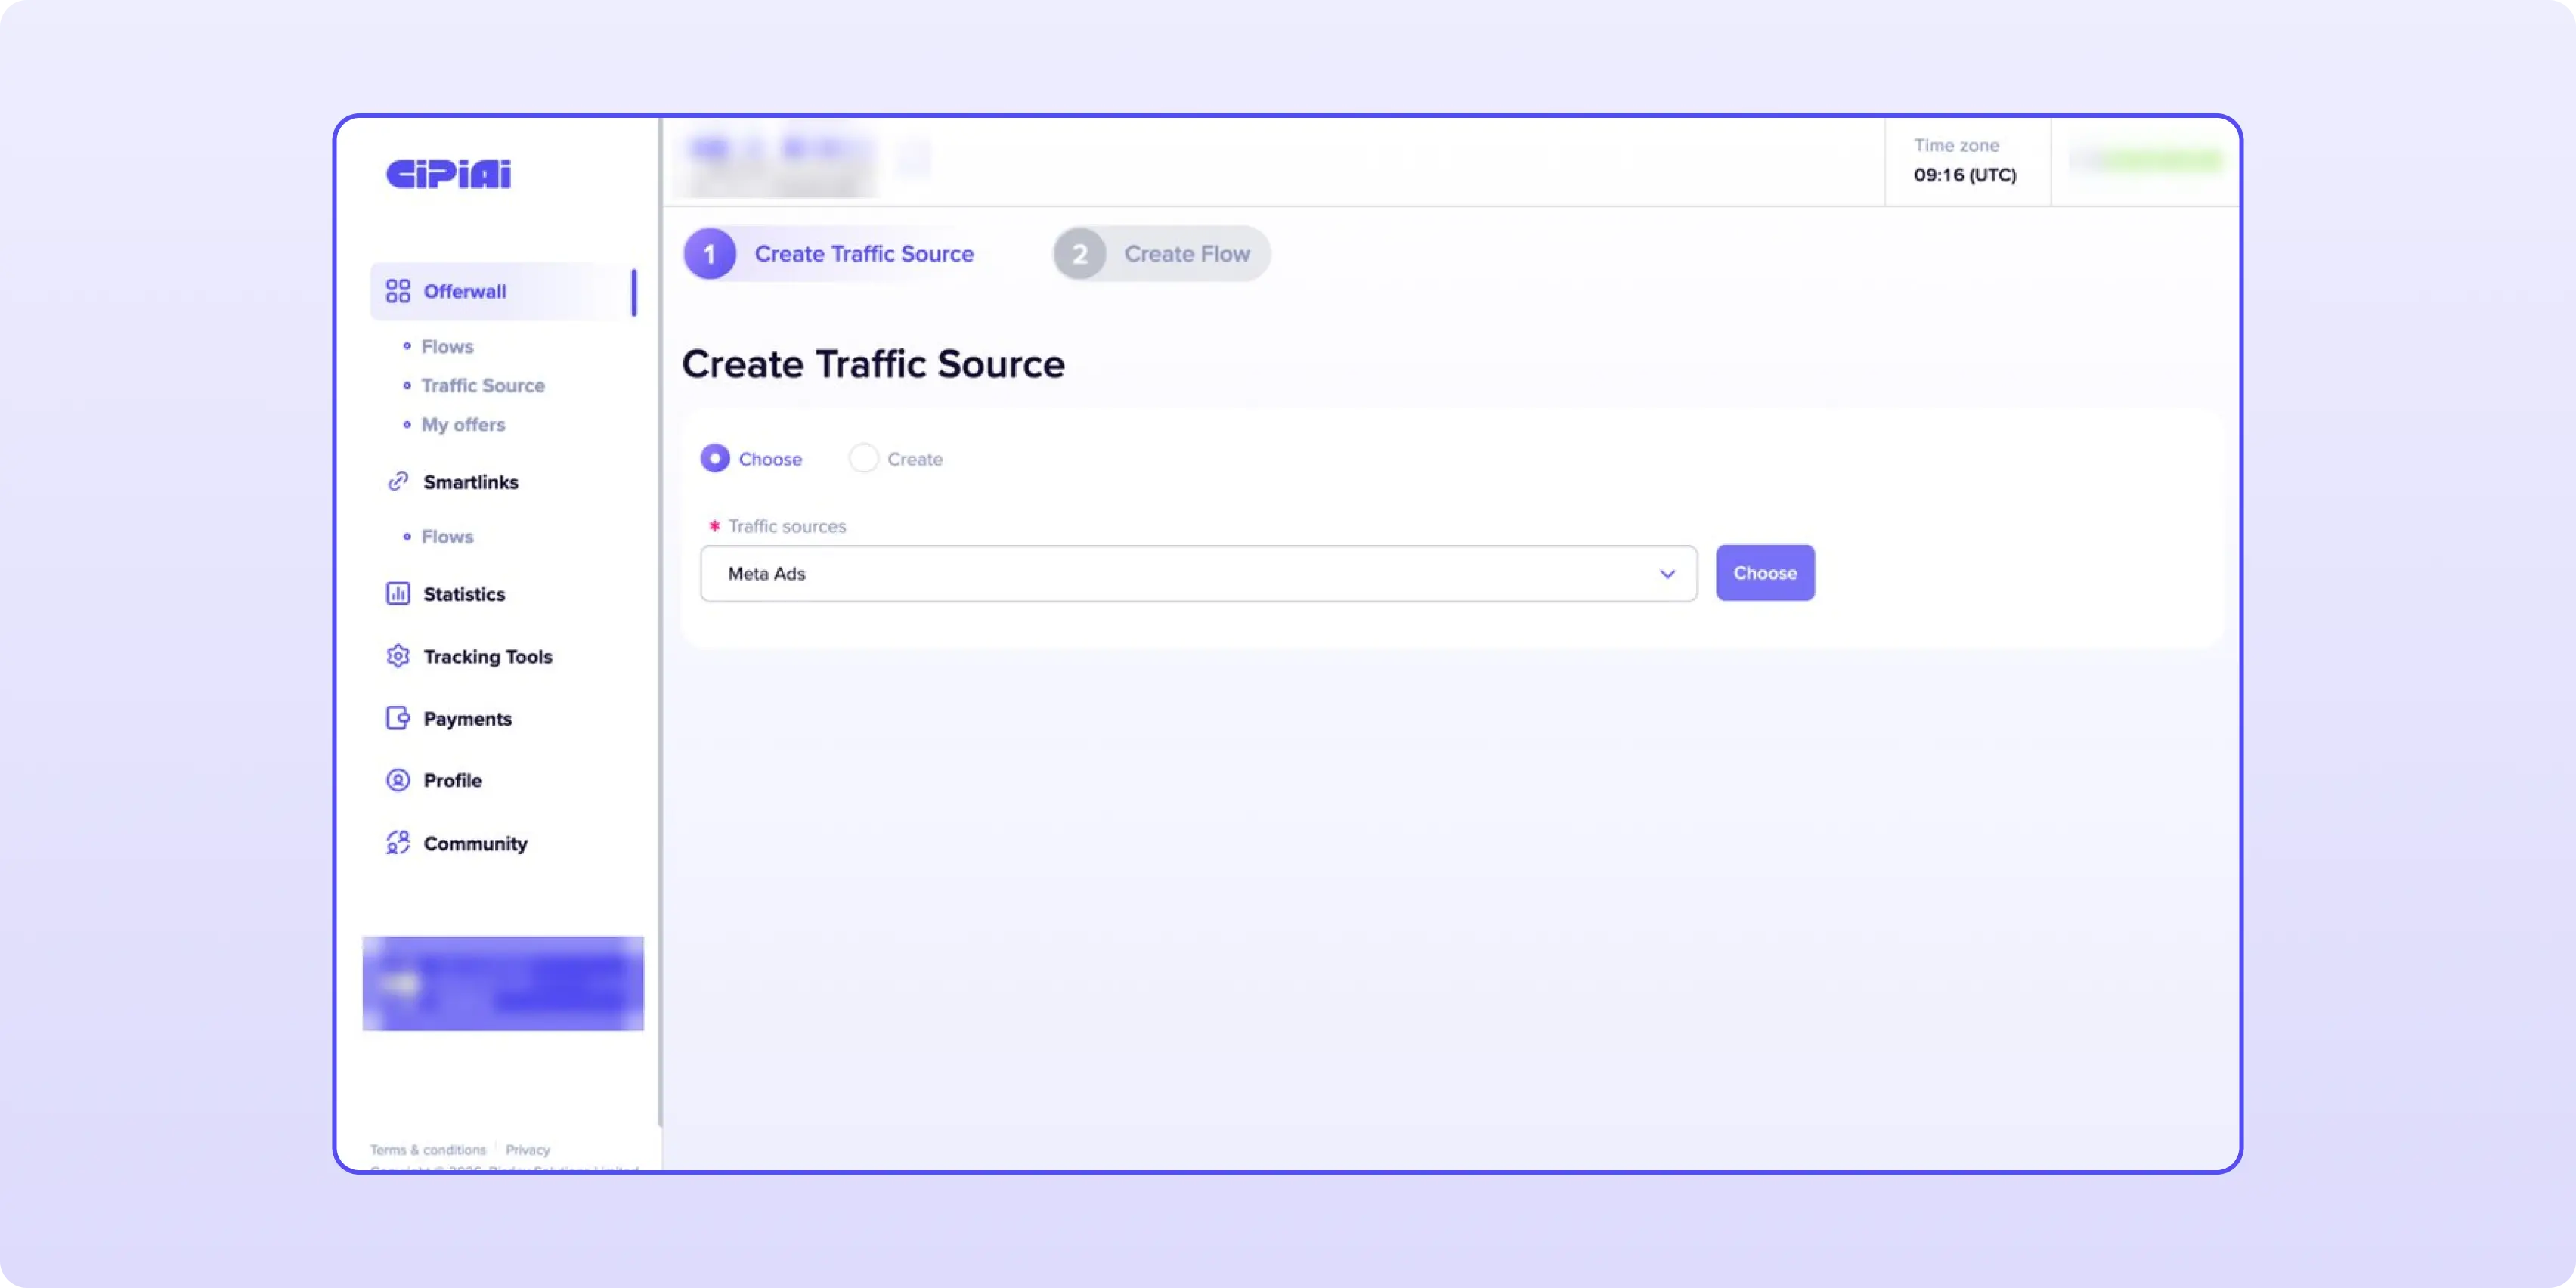
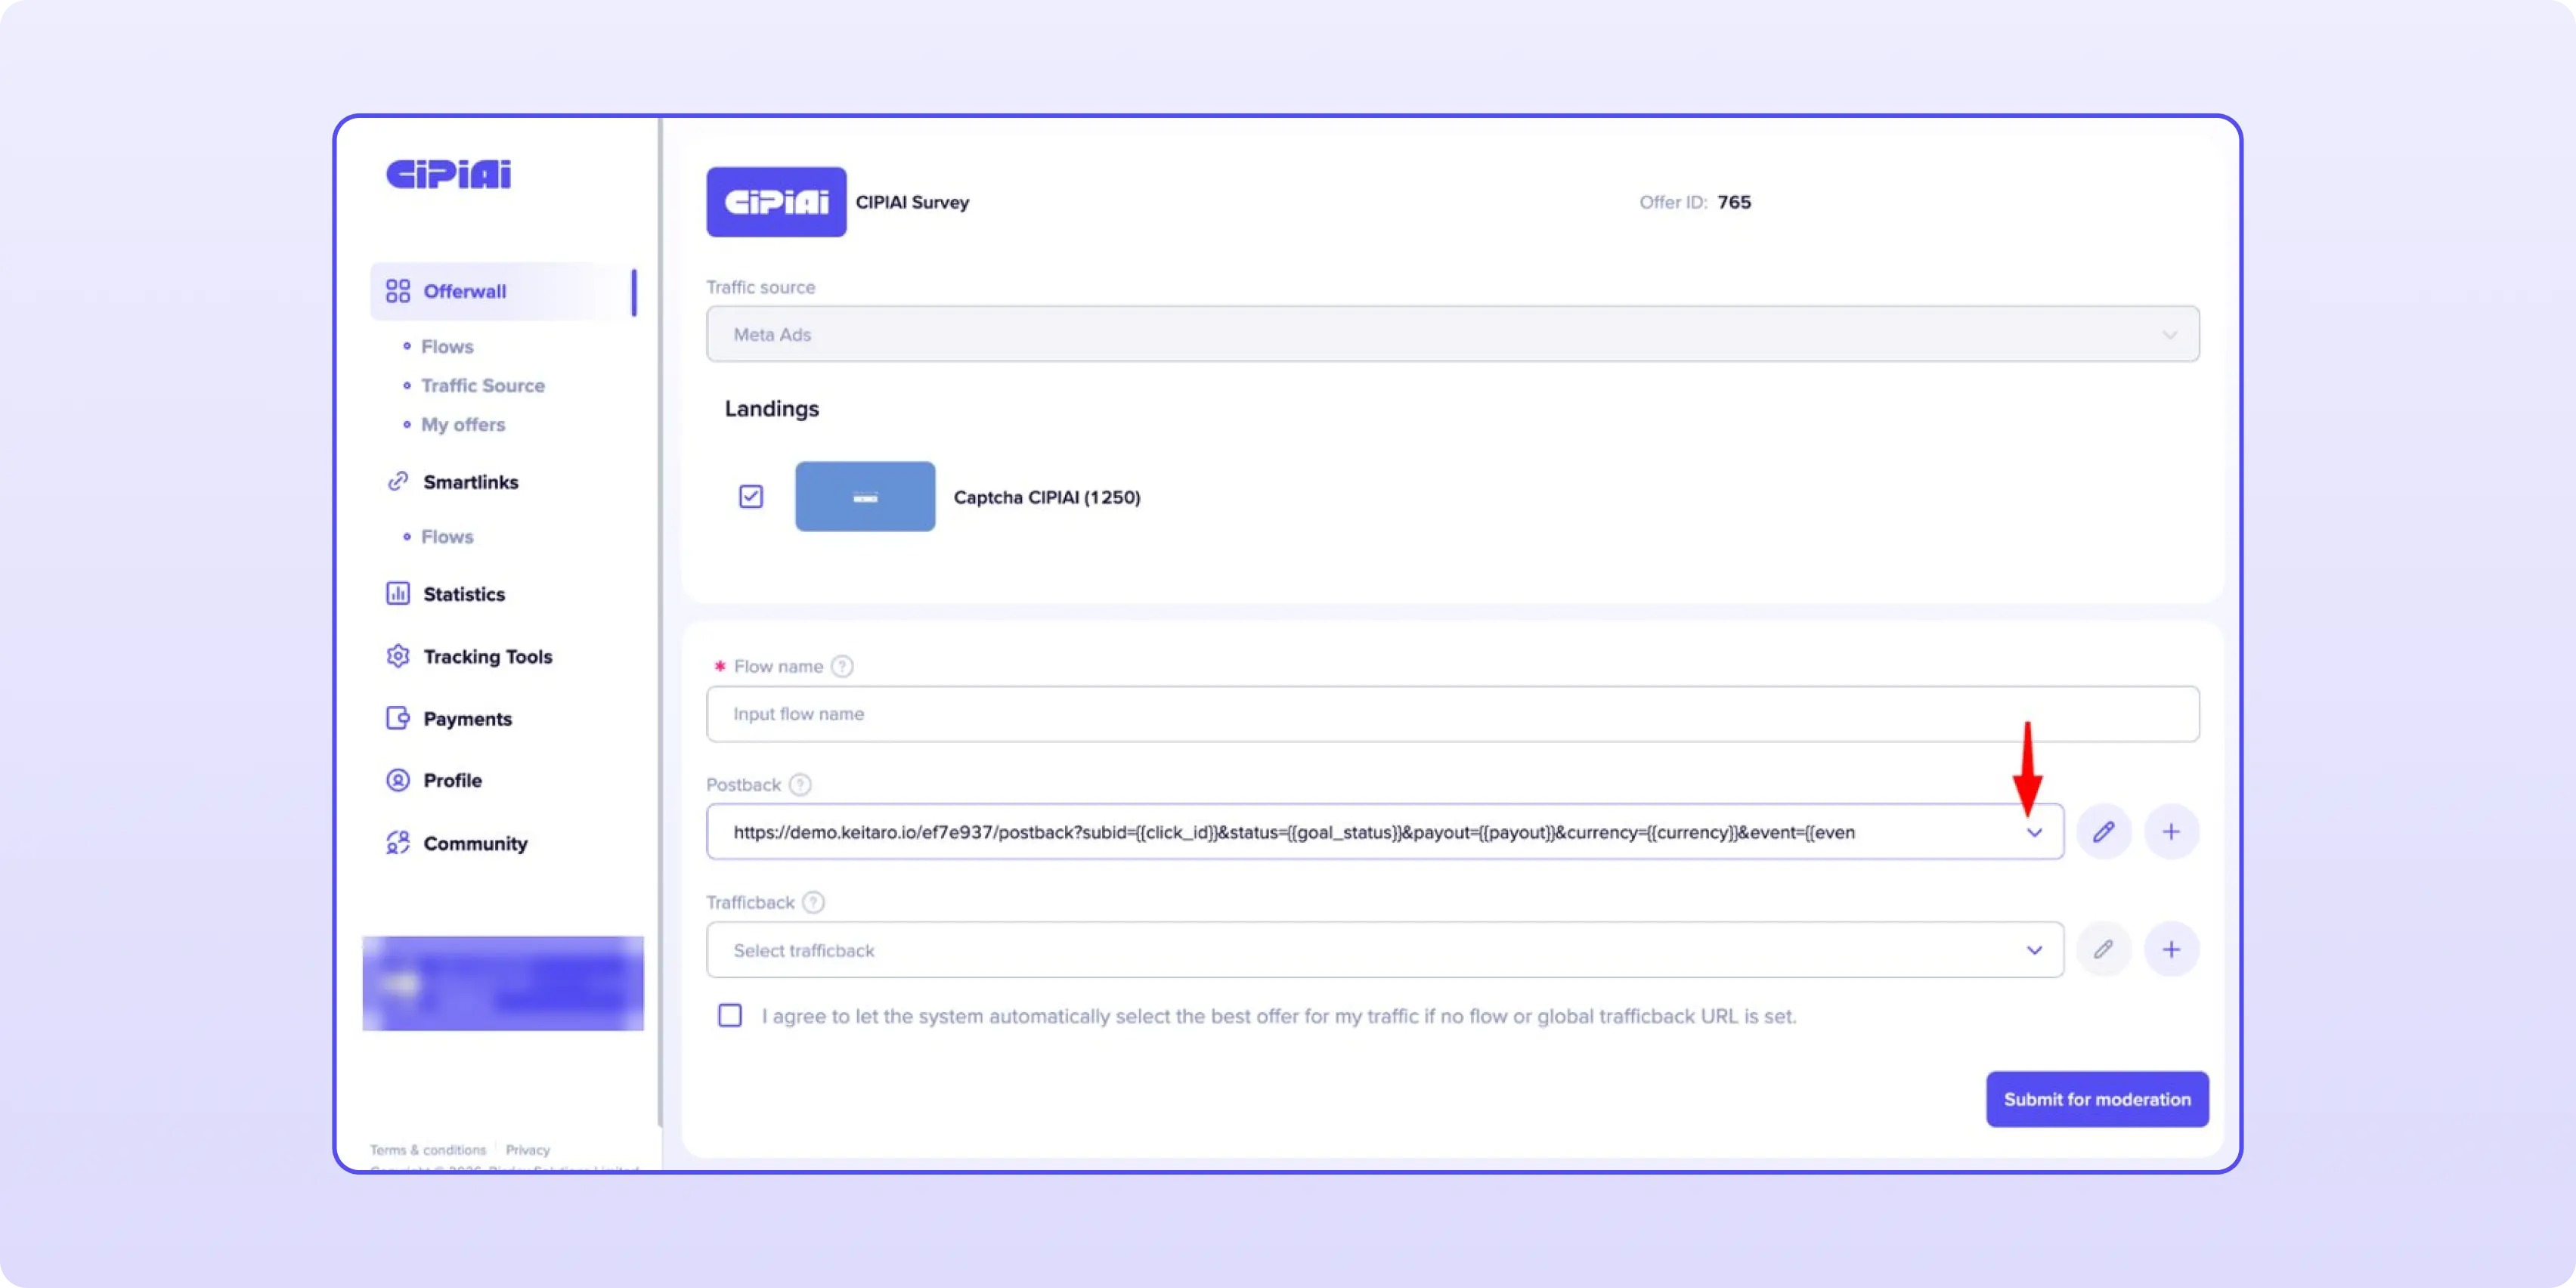
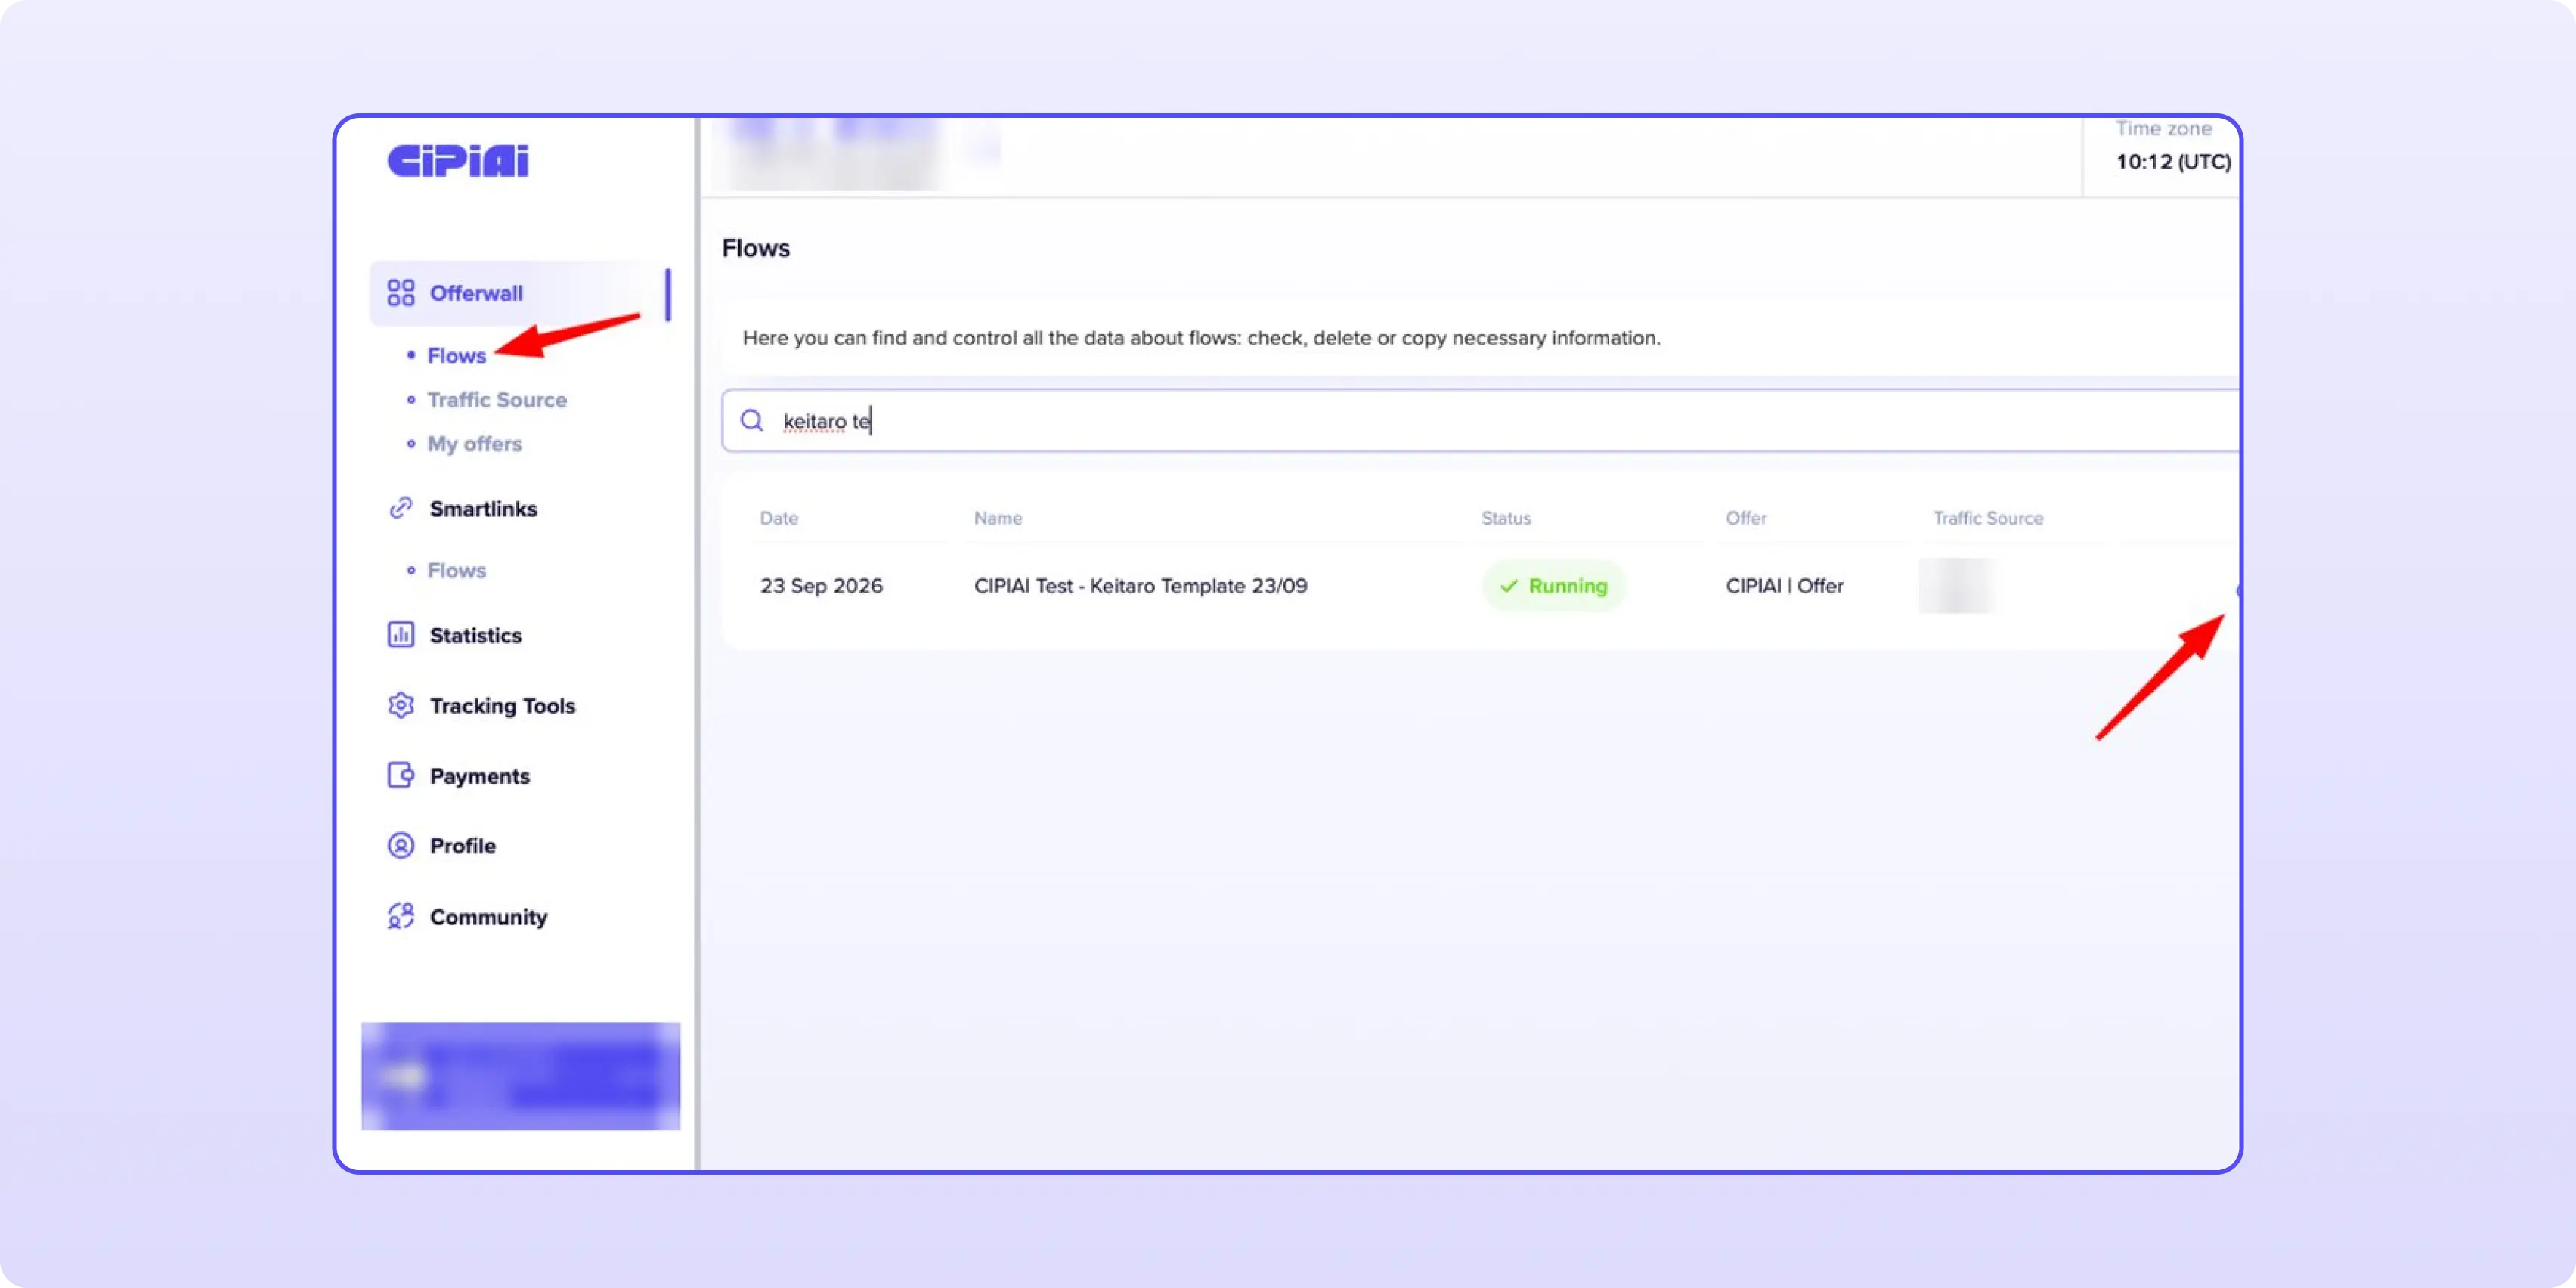
Once the flow is approved, go to Offerwall → Flows, find it by name and click the link icon to copy the tracking link. You'll need it in Step 6.
Go to Affiliate Networks → Create in Keitaro and select Cipiai.com from the Template list. The template fills in two fields for you:
click_id={subid}. Keitaro appends this to every CIPIAI offer URL, which is how your click ID reaches CIPIAI and comes back in the postback.
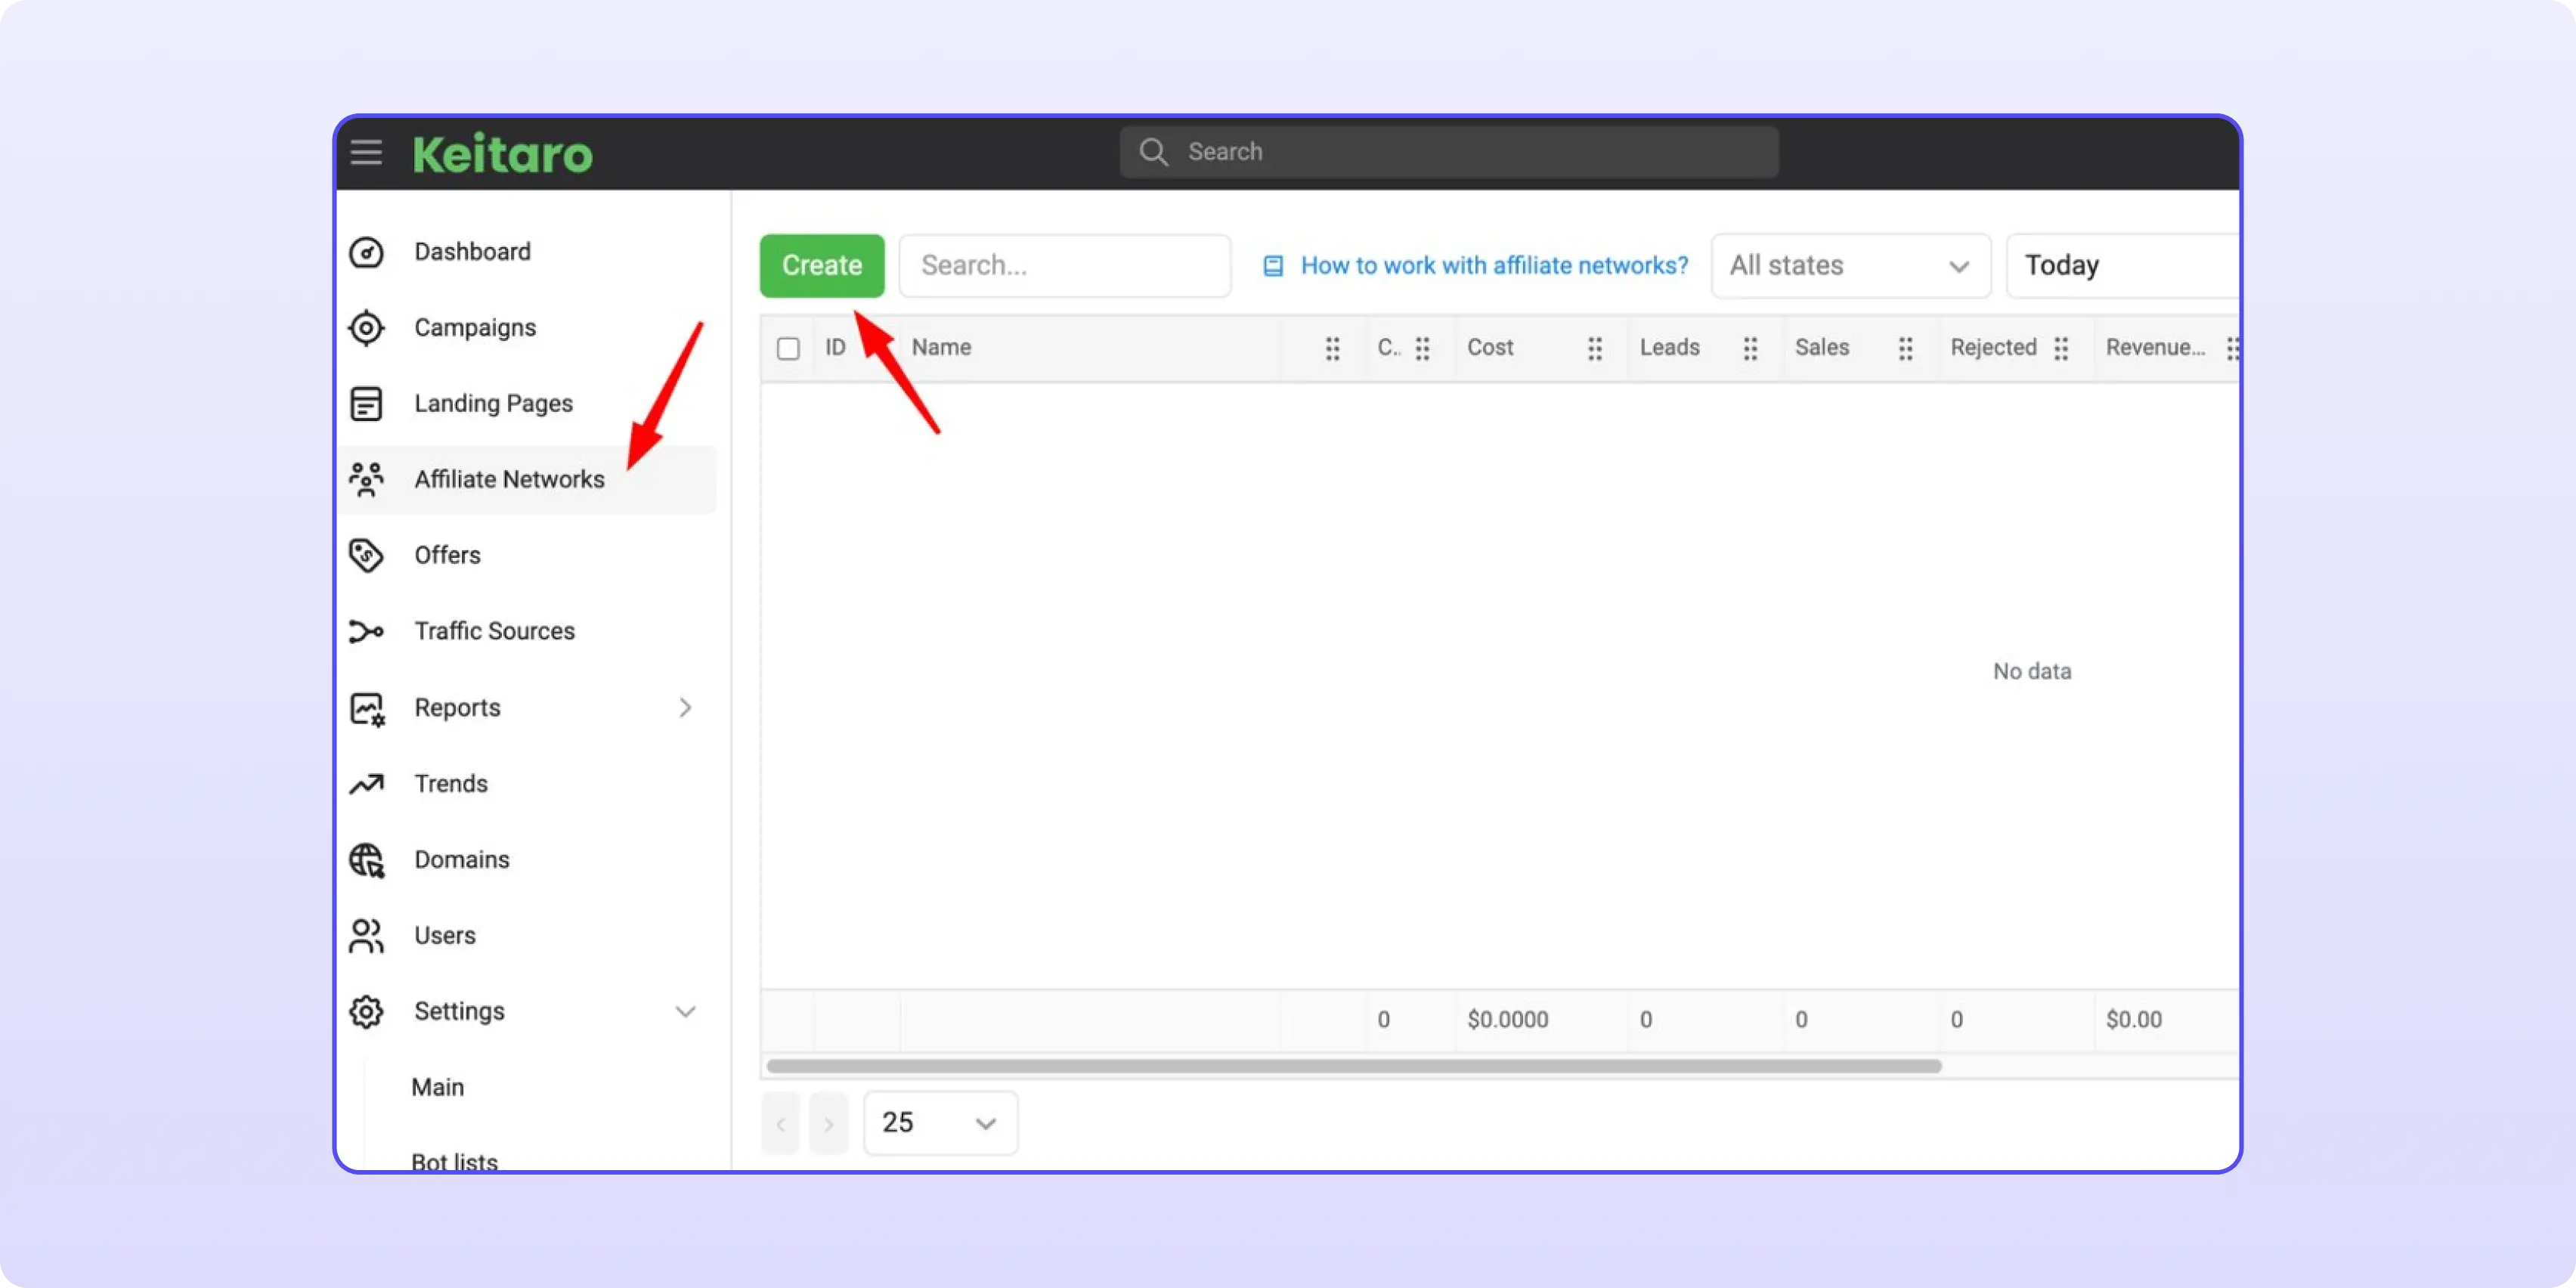
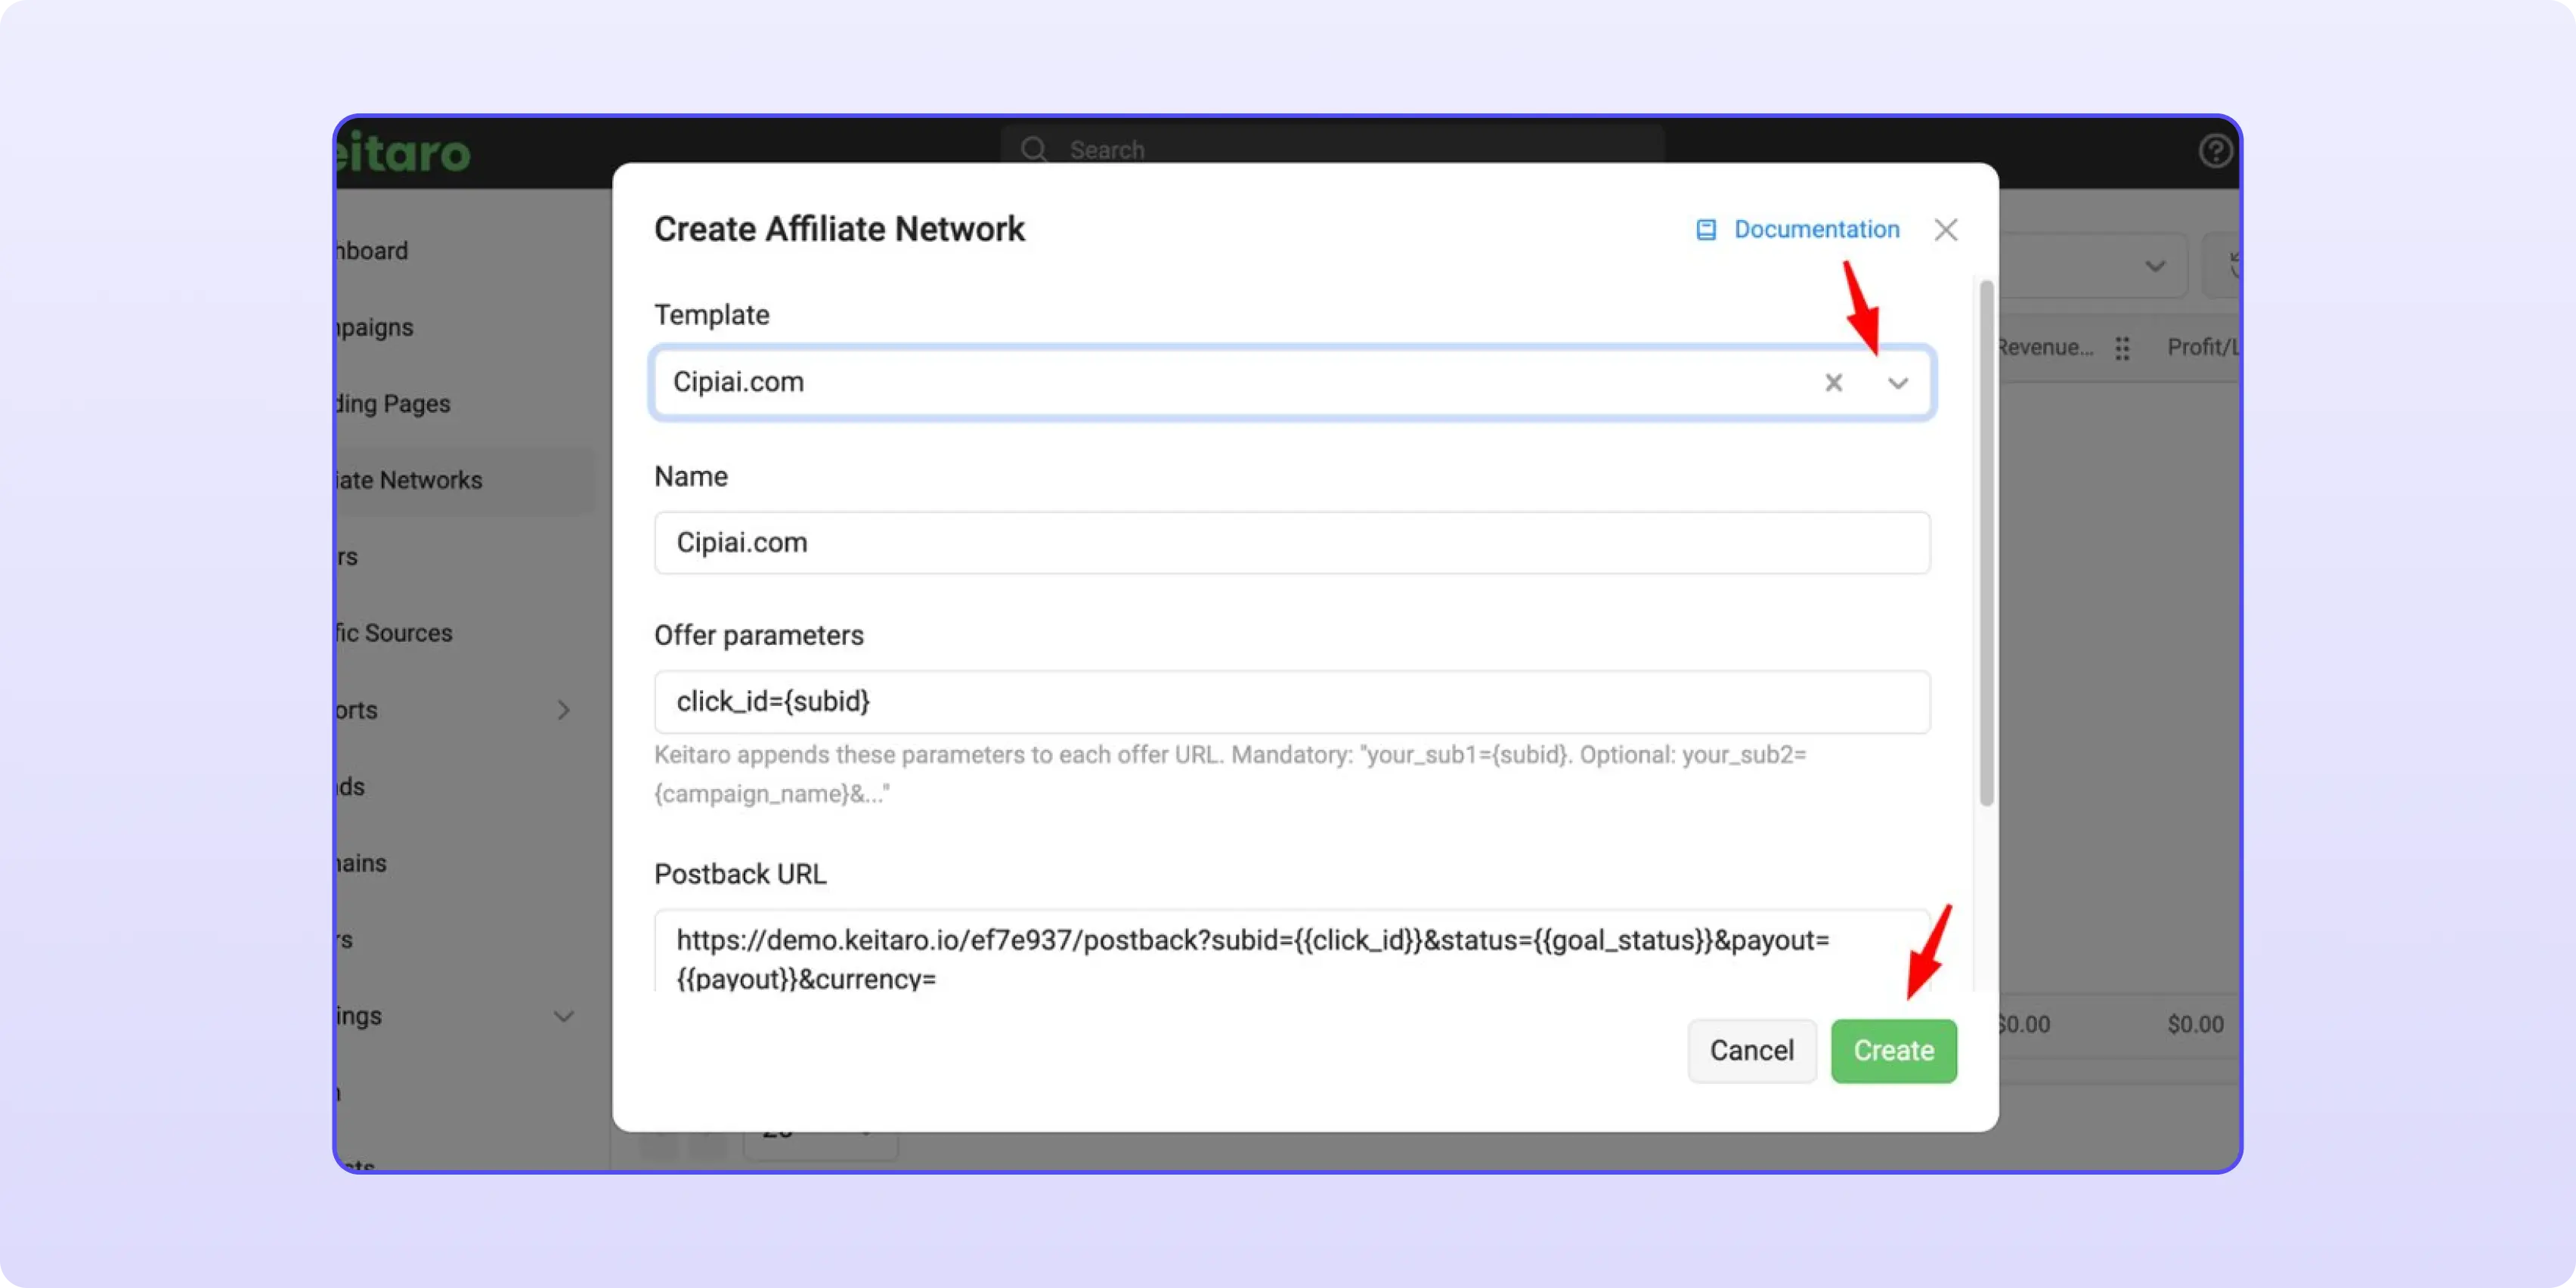
Click Create. You only do this once per Keitaro install.
Open Offers → Create and fill in:
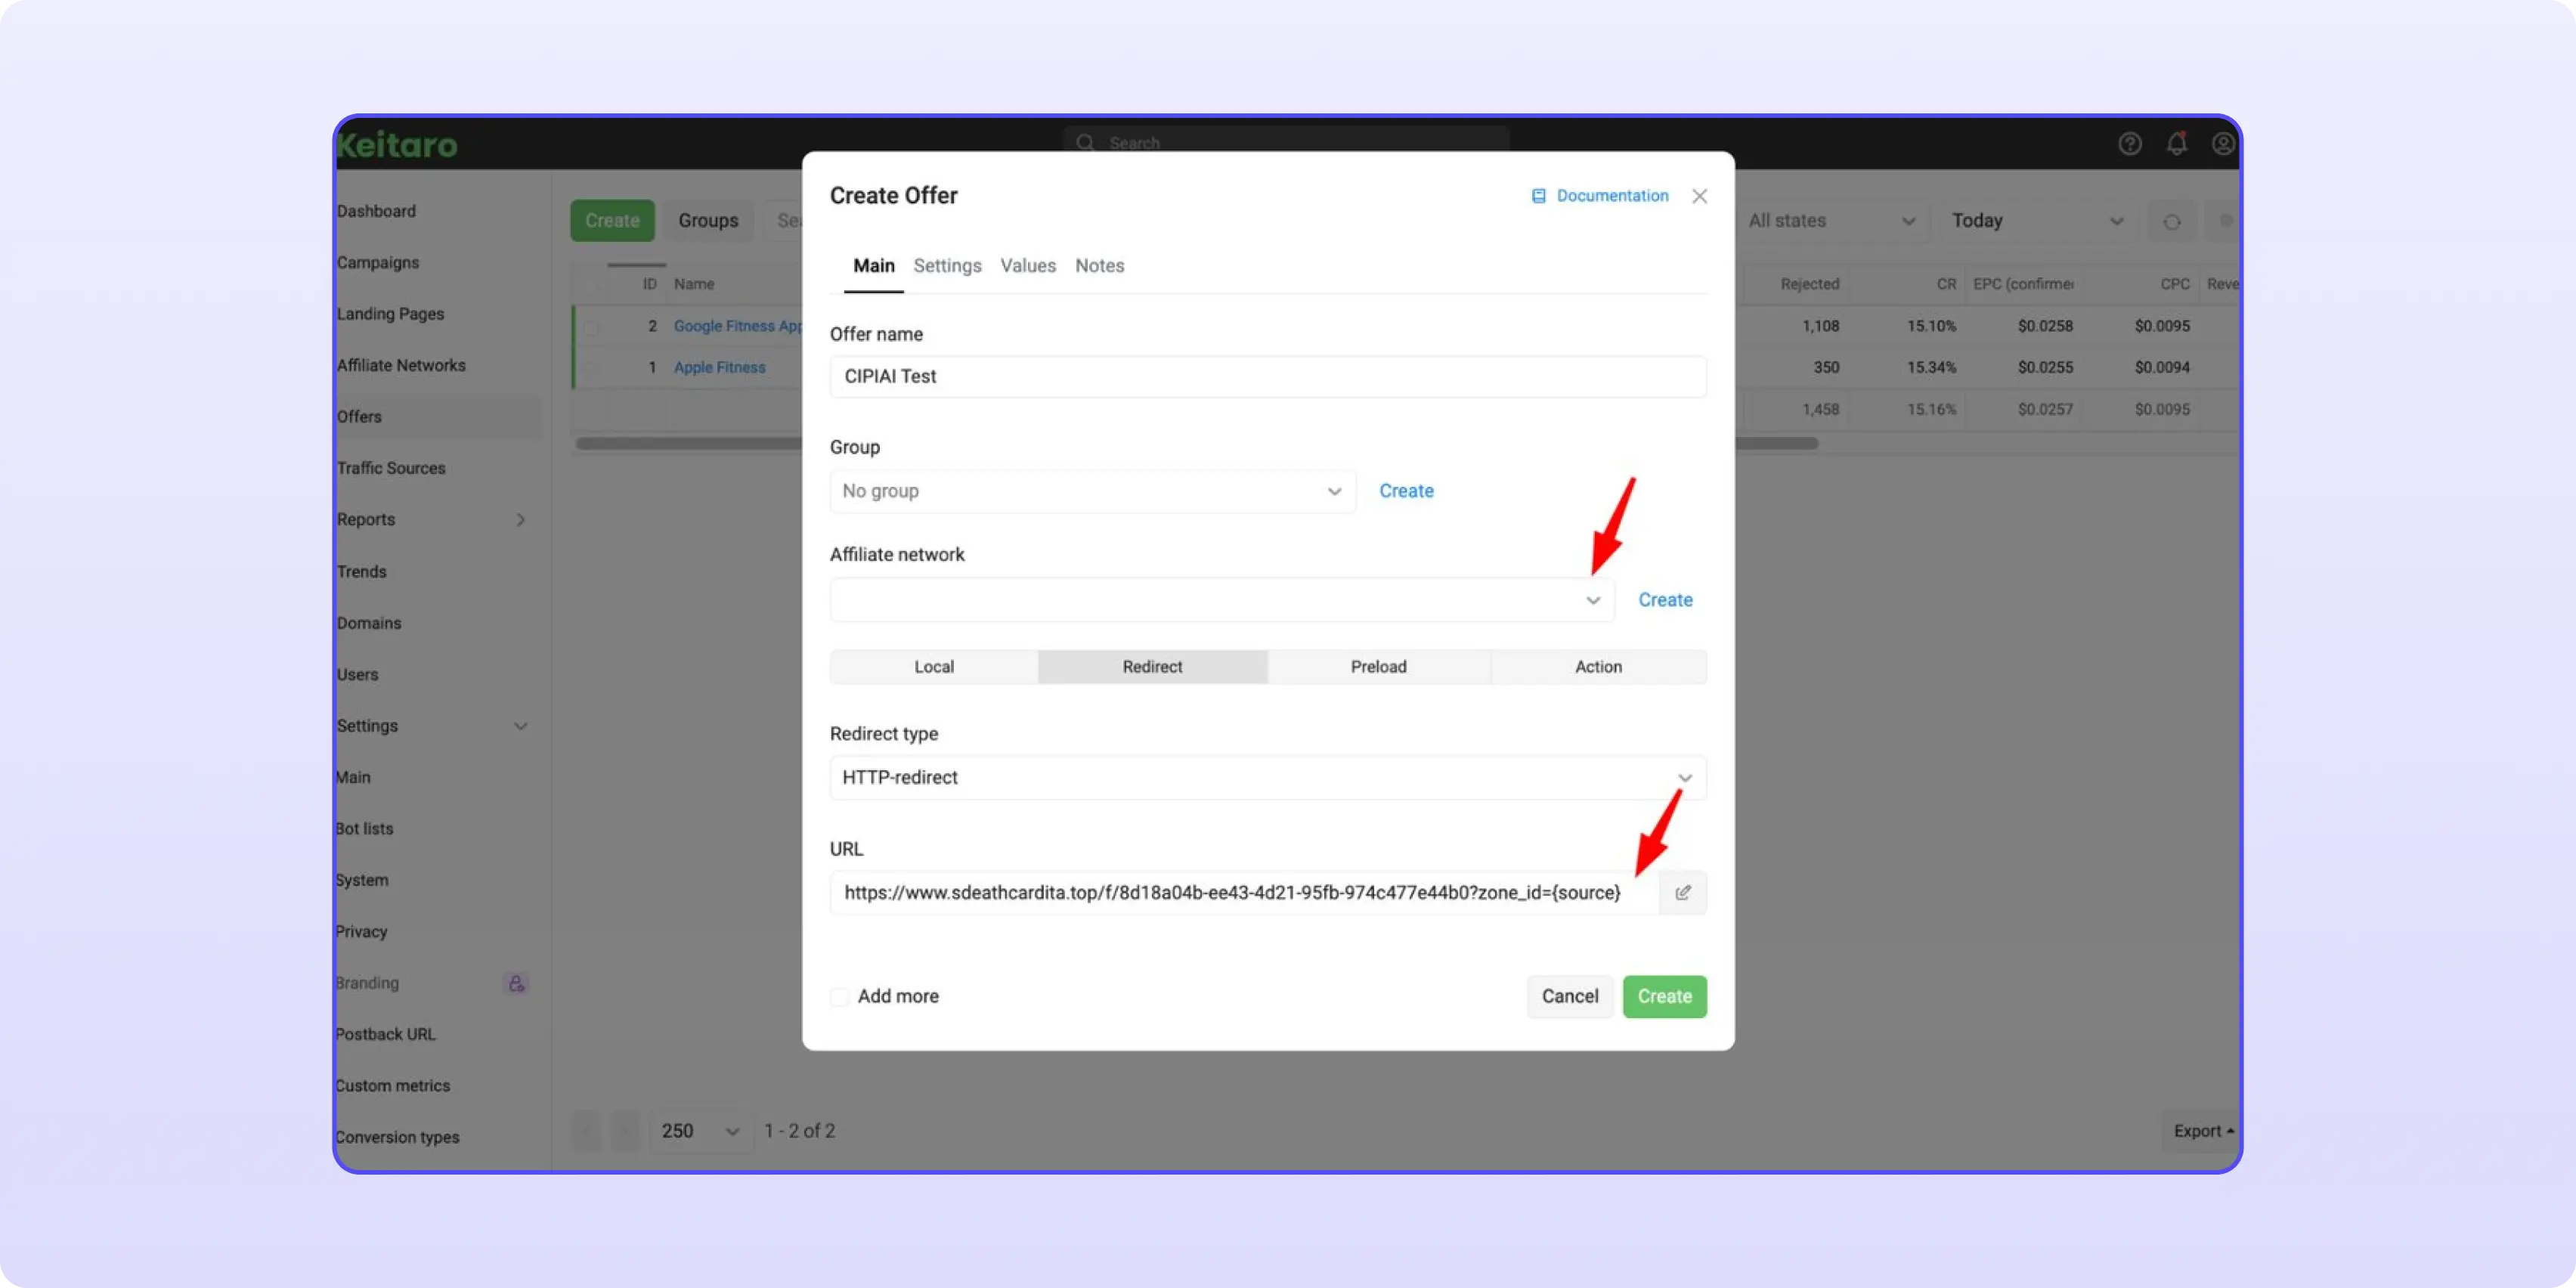
Add zone_id={source} to the end of the flow link so CIPIAI statistics show which zone, placement or publisher each conversion came from:
https://your-cipiai-flow-link/f/8d18a04b-...?zone_id={source}
If the flow link already contains a ?, join the parameter with & instead.
{source} is a Keitaro macro that takes whatever your traffic source template puts in its Site parameter. In the PropellerAds template, for example, Site is mapped as source={zoneid}, so {source} resolves to the PropellerAds zone ID. Other sources name this differently; open Traffic Sources, edit your source and check which network macro sits in the Site row.
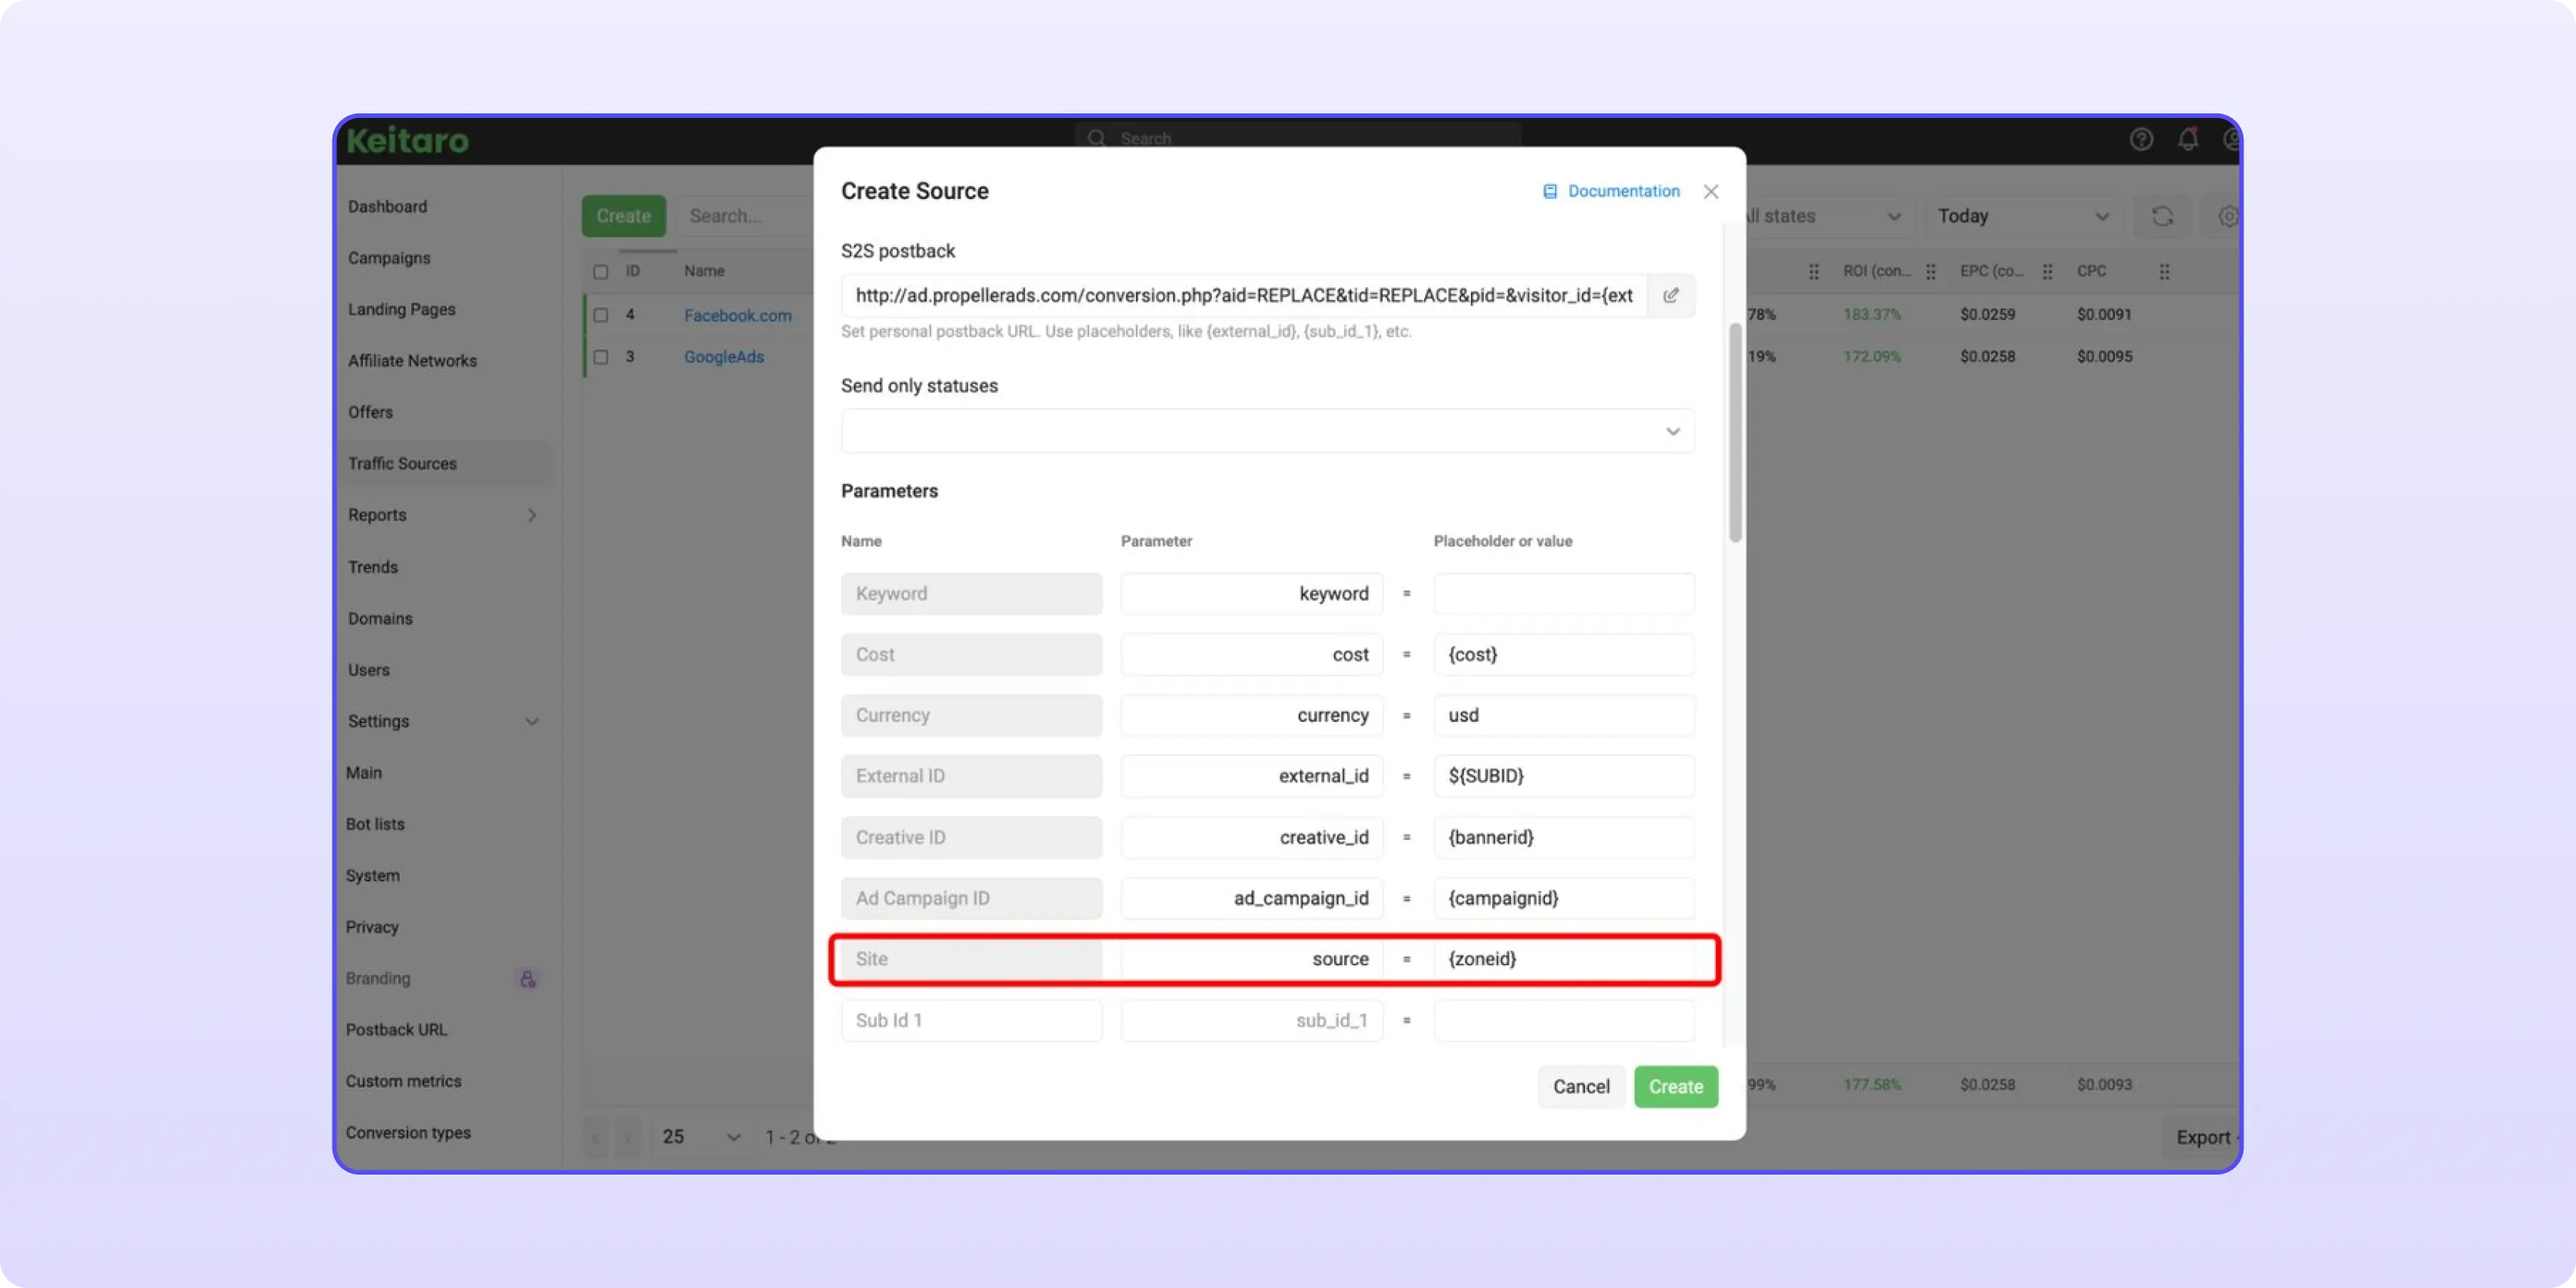
On pop and push traffic, zone-level data is what lets you blacklist losing zones quickly, which our popunder ads guide covers in more detail.
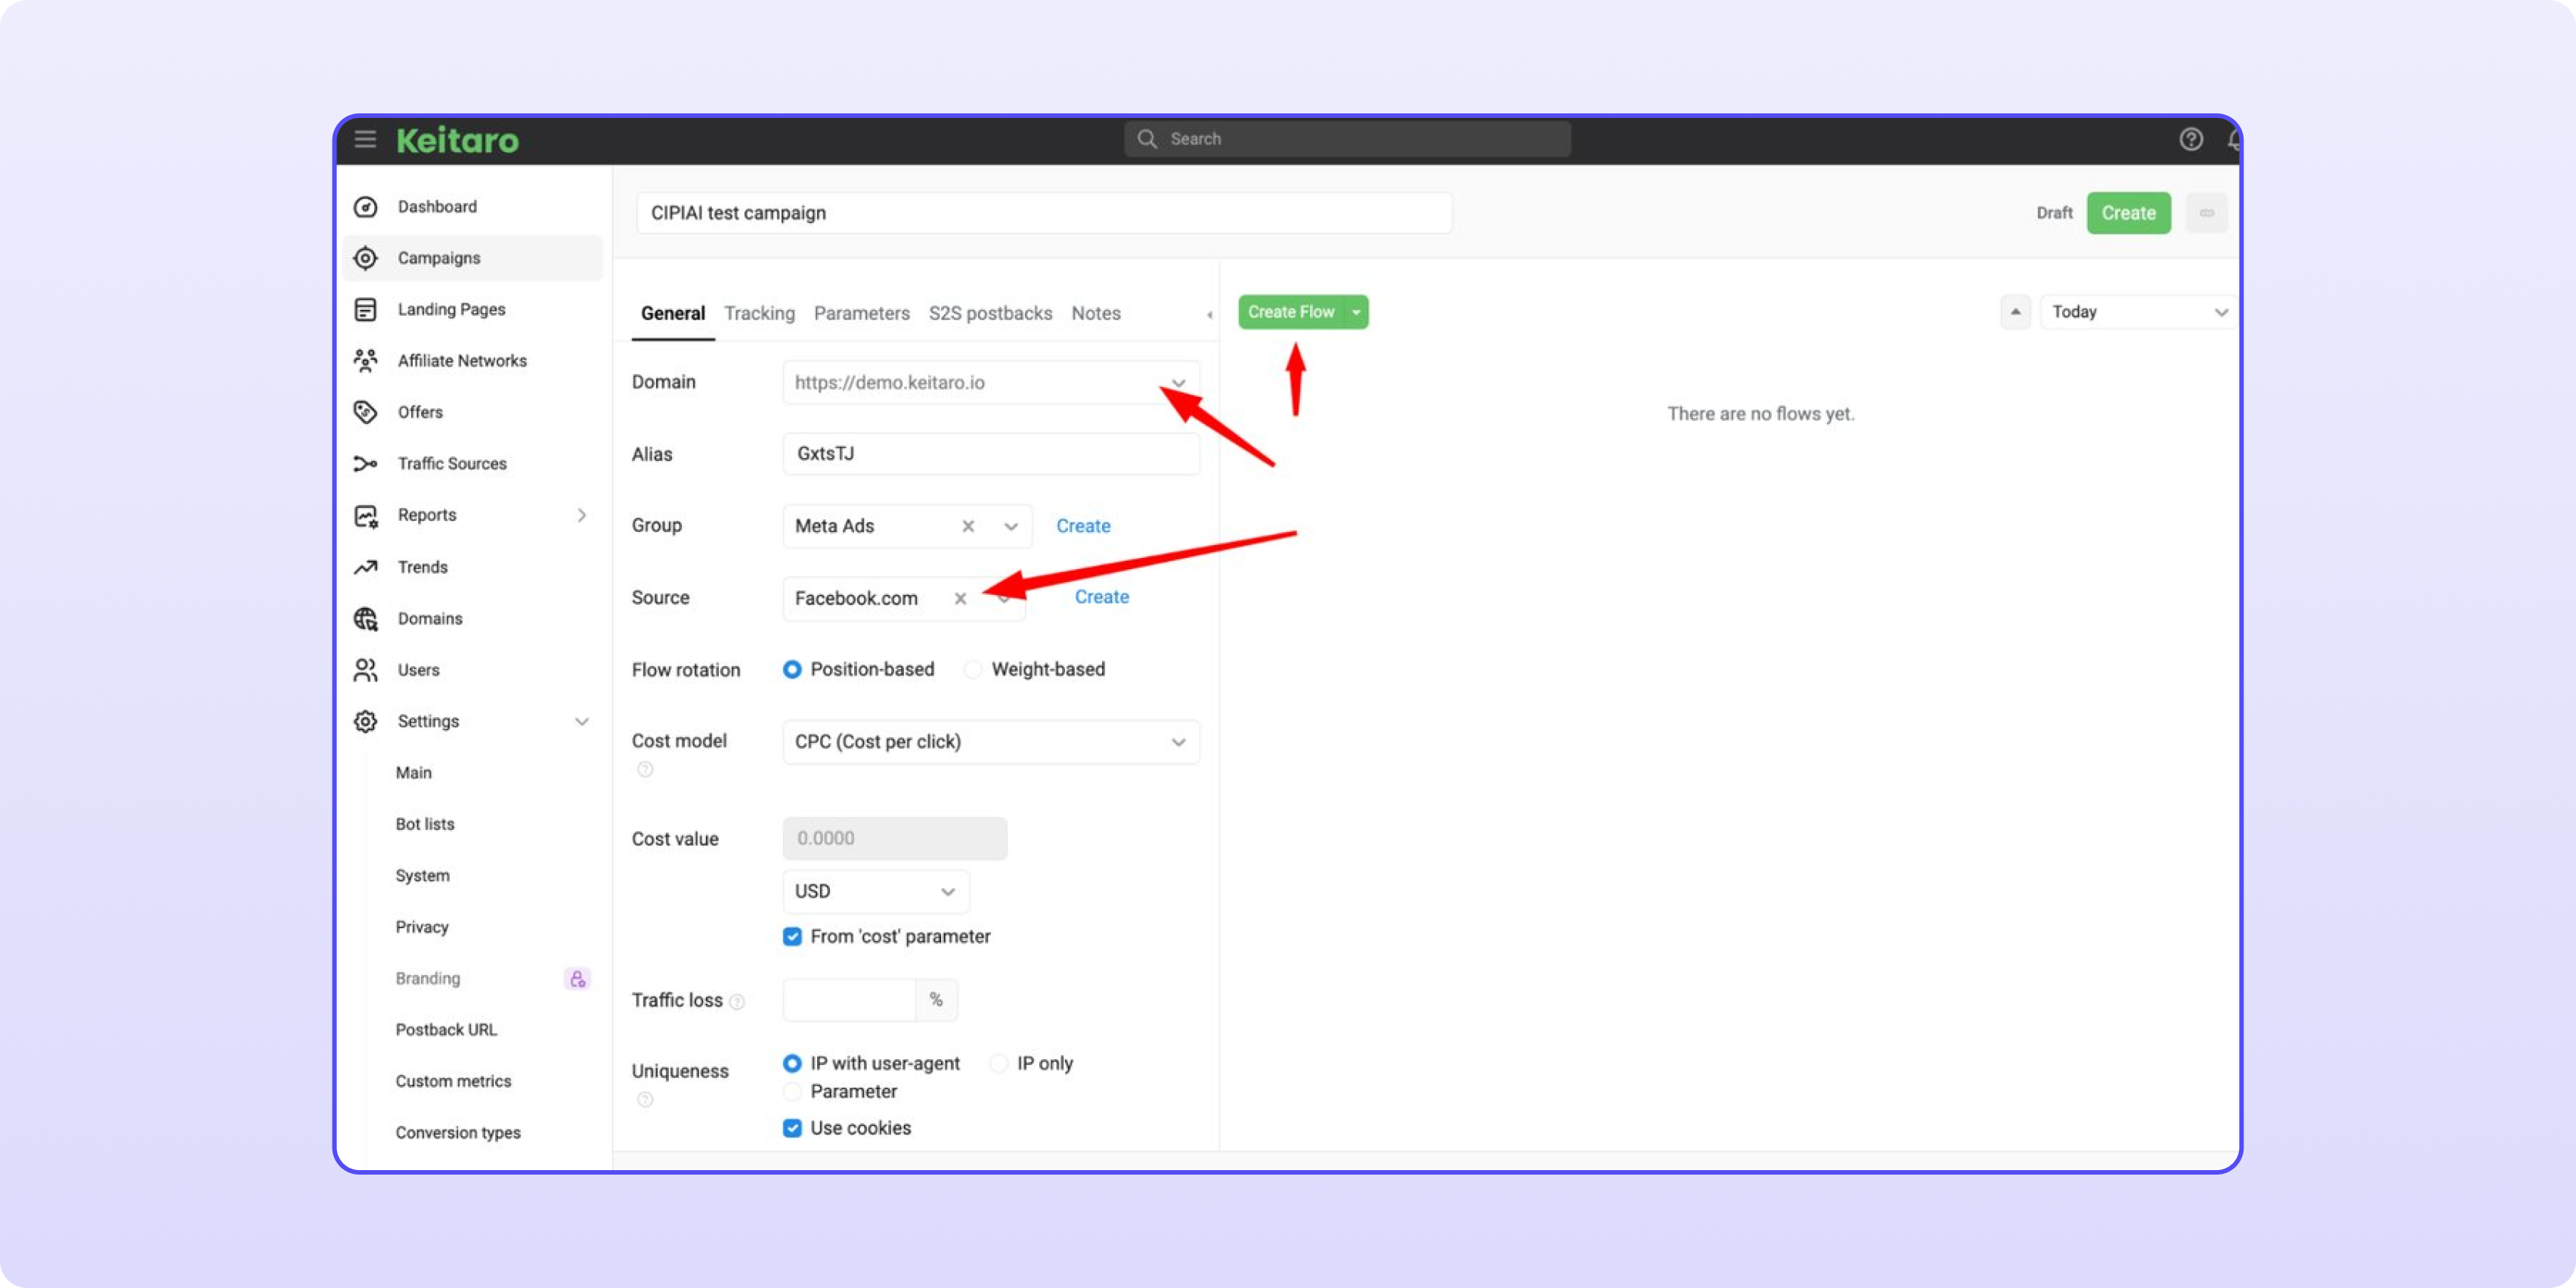
1. Go to Campaigns → Create.
2. Enter a campaign name, pick your tracking domain, and select the source you'll run.
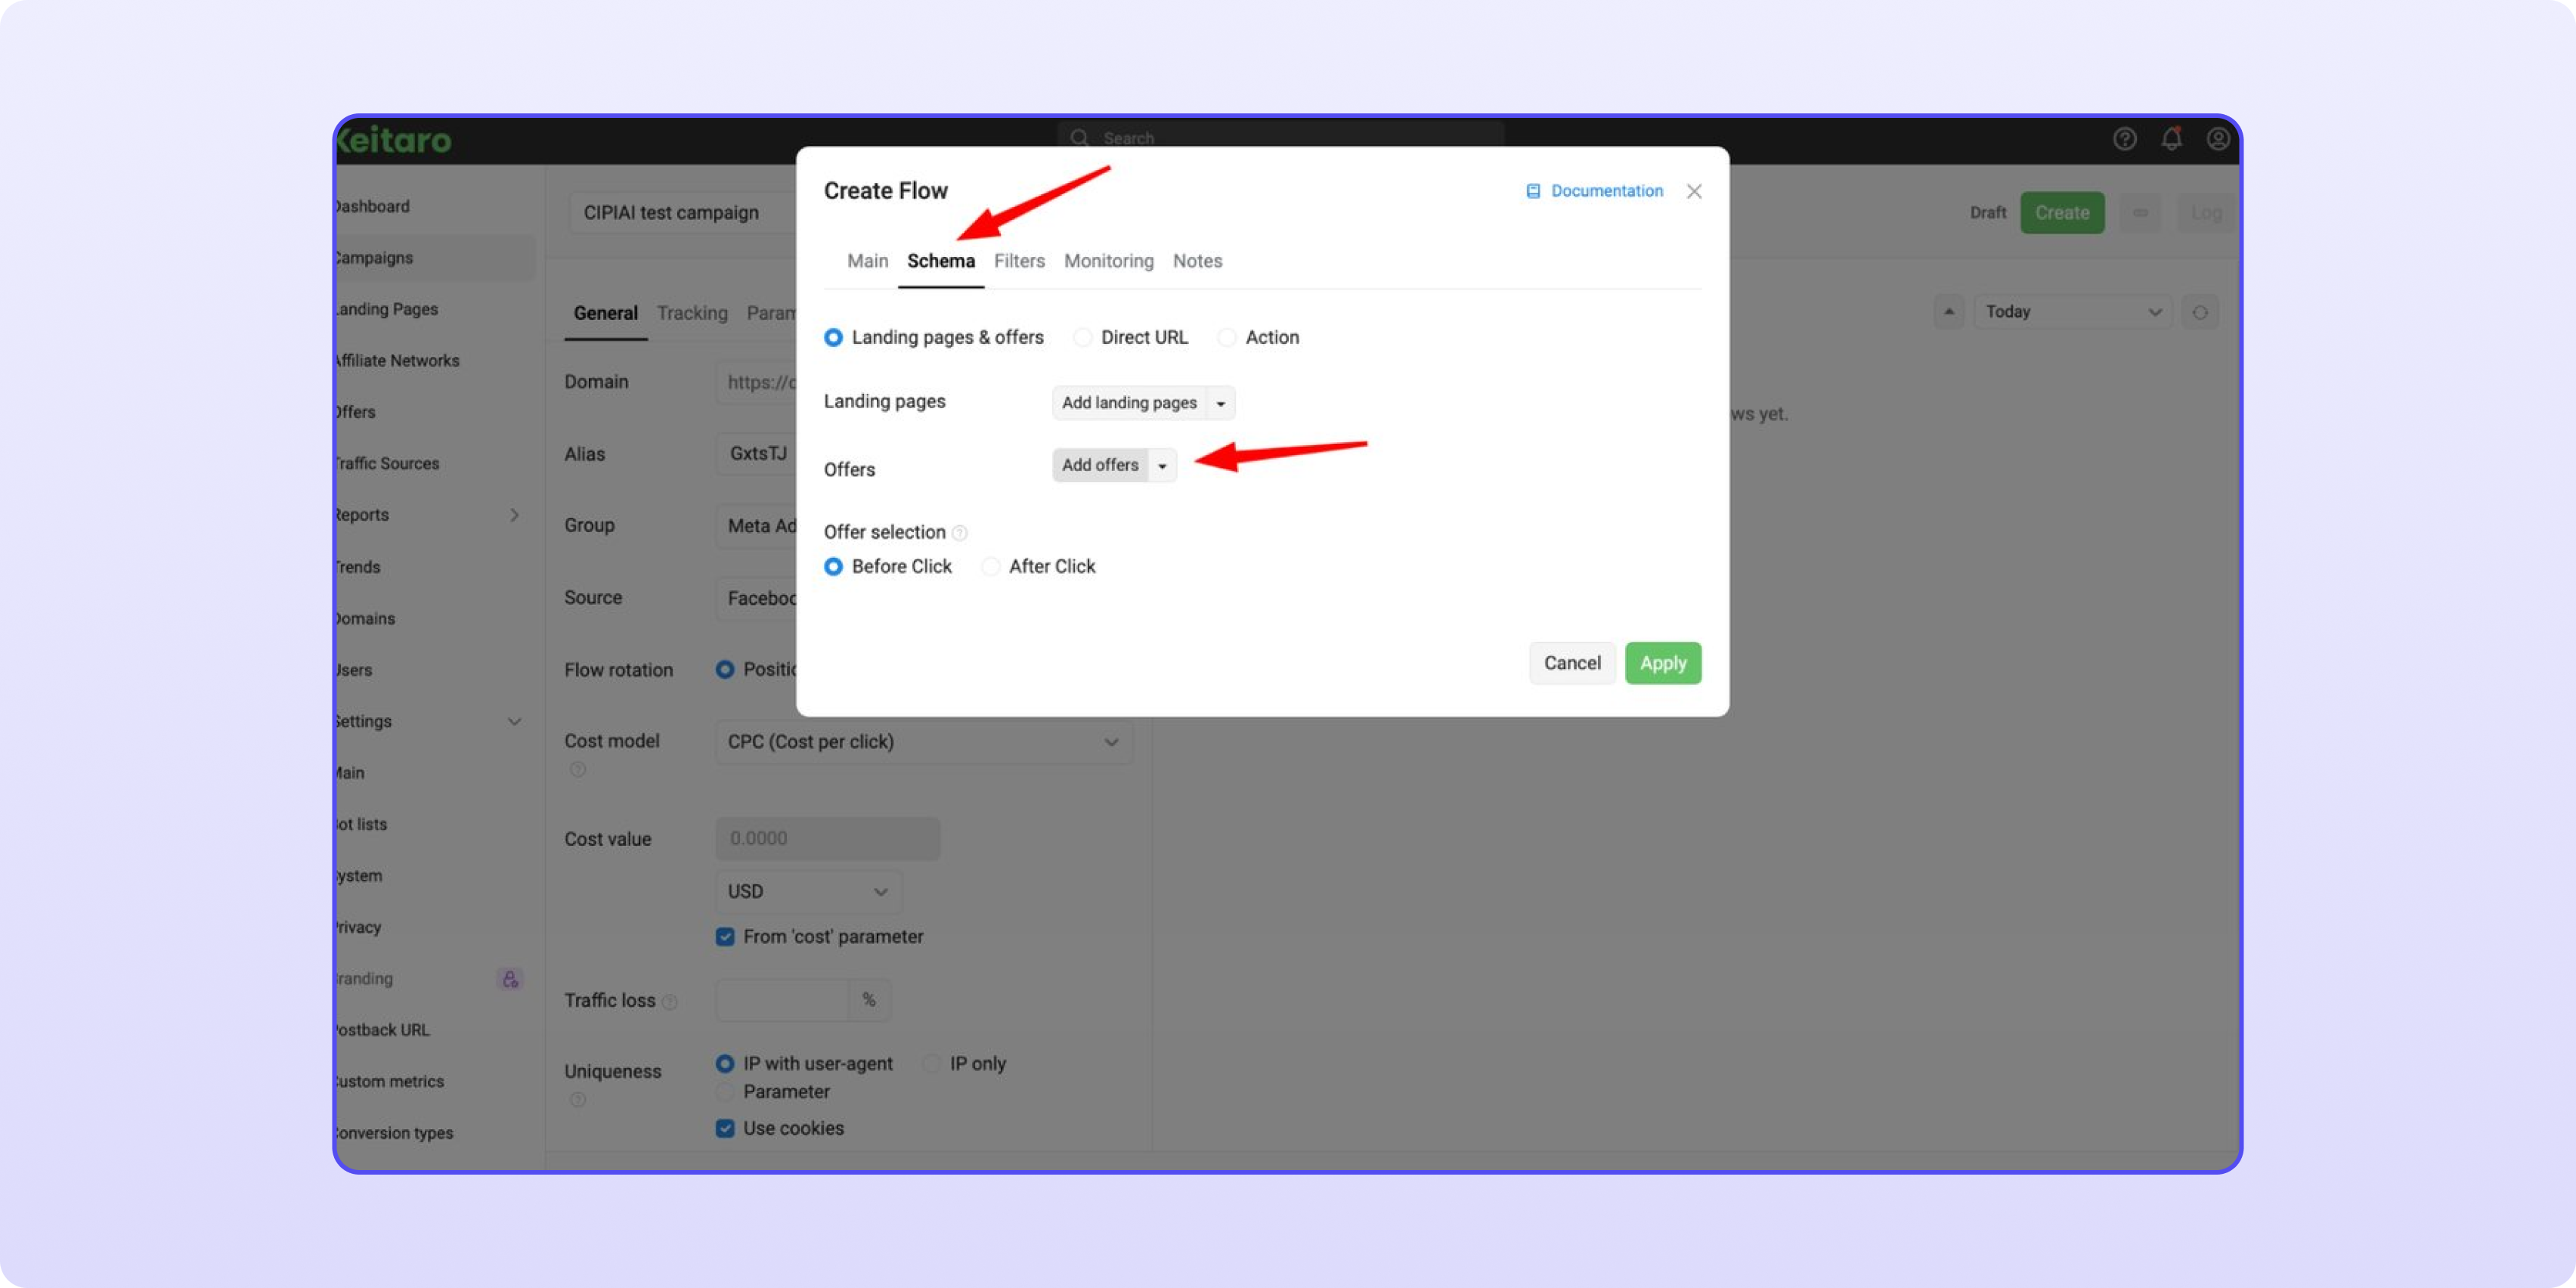
3. Click Create Flow, open the Schema tab, keep Landing pages & offers, and add your CIPIAI offer under Offers (add a landing page first if you use one).
4. Click Apply, then save the campaign.
5. Copy the campaign link from the top bar or the Tracking tab and paste it into your traffic source as the destination URL.
Yes. Keitaro includes a Cipiai.com template under Affiliate Networks → Create. It adds click_id={subid} to every CIPIAI offer URL automatically, so you don't have to type the click ID parameter by hand.
In Tracking Tools → Postback → Global. A global postback applies to every flow you link it to, so you set it once and pick it from the list when creating each new flow.
{{click_id}}. CIPIAI receives the Keitaro click ID through the click_id parameter in the offer URL and returns it in {{click_id}}, which Keitaro reads as subid.
A successful test only confirms that Keitaro responded. If the conversion doesn't appear, check Maintenance → Logs → Postbacks in Keitaro; an unrecognised status is the usual reason, and adding it as an alias in Conversion types fixes it.
zone_id passes the zone, placement or publisher ID from your traffic source to CIPIAI. Add zone_id={source} to the flow link in Keitaro, and make sure your traffic source template fills the Site parameter.
Only if you want them in your reports. Hold and Approve are enough to track revenue; adding Reject and Decline shows which sources or zones produce conversions that don't get confirmed.
Set up the global postback once, confirm one real conversion in Keitaro, and only then clone the campaign across sources and GEOs; a working chain on one flow saves hours of guessing across ten. If you're buying traffic through Keitaro and want offers that already have a tracker template, CIPIAI runs direct tech offers (VPN, utilities, extensions) and SmartLinks for mixed traffic, covered in our SmartLink guide. NET30 with autopayments, from $50 via payment services.
Register as a CIPIAI webmaster →


Bisdev Solutions Limited
Room 701, 7/F, Lucky Centre, 165-171
Wanchai Road, Wan Chai, Hong Kong China
Copyright © 2026. Bisdev Solutions Limited
All rights reserved